Lab 12: Moving Picture Tutorial

Sydney Ortenberg
April 12, 2019
Lab 12: Moving Pictures Tutorial
Objective/Purpose:
The objective of this lab was to go through the moving pictures tutorial and learn how to use Qiime2 better. The purpose was to teach us all the commands so we can do it in the future with our data and not the tutorial’s data.
Procedures:
- In order to re-install Qiime2, download 64-bit .pkg installer version of Miniconda. (only if necessary)
- Type “conda update conda” in the terminal, and then “y”.
- Type “conda install wget” in the terminal, and then “y” to ensure all files are downloaded.
- Type “wget https://data.qiime2.org/distro/core/qiime2-2019.1-py36-osx-conda.yml
conda env create -n qiime2-2019.1 –file qiime2-2019.1-py36-osx-conda.yml
# OPTIONAL CLEANUP
rm qiime2-2019.1-py36-osx-conda.yml” to allow for the cleanup process. - Type ” source activate qiime2-2019.1″ to activate it Qiime2
- To begin the moving pictures tutorial, type “mkdir qiime2-moving-pictures-tutorial cd qiime2-moving-pictures-tutorial” to change to a new directory.
- Go to files within finder and click the link at the bottom with your ID in order to visualize the following steps.
- Type “wget \ -O “sample-metadata.tsv” \ “https://data.qiime2.org/2019.1/tutorials/moving-pictures/sample_metadata.tsv”” to download sample metadata.
- Type “mkdir emp-single-end-sequences.” followed by “wget \ -O “emp-single-end-sequences/barcodes.fastq.gz” \”https://data.qiime2.org/2019.1/tutorials/moving-pictures/emp-single-end-sequences/barcodes.fastq.gz”/ wget \ -O “emp-single-end-sequences/sequences.fastq.gz” \ “https://data.qiime2.org/2019.1/tutorials/moving-pictures/emp-single-end-sequences/sequences.fastq.gz”qiime tools import \ –type EMPSingleEndSequences \ –input-path emp-single-end-sequences \ –output-path emp-single-end-sequences.qza” to download the sequences.
- Type “qiime demux emp-single \ –i-seqs emp-single-end-sequences.qza \ –m-barcodes-file sample-metadata.tsv \ –m-barcodes-column BarcodeSequence \ –o-per-sample-sequences demux.qzaqiime demux summarize \ –i-data demux.qza \ –o-visualization demux.qzv” to demultiplex the sequences.
- Then drag the qzv file to Qiime2 View to observe the visualization.
- Type “qiime dada2 denoise-single \–i-demultiplexed-seqs demux.qza \–p-trim-left 0 \–p-trunc-len 120 \–o-representative-sequences rep-seqs-dada2.qza \–o-table table-dada2.qza \–o-denoising-stats stats-dada2.qza/ qiime metadata tabulate \ –m-input-file stats-dada2.qza \ –o-visualization stats-dada2.qzvmv rep-seqs-dada2.qza rep-seqs.qzamv table-dada2.qza table.qza” to denoise the sequences.
- Then drag the DADA2 qzv file to Qiime2 View to observe the visualization.
- Type “qiime feature-table summarize \–i-table table.qza \–o-visualization table.qzv \–m-sample-metadata-file sample-metadata.tsvqiime feature-table tabulate-seqs \–i-data rep-seqs.qza \–o-visualization rep-seqs.qzv” to create the feature table.
- Then drag the newly made qzv file to Qiime2 View to observe the visualization.
- Type “wget \ -O “gg-13-8-99-515-806-nb-classifier.qza” \ “https://data.qiime2.org/2019.1/common/gg-13-8-99-515-806-nb-classifier.qza”qiime feature-classifier classify-sklearn \ –i-classifier gg-13-8-99-515-806-nb-classifier.qza \ –i-reads rep-seqs.qza \ –o-classification taxonomy.qza qiime metadata tabulate \ –m-input-file taxonomy.qza \ –o-visualization taxonomy.qzv” to use taxonomic analysis.
- Then drag the taxonomy qzv file to Qiime2 View to observe the visualization.
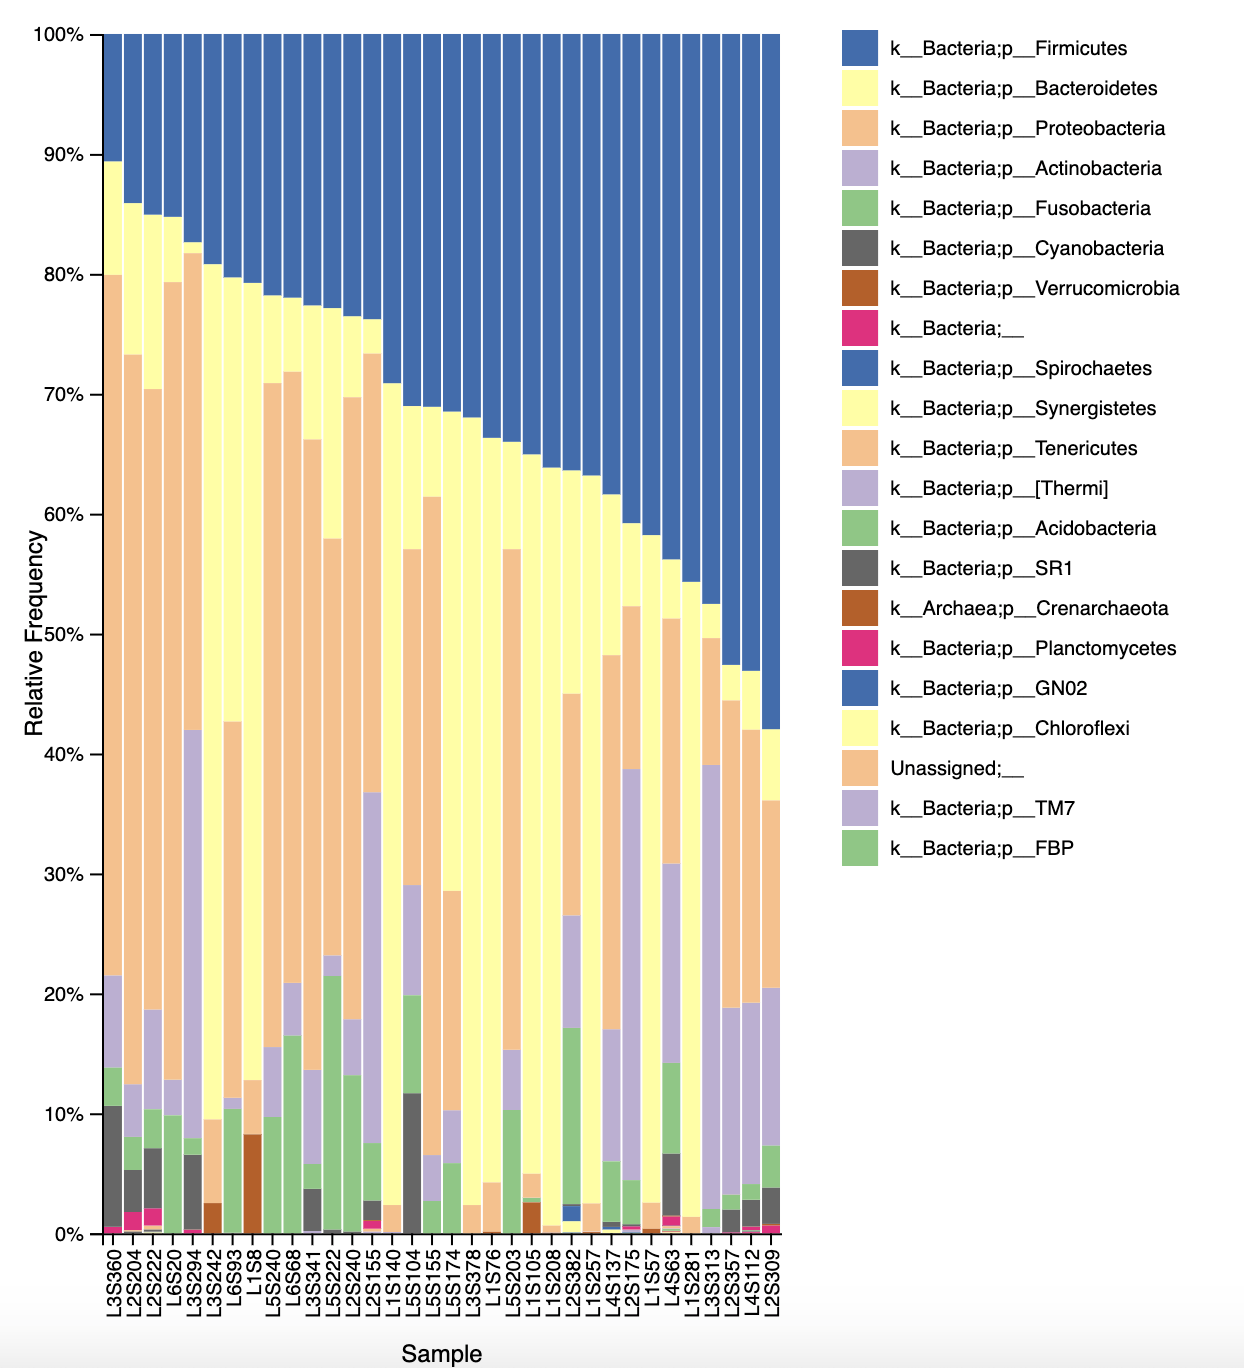
- Type “qiime taxa barplot \ –i-table table.qza \ –i-taxonomy taxonomy.qza \ –m-metadata-file sample-metadata.tsv \ –o-visualization taxa-bar-plots.qzv” to create the taxa barplot.
- Then drag the taxa barplot qzv file to Qiime2 View to observe the visualization.
- download PDF or screenshot demultiplexed file for QTM.
Data:

Storage:
N/A since in computer lab.
Conclusion/Future Steps:
This lab laid down a foundation for us to use the Qiime program and the terminal. Using the tutorial not only taught us the steps in order to do it but also provided us with more details on how it works and how we can use the program for ourselves. We are becoming more comfortable with the software and bioinformatics in general. It was interesting to see how we got the data tables and figures just from the coding. I am looking forward to using this knowledge to meta barcode our own DNA samples and see the results we get.