November 9

Lab 12-Ciliate Classification

Print Friendly, PDF & Email

Sheridan Mikhail

11/9/18

Lab 12-Ciliate Classification

Objective: The objective of this Ciliate Classification lab is to allow students to practice skills needed to identify specimen and develop their own procedures on how to isolate specimen.

Purpose: The purpose of this lab was to give students time to find, isolate, and eventually identify a ciliate in their soil sample.

Methods:

Soil separation

  1. Using a plastic Falcon tube with a cap, place 4 mL of dry soil into the tube.
  2. Fill the tube to the 10mL line with tap water.
  3. Add 1 drop of texture dispersing liquid.
  4. Spin the tube on a vortex mixer for about 30 seconds.
  5. Label the tube with identification number.
  6. Leave in a test tube rack to observe next class.

Ciliate Isolation

  1. To find a ciliate take 10 drops of 5ul water from the non-flooded plate and place on a slide.
  2. Scan each of the drops to see if there are any ciliates.
  3. When a ciliate add 2 ul of water to dilute the drop so that the ciliate can be isolated.
  4. Draw up the ciliate into a pipette and move to a concavity slide.  
  5. Video the ciliate swimming with an IPhone or Moticam.
  6. Add 2ul of iodine to the drop on the concavity slide.
  7. Place 4 drops of vaseline to the corners of the slide cover and place over the ciliate.
  8. Photograph the ciliate at 40x (Figure 1 ).

Results:

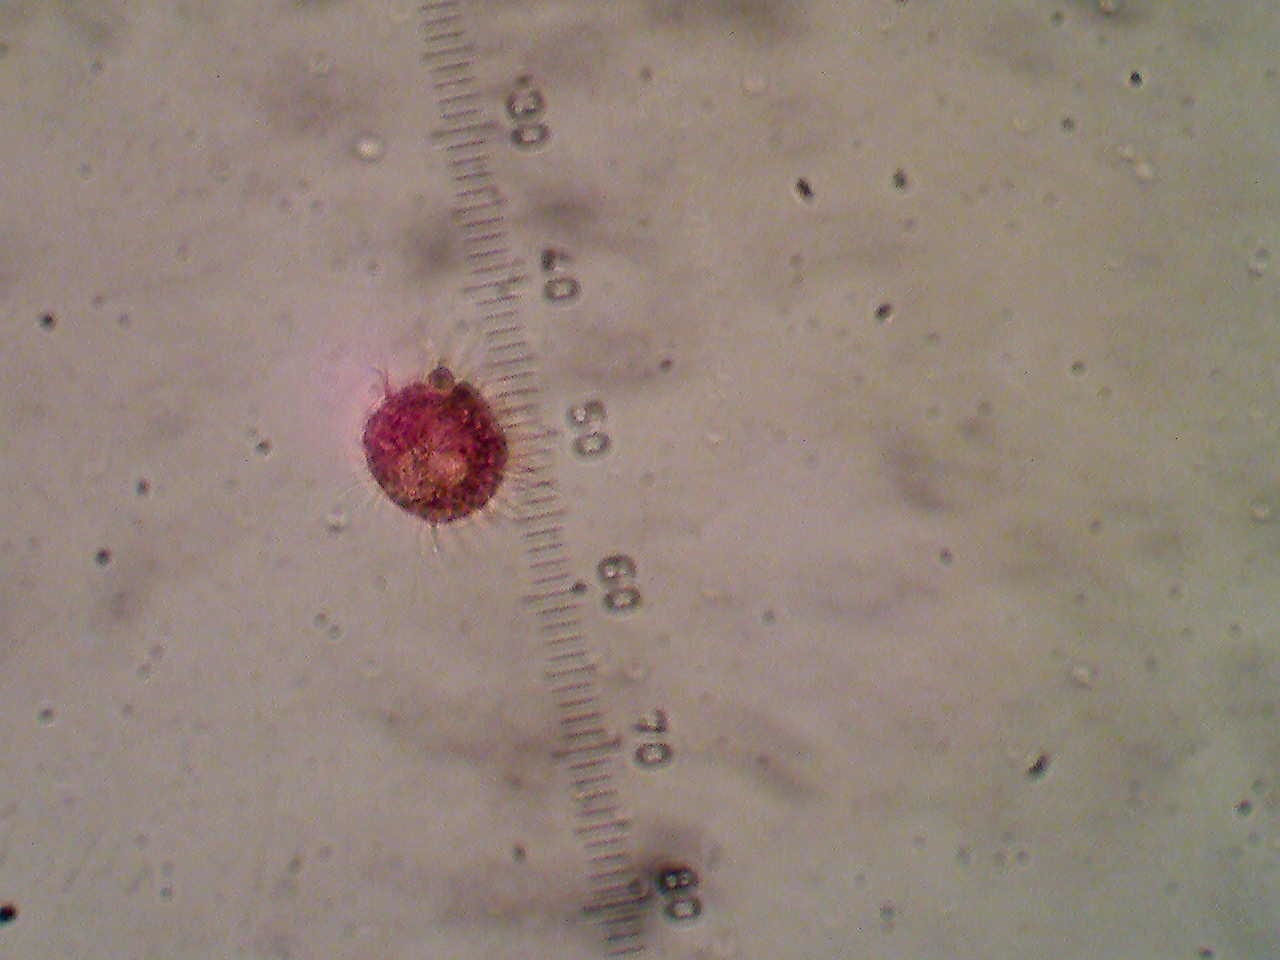
Figure 2. Picture taken with 40x using the Moticam, the ciliate was stained with iodine.

Conclusion:

The ciliate moved very quickly, obtaining a good picture was very hard. To isolate the ciliate, it was necessary to dilute the drop with water continually until there was very little dirt left. I have not identified my ciliate yet, however Dr. Adair suggested that it is a Halteria. Students focused of ciliate morphology and taxonomy earlier in the class. To identify the ciliate, one must focus on the morphology as well as general size and movement. Soil texture will be used to identify what type of soil harbors which type of ciliates.

Future Use: The compiled class information will be helpful to build a database for ciliate classification and location around campus.

Storage: Falcon tubes are stored in test tube racks at room temperature for next lab. Slides were washed and microscopes were stored.

November 2

Lab 11: Soil Ciliate Discovery

Print Friendly, PDF & Email

Sheridan Mikhail

11/2/18

Lab 11: Soil Ciliate Discovery

Objective: The objective of Soil Ciliate Discovery lab was to learn techniques to isolate and identify a ciliate taken from soil.

Purpose: The purpose of this lab was to allow students to determine the genus and species of a ciliate taken from Baylor’s campus as well as test the pH of the soil and determine water content.

Materials:

Water Content-

  • Wet soil mass
  • Mass of petri dish
  • Dry soil mass+petri dish mass
  • Balance

pH Level-

  • pH paper
  • P-10 Micropipettor
  • P-1000 Micropipettor

Ciliate Discovery-

  • Compound Microscope
  • Dissecting Microscope
  • Saturated soil

Procedure:

Water Content-

  1. To determine water content the initial wet mass of the soil was recorded weeks ago using a balance.
  2. The soil was left for a couple of weeks to dehydrate
  3. The mass of the dehydrated soil was recorded by Taylor.
  4. To determine the water concentration in the soil the equation below was used:

(Mass of wet soil-mass of dry soil)/(Mass of wet soil)

pH Level-

  1. To determine the pH of the soil, water was added to the dehydrated soil until the soil was saturated.
  2. Excess water was taken off using a p-1000 micropipette and placed in a centrifuge tube.
  3. The water and soil was then spun down in a centrifuge for 1 minute.
  4. After a pH strip was placed on the petri dish lid and 10 ul drop s of the water left at the top of the centrifuge tub was placed on the end of a pH strip until the strip was saturated.
  5. After 1 minute the color was measured against the pH meter and recorded (Figure 1).

Figure 1.

Ciliate Discovery-

  1. To locate a ciliate in the soil a sample of soil was brought to class weeks ago. After the soil was left to dry for a couple weeks, the soil was saturated with D.I water 2 days before class.
  2. Soil was pushed to the edge of the plate, and the excess water moved to the center of the plate (Figure 2).
  3. The soil was then observed under a dissecting microscope using the bottom lighting. No ciliates were seen.
  4. Drops of the water from the soil were then placed on a compound slide and observed under a compound microscope at 4x.
  5. Students took pictures and recorded any ciliates that could seen.

Figure 2.

Conclusion:

The water concentration of the soil was 20.66%. The pH was 6.5. According to the pH scale the soil is slightly acidic. No ciliates were observed, however there were many encysted ciliates that may bloom. Only one worm could be seen in this particular soil sample. Soil ciliates are often not studied because there is not as much funding for studies as they do not have a human element.

Storage: All slides were bleached and the soil sample was stored, and kept damp, for continued observations.

Future work: The ciliates observed will be identified to begin a soil ciliate database.


September 28

Lab 6: Twine Juice, Cell Count, Assays

Print Friendly, PDF & Email

Lab 6: Twine Juice, Cell Count, Assays

Sheridan Mikhail

9/28/18

Objective: The objective of Lab 6 was to identify experimental procedure and give students an opportunity to finalize the procedure for trials to be used in the class experiment. Students also had the chance to practice new assays testing, speed, directional change, and vacuole formation. 

Purpose: Twine Juice was made to emulate the wear and tear on utilized twine and extract the microplastics so that the Tetrahymena will be able to ingest the pollutants. The purpose of the Cell Count was to practice preforming the skill as well as collect data for the control group. Different assays were preformed to begin a data set for normal Tetrahymena behavior so that there is a control to test against.

Materials:

Twine juice-

  • 50 ml Proteose-peptone-tryptone (PPT) media
  • 0.5 g Green Polypropylene Twine (PT)
  • Weigh boat
  • Balance
  • Glass jar
  • Graduated Cylinder
  • Compound microscope
  • Scissors

Cell Count-

  • Petri dish bottom
  • Iodine
  • P-20 Micropipettor
  • P-10 Micropipettor
  • Concavity slide
  • Compound microscope
  • Tetrahymena stock culture

Direction Change Assay-

  • P-10 Micropipettor
  • P-200 Micropipettor
  • Timer
  • Concavity slide
  • Dissecting microscope
  • Tetrahymena stock culture

Procedure:

Twine juice-

  1. Students cut up Twine into pieces around 3mm long
  2. After placing a weigh boat on a balance and zeroing the balance, students measured out 0.5 g of the cut twine.
  3. 50 mL of PPT was measured in a graduated cylinder.
  4. Then in a sterilized glass jar 0.5g of twine and 50 ml PPT were combine.
  5. Lab assistants boiled the jars for 1 hour and let sit in a 55ºC water bath overnight.
  6. In open lab, the jars were autoclaved then filtered through a 5µm filter paper into a 50ml sterile tube.

Cell Count-

  1. Pipet 20 µl of Tetrahymena onto the bottom of a petri dish. 
  2. Add 5µl of Iodine to stain the Tetrahymena.
  3. Take 5µl of from the combination above and pipet 3 different drops onto a concavity slide.
  4. Observe under compound microscope at 4x.
  5. Pictures of each sample were taken through microscope (see Table 2) 
  6. Count number of cells per drop and average
  7. Calculate Cells per milliliter using the equation below:
    1. # of cells/ 5µl x (dilution factor)x 1000µl/mL
  8. 67/5x5x1000= 67,000 cells/ mL

Direction Assay-

  1. Pipet 5 µl of Tetrahymena and 45 µl using P-200 micropipettor onto a concavity slide (1:10 dilution)
  2. Using the black plate and reflective light, focus the directing microscope the sample.
  3. Once sample can be seen, choose one Tetrahymena to track for 10 seconds
  4. Record how many times the Tetrahymena turns (more than 17 degrees).
  5. Collect data for 10 cells, recorded in data Table 2
  6. Standard deviation would be 1.58

Data:

Table 1:

Cell Count Number of cell 5µl of Tetrahymena in 20µl media with Iodine at 4x 

1

52


2

101

3

49

Average:

67


Table 2:

Cell Turns

1

0

2

0

3

1

4

4 (Turning in circles)

5

2

6

3 (Turning in circles) 

7

0

8

0

9

1

10

1

Results:

Cell counts determined that there are roughly 67,000 Tetrahymena in every 1 ml of media. Direction Change Assay suggests that Tetrahymena either swim relatively straight or turn around several times. The Speed Assay tested the speed at which a Tetrahymena cell swam in a certain time. Lysosomal Assays would be used to calculated the amount of vacuoles normal in India Ink digestion.

Conclusion:

The class’s average cell count would be used to determine control cell/mL of stock culture. This will be used to help determine the effect that polypropylene pollution has on the Tetrahymena. To determine direction of Tetrahymena it was necessary to add 20µl of media so that the ciliate could be tracked. The 1:9 dilution allowed the ciliates enough room to move freely. With the original stock culture, the drop was over crowed with Tetrahymena and the specimen was impossible to track. All assay data will be collected and averaged to use as a control in the future experiment. 

Storage: Any slide used was bleached and left to dry. Information was collected and stored on Google Documents for collaboration.

Future goals: All techniques in this lab will be used in the larger experiment to determine the effect of polypropylene on Tetrahymena. Data collected will be used as a control for the experiment.


September 21

Lab 5: Serial Dilution and Cell Count

Print Friendly, PDF & Email

Lab 5: Serial Dilutions and Cell Count

Sheridan Mikhail

9/21/18

Objective: The objective of Lab 5 was to allow students to practice sample collection, preform serial dilution, and experience experimental procedure set up.

Purpose: Soil samples were collected for future use. The purpose of the Serial Dilution and Cell Count lab was to give students another tool to use in the experiments they would design in testing microplastics and Tetrahymena. Specifically the ability to preform a serial dilution in order to count Tetrahymena.  The computer lab time was used to finalize experiment process and create a feasible materials list.

Soil Collection:

Materials

  • Plastic Bag
  • Spoon
  • Soil
  • Phone
  • Petri dish
  • Balance

Procedure

  1. Students collect soil from designated areas
  2. Using a spoon to remove the top layer of dirt students filled 1/2 of a plastic bag.
  3. The plastic bag was then labeled with designated ID number SGM32F18
  4. In class, a petri dish was placed on a balance and the mass was recorded in grams.
  5. Then the petri dish bottom and allocated amount of soil was placed on the balance and mass recorded in the Table 1 below.

Table 1:

Mass of petri dish bottom Mass of petri dish and soil sample Mass of soil (Mass of petri dish and soil-mass of petri dish)
6.9g 28.2g  21.3g

Serial Dilution:

Materials

  • P-10 Micropipettor
  • P-200 Micropipettor
  • P-1000 Micropipettor
  • 24 Well plate
  • Concavity slides
  • Compound Microscope
  • Dissecting Microscope

Procedure

  1. Students were given a 24 well plate with a preprepared stock solution with Tetrahymena in well 4C
  2. The stock solution was observed under a dissecting microscope, the solution looked like moving dust particles and slightly cloudy.
  3. Students then chose a column of wells to preform a 10-fold serial dilution. Fig.2 
  4. 900µl of Tetrahymena culture media was placed in the wells of the column using a P-1000 micropipettor
  5. 100µl of 10Tetrahymena stock culture was added to well  3A with a P-100 micropipettor and mixed by pipetting up and down 5 times and the tip was disposed of making a 10-1 dilution. Fig.1  
  6. Then 100µl of 10-1 was added to 3B, mixed by pipetting up and down 5 times making a dilution of 10-2 and the tip was then disposed of (see Fig. 1) 
  7. 100µl of 10-2 was then added to 3C, mixed, and the tip was disposed of. 
  8. 100µl of 10-3 was then added to 3D, mixed, and the tip was disposed of. 
  9. After the serial dilution was complete the different dilutions were observed under a dissecting microscope. The well with a reasonable amount of cells, 30-40, was chosen to prepare a wet mount.
  10. Using concavity slides, students placed 3 5µl drops onto the slide with a P-10 micropipettor. Then they counted how many cells were present under the compound microscope. Table 2 shows cell count.

Figure 1:

Figure 2:

Table 2:

Trial Dilution (10-1) Cell count in 5µl Cells per µl in the drop  (divide by 5) Cells/µl the undiluted sample (x dilution factor) Cells/ml in the undiluted sample (x1000)
1 10-1 11 2.2 22 2200
2 10-1 14 2.4 24 2400
3 10-1 10 2.0 20 2000
Average 10-1 2200

Practice Problems for Serial Dilution and Cell Count

  1. 0.5 ml= 500µl
  2. There would be 5000 Tetrahymena in a 10-3 mL of the 20mL water sample.
  3. .1 g of India ink should be added to 10mL of water to make a 1% solution.
  4. 4 mL of cells and 16 mL of cell culture media would make
  5. The solution of 100% ethanol diluted 1:10 would be 9.09% ethanol
  6. To make a 1/10^6 dilution one would have to preform 6 1/10 serial dilutions (Figure 1).
  7. 4700 cells per 1mL would be found in a sample of 10µl of culture with 42 cells.

Computer Lab:

Procedure:

*See below for proposed experiment

  1. Students used pre-prepared questions to come up with a falsifiable hypothesis
  2. Students finalized their hypothesis for their experiment
  3. Students also identified their realistic reason for the type of microplastic chosen
  4. A list of materials was created for the experiment

Data:

Question:

What effects do microplastics have on Tetrahymena survival rates?

HypothesisIncreased amount of microplastics will show decreased survival rates in Tetrahymena.

Reason for microplastic chosen: Polyethelene Microbeads have been used as an exfoliant in face wash and body wash. Microplastics between 1-5µl can be eaten by Tetrahymena therefore the microplastics are ensured to be eaten by the ciliates.

Experimental procedure:

  1. 4 treatments would be preformed by 2 groups each.
  2. Groups 1-2 would add 0.025g of Polyethelene Microbeads to 900µl of media and 100µl of 100 stock solution.
  3. After 24 hours, the each person in the group would preform 1 10-fold serial dilution and count the surviving cells.
  4. The same procedure would be preformed for the remaining groups however the amount of pollutant added would change.
  5. Group 7 would preform a serial dilution and cell count on a non polluted sample which would act as the control.
Group Amount of Microplastic added
1-2 0.025g
3-4 0.050g
5-6 0.075g
7 none

Conclusion: The serial dilution and cell count portion of this lab allowed students to develop another tool for their experimental design.  This lab allowed students to develop real life experimental procedure. Using knowledge gained from the pre-lab about experimental procedure, students proposed a hypothesis and experiment on Tetrahymena and Microplastics uses.

Storage: Students stored collected soil samples in petri dishes under the fume hood. Wet mounts made in the serial dilution experiment were bleached and laid out to dry. All information for possible experimental procedure was saved to Google Documents.

Future goals: The future goals of this lab is to have students develop and preform their own experiments using the techniques taught.

September 14

Lab 4:

Print Friendly, PDF & Email

Objective: The objective of Meet Tetrahymena Activity was to allow students to further develop lab skills such as micropipetting, determining size and estimating the specimen count.

Purpose: The purpose of this lab was to allow students to practice microscopy, micropipettors, wet mounts, field of view, and specimen count. These skills will be used in student designed experiments in the future. Students also became more acquainted with Tetrahymena. 

Materials:

-100 µl of Tetrahymena stock culture

-24 welled plates     

-Dissecting microscope 

-Compound Microscope   

-5 Concavity slides

-P-10 micropipettor

Procedure:

  1. Students first practiced micropipetting, becoming comfortable with the process by transferring water to empty petri dishes.
  2. Students were then given a 24 welled plate, with 100µl of Tetrahymena stock solution.
  3. The 24 welled plate was placed on a dissecting microscope with a black stage plate using the reflected light. This allowed students to see the ciliate.
  4. Using the P-10 micropipettor students took 5µl of the Tetrahymena stock solution and made a wet mount by placing the specimen on a concavity slide.
  5. Students observed the ciliate under the compound microscope at 4x and 10x.
  6. Students then estimated the number of ciliates in the sample by sectioning the field of view (determined in an earlier lab), counting the ciliates then accounting for rest of sample size.
    • Ex. In 1/10 of the FOV at 4x there were roughly 40 ciliates. To account for the rest of the sample size multiply 40×10=400 ciliates in 5µl of stock solution.
  7. Students also recorded the size of the ciliates by estimating how many ciliates would fit in the field of view end to end.
    • Ex. 100 ciliate would fit in FOV at 4x. FOV= 4000µl.                       4000µl/100= 40µl (approximate size of ciliate).
  8. This process was repeated 5 times

Data Table 1:

Magnification  Diameter in Millimeters   Diameter in Nanometers  
4x  4mm  4000 µm 
10x  1.6mm  1600 µm  
40x  .4mm  400 µm  

Data Table 2:

  Trial 1  Trial 2  Trial 3  Trial 4   Trial 5  
4x Size (Length)  40µl   35µl  40µl  40µl  40µl 
4x Count   300-400  400  300  350  200 
10x Size (Length) 32µl  32µl  32µl  32µl  32µl 
10x Count  50  30  30  40  50 


Figure 1: 10x magnification

Conclusion: In this lab students learned how to work with micropipettors, estimate size of specimen and determine amount of ciliates in sample taken. To obtain these results students used previously determined FOV and new lab skills such as micropipetting and using a wet mount. Students determined for how to determine size and count by their own technique (listed in step 6 and 7 of procedure). 

Storage: Students washed the concavity slides with bleach. The tip of the micropipettor was disposed of and both microscopes were covered. 

Future goals: Techniques used in this lab will be used in future labs, specifically labs students design themselves regarding microplastics and Tetrahymena reproduction. 

September 7

Lab 3:

Print Friendly, PDF & Email

Sheridan Mikhail  

Lab 3: Compound Microscopy  

September 7, 2018 

Objective: The objective of Compound Microscopy lab was to acclimate students to compound microscopes, discover field of view, and identify a specific ciliate.   

Purpose:  The purpose of this lab was to teach students how to stain a slide, to practice using microscope, and practice the skills for later use. 

Materials:  

-Clear plastic ruler  

-24 welled plates  

-Plastic pipets 

-6 unknown ciliates in 24 welled plate   

-Dissecting microscope 

-Compound Microscope   

-Glass flat slide 

-Concavity slide 

-Slide cover  

-Cellulose  

-Methyl green  

-Bleach  

Procedure to calculate field of view: 

  1. To find field of view, students placed a clear ruler onto their compound microscope stage set on 4x magnification. 
  1. Students then looked at the millimeters side of the ruler and counted how many millimeters one could see in the scope without moving the stage. 
  1. After recording Data for 4x magnification students used the following formula: 

FOVIOW x MagIOW=FOVhigh x FOVlow 

Plugging in 4mm for FOVIOW and 4x for MagIOW 

  1. Students recorded their results in Data Table 1. 

Procedure for Wet Mount:   

  1. Prepare microscope by cleaning the optical lenses and base. 
  1.  Take 24 well plate and examine each well under dissecting microscope 
  1. After deciding which ciliate from the 6 unknowns they would identify, students then used a pipet to extract the specimen. 
  1. The specimen was then placed on a slide cover which was inverted onto a concavity slide, this ensured the ciliate would transfer. 
  1. Students then observed the ciliate under the dissecting microscope. 
  1. Students then recorded their observations in Figure 1. 

Procedure for Methyl Cellulose:  

  1. Students use the same slide with the ciliate to experiment with Cellulose. 
  1. One drop of Cellulose was added by pipet to the edge of the slide cover.  
  1. Students then quickly observed the ciliate under the compound microscope  
  1. Ciliates slowed and eventually died within minutes of the Cellulose being added to the slide. 
  1. Observations were recorded in Data Table 2.  

Procedure for Iodine:  

  1. Students prepared a new slide by placing drop from a ciliate procured from the same sample with a pipet onto a slide.  
  1. Students then added a drop of Iodine to the ciliate.  
  1. The ciliates were observed, and the observations were recorded in Data Table 2 below.  

Procedure for Methyl Green:  

  1. Once again, the slide was cleaned, and a new drop of the same ciliate was added to the slide.  
  1. A drop of Methyl green was added to the drop and observed under the microscope. 
  1. Observations were recorded in Data Table 2. 

Data Table 1:  

Magnification  Diameter in Millimeters   Diameter in Nanometers  
4x  4mm  4000 µm 
10x  1.6mm  1600 µm  
40x  .4mm  400 µm  


Figure 1:


Data Table 2:   

  Methyl Cellulose   Iodine   Methyl Green  
Size  80µm 

90µm 


80µm 


Shape / Color   Pink   Amber yellow   Blue  
Sketch/ Picture  

40x  


40x 


40x 


40x 

Other Characteristics  -defined spots and striations in the ciliate  

-Very clear cilia all around ciliate.  

-Longer cilia in groove  

-a hole or tube could just be seen  

-Died immediately  

-3 spots of darker shades than the rest of the ciliate 

-Lots of small speckles in the middle section  

-Undefined cell wall on one end 

-Died immediately 


Conclusion: In this lab students learned proper microscope technique after practicing virtually. The specimen observed in this lab is assumed to be the ciliate, Paramecium. Paramecium contain an oral groove, 2 nuclei and cilia in the oral groove. To come to this conclusion, Methyl Celulose was imperative to slow the ciliate down to allow the student to observe and record structures inside the specimen.  Iodine allowed students to see the internal structures. While Methyl Green showed the DNA, specifically in the two nucelli.  

Storage: After the lab, slides were bleached and laid to dry, microscopes were stored on the desks.  

Future goals: This lab allowed students to practice skills with the compound microscope which will be used in future labs. Students will use the skills to identify ciliates and eventually create their own experiment.  

August 31

Ciliate Identification Challenge

Print Friendly, PDF & Email

Sheridan Mikhail  

Objective: The objective of this lab was to help students develop lab techniques and to further identification of specimen skills.   

Purpose: The purpose of the Ciliate Identification Challenge was to allow students a chance to learn how to use a dissecting microscope as well as learn how to identify specimen.  

Materials:  

-24 welled plates  

-Plastic pipets 

-6 unknown ciliates in labeled test tubes  

-Dissecting microscope  

-Bleach  

Procedure: 

  1. Prepare microscope by cleaning the optical lenses and base.  
  1. Pipet ciliates into 24 well plate with unknown ciliate specimen. 
  1. Mark the well in with the number of unknown specimens. 
  1. Students worked in groups of 3, each student collected 2 different types of ciliates. 
  1. After focusing the dissecting microscope on a ciliate, students recorded their observations. 
  1. Students then rotated within their groups until every student recorded data for every specimen. 
  1. Students then attempted to identify the species of each unknow ciliate. 


Data Table: 

Unknown #  Shape  Relative size   Movement  Location in Media   Other Characteristics   Sketch and magnification  Identification 
1  Oval with a slightly pointed top   Slightly larger than 2   Large tornado like movement. Moved slower than most other specimen   In Media   Prominet dark spot (possibly nucleolus)   Magnification: x20  Blepharisma 
2  Tube/ Bell shaped   Smallest   This specimen moved the quickest. Pivoting often   On top of media 

Prominet dark spot  

(possibly food vacuole  

Magnification: x25 

Euplotes 
3  Green and oval shaped  Medium (larger than 1, same size as 3)  Fast moving in spiral motion, looked as if the specimen was flipping   In media (swimming)  Had a fold in body  

Magnification: x15 


Paramecium  
4  Slug shape and purple   Medium (larger than 1, same size as 4)   Relatively fast  Everywhere in media  Some had a red dot  

Magnification: x20  


Holosticha 
5  Green with Elongated oval shape  Largest length of all ciliates observed   Slowly and snake like   On top of water   Very long with a translucent end  

Magnification:x12 

Spirostomum 
6  Bell shaped  

Medium 


(larger than 1)  

Move in spiral   In media   Tube like mouth with a cilia like movement  

Magnification: x25 

Stentor 


Conclusion: 

Students discovered the different movements of ciliates. Some specimen would dart around while others moved in a slow snake like motion. As well as discovering different movements, students also discovered that every ciliate had cilia surrounding it and did not have any flagella. Some ciliates presented a prominent dark spot while others did not. Different ciliates reside in different levels of the medium, most resided in the medium.   


Future goals: This lab will help students to further investigate ciliates and hone lab skills, specifically with a dissecting microscope.