September 7

Bio Ciliate Lab #3

Print Friendly, PDF & Email

9/6/18 Lab #3

Compound Microscopy

Rationale: In this lab students learn about how to properly operate a compound microscope and work with concavity slides. Throughout this lab, students also gain experience with different stains and applying them to ciliates in order to see different aspects of the ciliates. 

Experimental Procedure:

  1. First obtain a compound microscope, sample slides and ciliate samples.
  2. Then place a slide on the microscope to begin learning how to operate a compound microscope.
  3. Change the magnification to 40x to be able to see the sample clearly, while also adjusting the height of the stage and adjusting the fine tune.
  4. If the sample appears to bright, turn down the brightness of the light on the microscope to get a better look at the sample.
  5. A blue filter can be utilized on the microscope to change the coloring of the way the sample appears through the microscope; it can take away the orange tint and display the characteristics of the sample clearer.
  6. Next remove the sample slide and obtain a mini ruler to place onto the stage of the microscope in order to find the field of view.
  7. In order to find the field of view start with a magnification of 4x and count the hash marks while looking into the microscope.
  8. The amount of hash marks in mm that measure across the microscopes view at 4x is the field of view.
  9. You can then use this amount to find the fields of views at 10x and 40x by using the equation: Magnification (low) X FOV (low) = Magnification (high) X FOV (high)
  10. Next obtain a concavity slide and a ciliate sample
  11. Use a pipette to place a drop of the sample on the concavity slide and place it onto the microscope, then observe characteristics of ciliate. ( Record Data)
  12. Obtain a flat slide and get a new ciliate sample and put it onto the slide.
  13. Then insert a drop of iodine stain onto the sample and observe under microscope. (Record Data)
  14. Follow the same steps by getting a  new flat slide and a new sample, then obtain a few drops of the second stain and observe. (Record data)
  15. Lastly clean off all of the slides with water and let dry, then put the microscope away and return samples to original place.

Sample Storage/ Label: NONE, cleaned slides and set to dry


Data Table/ Results:

UNKNOWN #5

Hanging Concavity

Stain #1

Iodine

Methyl Cellulose
Movement Quick side to side movement No Movement Slow movement
Shape Long Oval Long Oval Long Oval
Size About 0.1 mm About 0.1mm About 0.1mm
Characteristics

-Twisting movement while moving side to side

-transparent

-No movement

-Transparent

-Slow movement, eventually die

-able to see small vacuoles

Sketch:

Interpretations, Conclusions and Next Steps:

Throughout this lab I learned how to properly use a compound microscope along with utilizing a blue filter which helped me see the ciliates clearer. I also learned how to calculate the field of view of a microscope which later on helped me describe the approximate size of my ciliate sample. To be able to analyze the ciliates correctly, I used a concavity slide which prevents the sample from being smashed between the top slide and the real slide. One form of error that could have occurred throughout this lab is during the transfer of the sample with the top slide to the concavity slide which can sometimes smash the sample preventing certain characteristics of the sample to be seen. I also learned how certain stains can affect the samples and show different aspects of the ciliate sample; the stains allowed for the ciliates to freeze and reveal certain properties not seen when they are in constant movement. Overall I was able to successfully carry out this experiment and in the future I hope to learn more about ciliate structure and what causes their specific movements and properties. `


August 31

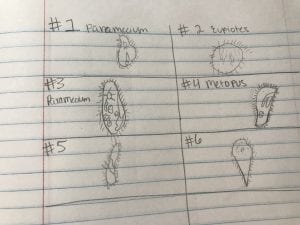
Lab 2: Ciliate Challenge

Print Friendly, PDF & Email

8/30/18 Ciliate Challenge Lab 2


Rationale: The purpose for this lab is to inform students about the different types of ciliates as well as the variety of characteristics of each. This lab also teaches students how to use dissecting microscopes properly in order to get the most out of learning about small organisms.


Experimental Procedures:

  1. First obtain six different types of ciliate organisms
  2. Assign two samples per person in the group
  3. Put your first sample in a well plate using the corresponding numbered pipette and then place the well plate onto the microscope.
  4. Adjust your magnitude to focus clearly on the ciliate to be able to see the type of movement and other characteristics. Also make sure the head of the microscope is lifted a good amount in order to see the ciliate clearly.
  5. Then, identify the ciliate by looking at the different types that it could be as well as looking at the characteristics of each type. (Take note of the type and characteristics in journal). It is helpful to look at both samples before identifying so that there is something else to compare the first sample to which will help with identifying the organism based of of specific characteristics.
  6. Next obtain the second sample with a pipette and distribute it into the well plate and put it on the microscope
  7. Change the magnification and other settings on the microscope in order to see the ciliate clearly.
  8. Lastly identify the second sample based off of the characteristics of the several types of ciliates. (Take note of the type and characteristics in journal)
  9. Then remove the well plate from the microscope and wash it out with bleach, then let it dry.
  10. Unplug the microscope and return the samples and pipettes to their correct places.


Storage of Sample: NONE- Cleaned well plates and set them to dry.


Interpretations, Conclusions and Next Steps:

Throughout this lab I learned how to properly use and adjust a microscope to see small organisms such as ciliates. I also learned more about the several characteristics and types of different ciliates. I was able to identify both of my ciliates successfully. Two others in my group identified samples 1,2,5 and 6. I identified sample #3 as Metopus at first due to its twisting swimming movement, however once I looked at the second sample, #4, I then thought the shape of #4 looked more like a Metopus due to its shape and the frontal lobe that hangs over. This led me to identify sample #3 as a Paramecium. I found it very beneficial to look at all of the samples first before officially identifying. It helped to be able to compare the different characteristics of each, especially the size comparison. I plan to continue expanding my overall knowledge of ciliates. I especially plan on looking further into each of their organelles and how they contribute to the functions they have. Overall, this experiment went very well and my group was able to successfully work together and identify all six samples of ciliates.


Observations, Results and Data:


# Of Ciliate Sample Shape Rel.Size Movement Location in Media Other Characteristics
1

Paramecium

(This came from Annie Dugan)

Cigar Smaller Free swimming On the surface Fast swimming
2 Eupiotes

( This came from Annie Dugan)

Flat,oval Larger than Paramecium Free floating and moderate speed Near the surface “Flayalling” around
3 Paramecium Elongated Smaller than Metopus Spiral Swimming Deeper inside the sample. (up and down) Has at least two contractile vacuoles and is cigar shaped
4 Metopus Elongated and twisted Between the size of #1 & #5 Twists while swimming On surface of water Frontal lobe overhangs AZM and doesn’t have cirri or spines
5 Spirostomium

(This came from Lauren Langston)

Elongated and narrow Thinner and more elongated than #3 Swims freely around other Ciliates Free swimming on surface One vacuole of the posterior and long channel anterior
6

(This came from Lauren Langston)

Trumpet Shaped Smaller than #5 and larger than #4 Swimming by twisting their bodies On surface Green Pigment