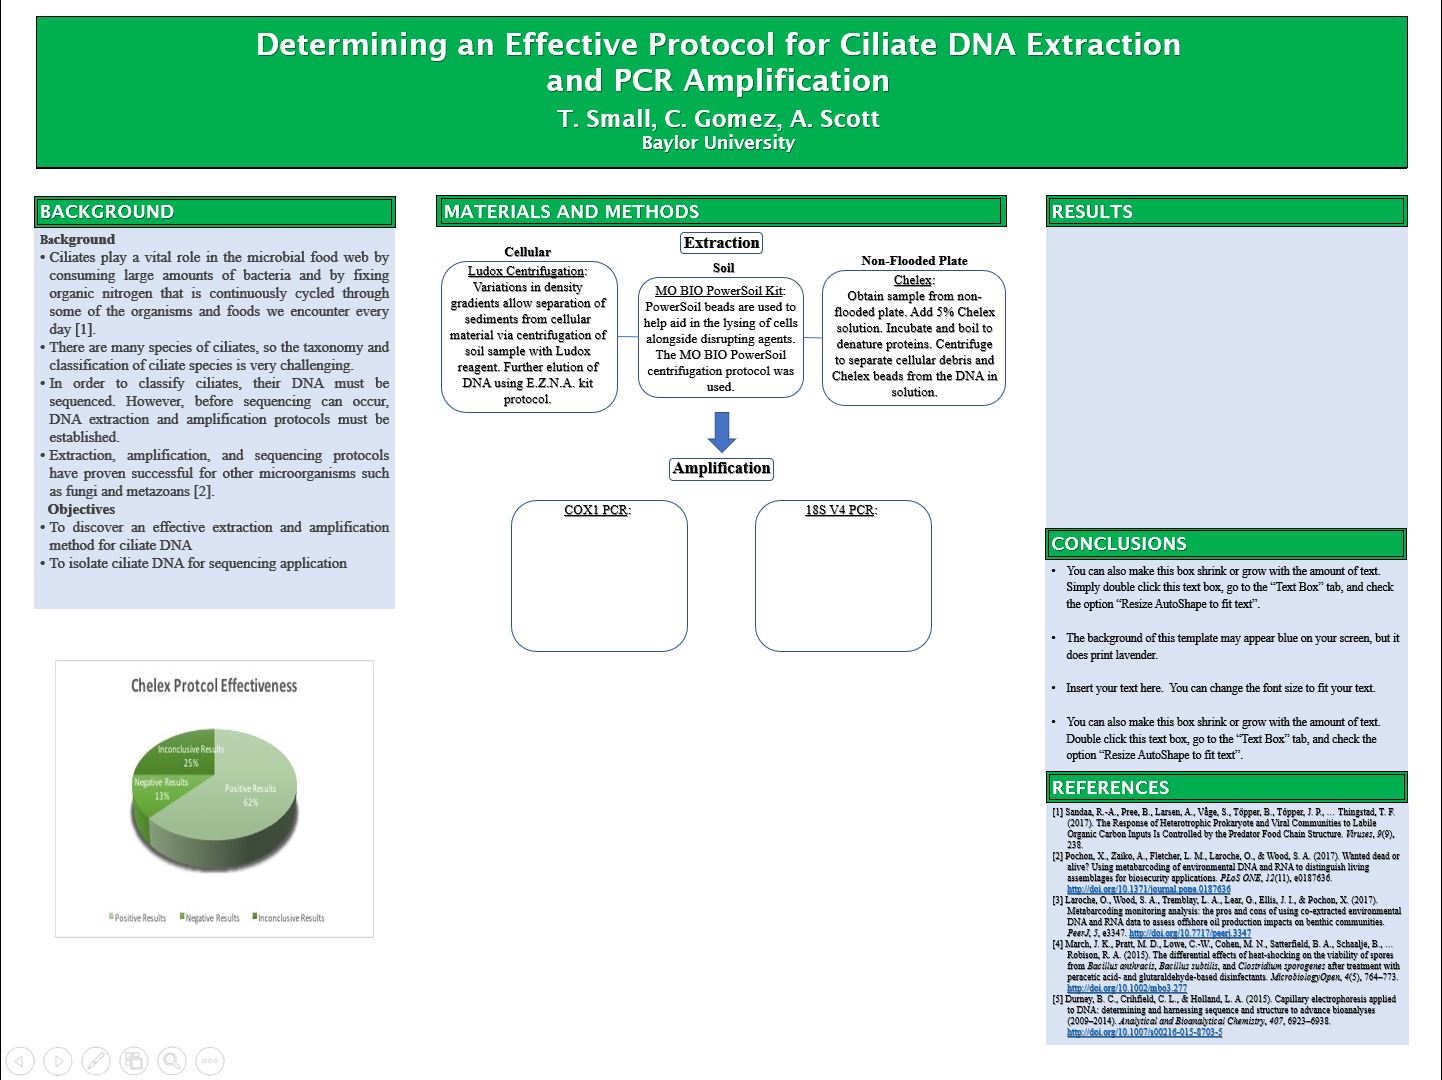
April 20

Lab 14: Compute Lab Poster Workshop 4/19/2018

Print Friendly, PDF & Email

Purpose

The purpose of this lab was to https://blogs.baylor.edu/cili-cure-fall2017/wp-admin/edit-comments.phpwork in our groups and work on the posters in the computer lab. It was also used to clear up any questions we had concerning the completion of the posters.

Procedure:

We just worked on the poster for this lab. Asking questions over the information that goes in each section.

Data


This is the screenshot of our poster so far. There is not much information on it besides our references, the pie chart I made, and some other results. We are going to fill out the rest of the poster once we have everything typed out and we have had our information checked for accuracy. We are also probably going to move the template onto a powerpoint because it is kind of bad quality right now.

Conclusion and Future Steps

After working on the poster today, a lot of our groups questions got cleared up. This weekend, our group will continue to work on the poster so that we can get feedback from Dr. Adair and Mr. Davis before we turn it in. This will allow us to make sure our information is accurately placed before we present next lab. We completed a lot of work during this lab and have a solid outline of what needs to be done to make this poster and presentation successful.

April 16

Lab 13: Chelex Results pt.2 and Poster Preparation 4/12/2018

Print Friendly, PDF & Email

Purpose
The purpose of lab 13 was to run the electrophoresis through 1.8% agarose gel that we made last week. We ran the gel through the reactions that we prepared in the previous lab. While we were waiting for the electrophoresis to finish setting up, our group divided the roles of our poster presentation and we agreed on the design of our poster. Once the electrophoresis was completed, we looked at the gels under UV light to determine if the Chelex protocol was successful.
Procedure:
1. Pour the 1X TAE solution into the gel powerboat so there is a thin layer on the top of the gel

2. Place 5uL drops of the reactions into the wells of the gel

3. Record which reaction is in each well

4. Run the electrophoresis at 100 volts for 30minutes

5. While the electrophoresis is being performed, discuss the poster designer and  what information will go where

6. Assign roles between group members

7. Once the electrophoresis is completed, take the gel upstairs to be analyzed

8. Save the image of the results and record the results for each reaction

9. Clean up lab area
Data and Observations

Reaction Set-Up from right to left 

◦ 21-2e (eDNA)

◦ 21-1e ◦ 21-2+

◦ 21-1+ ◦ 21-2-

◦ 21-1- ◦ Blank well

◦ Ladder
Results

◦ 21-2e had a faint band of results

◦ Both positive controls showed bands of results

◦ Ladder had results

◦ Nothing from the other wells

Presentation  Austin: Results and Conclusion/Future Work

Tim: Methods

Christian: References, abstract and Introduction

Conclusion and Future Work: 

Although we took the time to reperform the Chelex protocol, we were stilled filled with disappointment by our results. We had no significant results or any satisfying amount of DNA. However, we have learned that although the results were negative, they are still significant in the research of the protocols. Continuing into our final weeks of lab, we will now begin the preparation for presenting our results.

April 6

Lab 12: Chelex Extraction, Gel, and Nanodrop

Print Friendly, PDF & Email

Purpose:
The purpose of this lab was to perform the Chelex protocol, with hopes to replicate some of the successful results that other groups had using the Chelex method before. We then prepared 3 PCRs: a negative control, positive control, and an eDNA tube using the DNA extracted from the Chelex protocol. After extracting the DNA, we prepared the electrophoresis gel to be used in the future. We used the nano drop to determine the concentration of DNA in our sample our group extracted. The goal for every group was to have a concentration of about 10-50ng of DNA.
Procedure:
Chelex Protocol

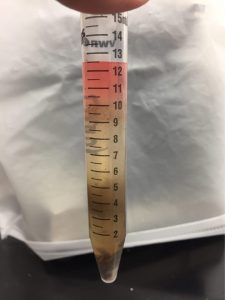
1. Tansfer 300-500 uL of dense ciliate culture to a micro centrifuge tube

2. Label the tube and centrifuge it at 6000 x gravity for 5min

3. Discard the supernatant

4. Add 200 uL of 5% Chelex to the belle and vortex for one minute

5. Add 15 uL of proteinase K

6. Incubate for 30minutes in 56 C

7. Boil for 8min in 100C water

8. Vortex for one minute

9. Centrifuge 16,000 x gravity for 3 min to pellet the cellular debris and Chelex beads

10. Remove supernatant with DNA in solution to clean micro centrifuge tube without removing Chelex bead

11. Label the top and side of micro centrifuge tube
PCR Set-Up

1. Positive Control: 1uL of DNA template, 12.5 uL of 2X Master Mix, 1.25uL of V4 stock primers, and 10.25 uL of deionized water

2. Negative Control: 0uL of DNA template, 12.5 uL of 2X Master Mix, 1.25uL of V4 stock primers, and 11.25uL of deionized water

3. eDNA: 1uL of DNA template, 12.5uL of 2X Master Mix, 1.25uL of V4 stock primers, and 10.25uL of deionized water

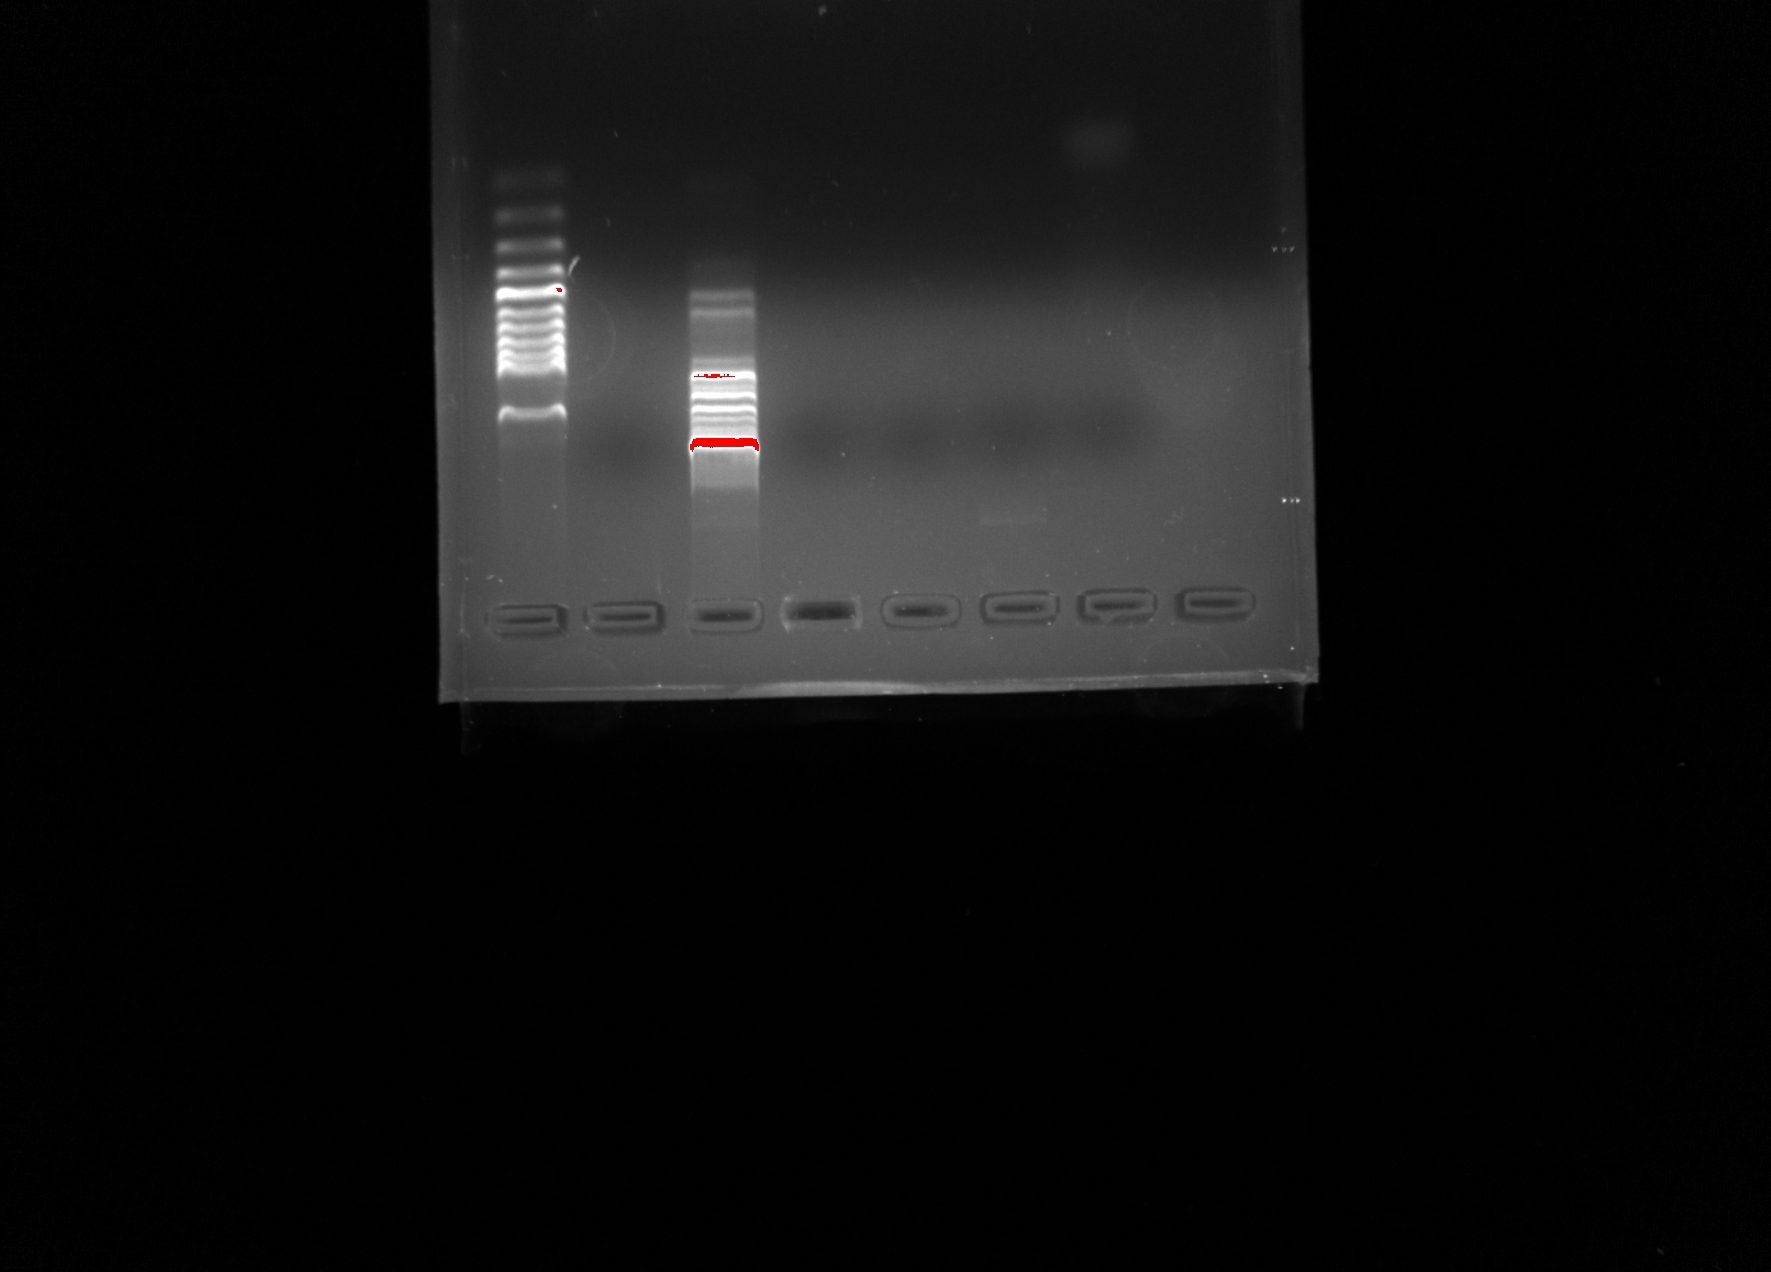
40mL of 1.8% Argose Gel:
1. Pour 40mL of 1X TAE solution into a flask

2. Pour 0.72g of argues gel

3. Heat the gel until it is clear in the microwave, then allow it to cool for about five minutes

4. Pour gel into tray

5. Label tray

6. Allow the gel to cool

Nanodrop
1. Take tray containing all PCR reaction and extracted Chelex to the nano drop

2. Place 1uL drop of chDNA on node

3. Run the nano drop

4. Record concentration, 260/280 value, and the 260/230 value

5. If the concentration is not within 10-50ng of DNA, dilute eDNA reaction by adding 1uL of solution containing 5uL of water and 5uL of chDNA
Data & Observations

• Mass of Agarose gel: 1.8 x 0.4= 0.72

• PCR tubes labeled: 21-1+. 21-1 -, and 21-1 e

• chDNA labeled: TCA 21-1, chDNA with the date (4-5-18) on the side of the tube

• Nanodrop reading

◦ Concentration: 138.2ng

◦ 260/280: 0.79

◦ 260/230: 0.20

◦ Group diluted the chDNA more and results will be given next lab• Electrophoresis Gel

◦ Gel labeled 21-1

Conclusion and Future Steps 

After performing the nandrop, the concentration was found much higher than the intended range. Consequentially, we had to dilute the eDNA more, however another nano drop test was not performed after our dilution due to time restrictions. In the future lab, we will run another nano drop to see if more dilutions need to be performed. We will also be running the electrophoresis through the gel. We will analyze the gels in hopes of better success than compared last time.

April 5

Lab 11: Electrophoresis 3/29/18

Print Friendly, PDF & Email

Purpose 
The purpose of this lab was to perform the gel electrophoresis on the reactions made from the Chelex or Power Soil protocol  created the lab prior. Once the electrophoresis was completed, we were to determine whether any significant amount of DNA was isolated or amplified from the eDNA.
1. Remove the rubber bumpers from the gel tray

2. Place the gel tray inside the electrophoresis power box

3. Pour 1X TAE solution into the power box

A. Do this until a thin layer of the solution covers the top of the gel, making sure the solution flows continuously to the other side

4. Place the 6 prepared reactions into the gel well using the micropipette

A. Fill the wells starting from the left side with the positive end facing away from yourself

B. Record which reaction is in each well

5. Run the gel electrophoresis for 30 or more minutes at 100 volts

6. After the electrophoresis is complete, remove the gel containing the reactions

A. You should be able to see the reactions run from the negative to the positive end of the power box

7. Bring the post electrophoresis gel to Dr. Adair to check the results using UV light of the eDNA

8. Record any results
Data and Observations

• No eDNA reactions containing V4 or COX1 primers showed any signs of amplified or isolated DNA

• Only the  ladder and positive control (containing Paramecium DNA and COX1 primers) showed any DNA

• Other reactions had no success in producing amplified/ isolated DNA

Loaded Samples from left to right

Well 1: Ladder

Well 2: COX1 Negative Control

Well 3: COX1 Positive Contro

Well 4: COX1 eDNA

Well 5: V4 Negative Control

Well 6: V4 Positive Control Well 7: V4 eDNA

Conclusion and Future Steps
In all honesty, the results of this lab proved to be disappointing. Our group used the Powersoil protocol to isolate the DNA for the reactions. Although we thought it would be successful, the results proved otherwise. Only the ladder and positive control with the Paramecium DNA and COX1 primers had results of amplified DNA. Those were successful, but our main focus was to get the DNA from our own soil ciliate sample to be amplified. There are many possible sources of error throughout the past few labs. A main source of error could be connected to the primers. With the semester almost ending, there is not much our group can do in terms of future steps for these protocols. However, we will continue to examine our sources of error and analyze the performed protocols to see which materials we should continue using in order to hopefully amplify the DNA sequences and analyze them. Overall, our efforts throughout these labs contribute positively to the scientific community due to our failed amplifications. Failure is a source for learning and improvement, and hopefully scientists in the future will be able to use our efforts to improve future protocols.

March 23

Lab 10: Setting Up Reactions and Protocol Review 3/22/18

Print Friendly, PDF & Email

Purpose

The purpose of this lab was to perform two sets of extraction methods and two sets of primers. Our hope was to have better results than we did from the Ludox protocol. Each group, performing either the Chelex or PowerSoil protocol, tested their extracted DNA and compared it to their positive and negative control groups. Two different types of primers were used: COX1 and V4 primers. The reason for this was to test the success of the DNA extraction methods we performed in the previous lab. After the reactions were set up, each group prepared the agarose gels so we can continue the analysis of DNA using gel electrophoresis. The gel was needed to be able to determine how successful our efforts have been during these last few lab sessions.

Procedure
Reaction Set-Up

1. Label tubes 1-6 and keep track of which tubes contain a specific solution 2. Add 0.63 mL of the 20x stock COX1 primer solution to tubes 1-3 that contain the master mix

3. Add 0.63mL of the 20x stock V4 primer solution to the tubes 4-6 that contain the master mix

4. Add 11.87 mL of water to tubes 1-4

A. This will be the negative control

5. Add 10.87 mL of water to tubes 2-3 and 5-6

A. Tubes 2 and 5 will be the positive control

a. Add 1ul of the positive control solution to these tubes

6. Add 1ul of eDNA collected from Powersoil or Chelex protocol to tubes 3 and 6

7. Store the tubes and record their location
1.8% Agarose TAE Gel Set-Up

1. Pour 90mL of D.I. water into flask

2. Add 10mL of 10x TAE

3. Add 0.63 grams of agarose to 35mL of the prepared 1X TAE solution from step 1

4. Mix and heat in microwave followed by some cooling time

5. Pour gel in the gel tray and allow it to cool for the remainder of lab

6. Label the gel tray and store the tray where instructed

Data and Observations

• Our six tubes were labeled with number 1-6 followed by our group members initials “TS”

• Tubes 1-3 contain COX1 primers

• Tubes 4-6 contain V4 primer

• Gel tray labeled: 21-TCa

• Calculation to find amount of agarose added: (0.018)(35) = 0.63 grams of agarose

• Must round to the nearest hundredth due to pipettes not being able to draw to the thousandths place

Conclusion and Future Steps 

At the end of this lab, we had successfully set up a reaction that will determine which protocol and which primers are the most effective. The final step is the electrophoresis gel that will allow us to examine any DNA and the sequences amplified. The electrophoresis will take place in the following lab. Our lab group hopes that these protocols and primers are successful and produce positive results that we can replicate in the future.

March 16

Lab 9: Chelex and PowerSoil Protocol 03/15/2018

Print Friendly, PDF & Email

Purpose
The purpose of this lab was to perform two different, commonly used protocols and compare them. The two protocols were called the Chelex and the Power Soil. Due to the time it takes to perform each protocol, each group at each table performed one of the protocols. These new protocols were performed due to the gel electrophoresis not producing any results of DNA. Although there were no results, we are certain that DNA was available due to the nano drop performed in class by Dr. Adar. It is still uncertain what could have gone wrong to have this negative outcome.

Procedure

Chelex Protocol
• Transfer 300-500 uL dense ciliate culture to a microcentrifuge tube.
• Label the tube and centrifuge it at 6000 x g for 5minutes, and then discard the supernatant.
• Weigh 0.5g of Chelex and transfer 15mL to a conical tube with an addition of 10mL of D.I. water
• Add 200 uL of 5% Chelex to the belle
• Vortex for 1 minute
• Add 15 uL of proteinase K
• Incubate for 30 minutes in 56 degrees Celsius water, and boil for 8 minutes in a 100C water bath or heat block
• Vortex for 1 minute
• Centrifuge at 16,000 x g for 3 min to pellet the cellular debris and Chelex beads
• Remove the supernatant with DNA in a solution to a clean micro centrifuge tube without removing the Chelex beads
• Label the top and side of the microcentrifuge tube and identifiable marker

PowerSoil Protocl
• Add 0.3 grams of soil sample to Power Bead tubes
• Vortex for 5 seconds
• Heat C1 solution to 60C until the precipitate has dissolved
• Add 60 uL of Solution C1 and vortex briefly
• Secure the PowerBead tubes and vortex at a maximum speed for 10min
• Centrifuge the tubes at 10,000 x g for 30 seconds at room temperature
• Transfer the suprernatant to a clean 2mL collection tube
• Add 200 uL of solution C3 and vortex briefly, and then incubate 4 degrees Celsius for 5 minutes
• Centrifuge the tubes at room temperature for 1 minute at 10,000 x g
• Transfer up to 750 uL of the supernatant to a clean 2mL collection tube
• Shake Solution C4
• Add 1.2 mL of solution C4 to the supernatant
• Vortex for 5 minutes
• Load 675 uL onto a spin filter and centrifuge at 10,000 x g for 1 minute at room temperature
• Add 675 uL of supernatant to the spin filter followed by more centrifugation at 10,000 x g for 1 minute at room temperature
• Load remaining supernatant onto the spin filter and centrifuge at 10,000 x g for 1 minute at room temperature e
• Add 50 uL of Solution C5 and centrifuge at room temperature for 30 seconds at 10,000 x g
• Centrifuge at room temperature for 1 minute at 10,000 x g
• Place the filter in a clean 2mL collection tube
• Add 100 uL of solution C6 to the center of the white filter membrane
• Centrifuge at room temperature for 30 seconds at 10,000 x g
• Discard the filter
• Store the DNA in a frozen environment (-20 to -80 C)

Data and Observations

Chelex
Faster to perform compared to the Power soil protocol
DNA is protected by metal ions that stop the enzymatic activity of the nucleases

Powersoil
Produces a more pure sample of DNA making it easier for application and analysis
Beads in Power Bead tubes crush cells to release the DNA

Our group performed the Powersoil Protocol and our final tube was labeled ” 1 TCA C6″
Tube contained the final C6 solution added and stored in freezer

Conclusion and Future steps:
Both protocols took nearly the entire lab period to complete, with the power soil protocol taking a bit longer. In the next lab we will examine the results using a nano drop to observe any DNA samples. If samples are found, we will continue in the amplification process of the DNA found. This time, we will be very careful in not making any mistakes, so we do not have the same results as the Ludox protocol. If the results deem the protocols unsuccessful, we will try again using a positive and negative control.

March 2

Lab 8: Electrophoresis and TAE Dilutions 03/01/2018

Print Friendly, PDF & Email

Purpose 
The pups of this lab was to perform gel electrophoresis on our 4 samples previously collected: ladder, positive control, negative control, and soil sample. However, in order to ensure we properly knew how to perform the insertion of the sample drops into the gel, we practiced using dilution samples containing no PCR. After we interred the samples into the wells in the gel, we peer-edited the rough drafts of our introductions from the pre-lab. We put together our thoughts from each individual rough draft, so we could write a new introduction as a group fro the following lab.
Procedure

  1.  Locate gel mold from last week and prepare the loading of the gel with the prepared dilution of 1x TAE and distilled water
  2. Remove the comb
  3. DNA will be running towards the positive side of the electrode
  4. Add 5uL of any practice solution that contains the buffer
  5. Transfer the solution to the three left wells and practice carefully depositing the gel
  6. Transfer 10 uL of the ladder into one well
  7. Transfer 5 uL of the positive control, negative control, and soil sample into a well
  8. Begin the electrophoresis through the gel at 100 volts for 30min
  9. While electrophoresis takes place, swap introduction from the pre-lab with a group member and revise according to provided rubric
  10. Exchange constructive ideas with group members to improve the introduction
  11. If there is enough time, view gel under UV light

Data and Observations 

Organization of Wells:

No errors were made in the deposition of the samples into the wells

Wells from left to right contained 3 consecutive practice samples

From left to right after the practice samples are the 10uL of ladder, soil sample, positive control, then negative control

Our group did not have enough time to view the results of the electrophoresis

Conclusion and Future Steps 
From this lab, the group was introduced and became familiar with dilutions involving concentrations of TAE. We successfully placed the entire samples in all the wells, so that the electrophoresis could be conducted. We well examine the results in the next lab under UV light; UV light is a key component in the examination of amplified DNA. If the electrophoresis was successful, we will continue by sequencing the DNA and discover matches in the genome of ciliates. If the electrophoresis is negative, we will have to start eh Ludox centrifugation stage  and most likely make some changes to the protocol, so we can receive a positive result.

February 23

Lab 7: Cox- 1 Primer and Electrophoresis 2/22/18

Print Friendly, PDF & Email

Purpose 
The purpose of this lab was to begin the DNA application stage of our protocol. We began this procedure by becoming familiar with Cox1 reverse and forward primary. Using these processes, amplificication could be completed: template DNA with nucleotides, buffer, DNA polymerase, an d primates. Once we had prepared our negative, positive, and sample tube, we created the agarose gel that we will be using next week for the amplified DNA.

Procedure 

◦ Negative control tube

‣ Add 1uL primer and 11.5 uL water

‣ Label tube “negative”

◦ Positive control

‣ Add 12.5 uL of 2x Master Mix

‣ Add 5uL of DNA template

‣ 1 uL primers ‣ Add 6.5 uL water

‣ Label tube “positive”

◦ Sample tube

‣ Add 12.5 uL 2x Master Mix

‣ Add 5uL DNA Template and 1 uL of primer

‣ Add 6.5 uL of water

‣ Label tube “sample”

◦ Obtain Erlynmeyer flask and place in freezer for 5 minutes at 4 degrees C

◦ Add ethidium bromide to solution

◦ Pour into assembled gel tray with comb

◦ Label tray with piece of labeled tape

◦ Allow gel to solidify for 30 minutes

◦ Record location of test tube on test rack

• Data and Observations 

◦  Positive Control stored in C1 labels with a “P1”

◦ Negative control stored in C2 labeled with “N2”

◦ Sample tube stored in C3 labeled “S1”

◦ COX-1 forward primary: 5′ ATGTGAGTTGATTTTATAGAGCAGA-3′

◦ COX-1  reverse primer: 5′- GGDATACCRTTCATTTT-3′

◦ Recipe for 40mL of 1.5% TAE ‣ (40)(0.015) = ).6 grams of agarose needed

◦ Gel tray labeled “21-1 TCA” and left to solidify

Conclusion 

Despite the fact that we have not yet seen the effects of the COX1 primers, our class is indeed confident that we will find results. Nevertheless, if we do not find results, we can use the positive and negative control groups to help us modify our protocol. We ran out of time to remove the comb from the gel because the gel had to solidify for 30 minutes. In the future, we will be running the electrophoresis gels. This will allow us to examine the DNA sequences that were amplified. The ethidium bromide solution will be essential because this is what allows the sequences to be examined. In the following lab, we will be using the prepared controls and sample into the solidified gel and continue our protocol.

February 16

Lab 6: EZNA Protocol 2/15/2018

Print Friendly, PDF & Email

Purpose: The purpose of this lab was to finish the last few steps from the previous protocol and examining our pellet. The next purpose was to try a new protocol named EZNA tissue DNA Kit Protocol. The purpose of using this protocol is because it seemed to have very successful results, so we are trying to replicate that success. This protocol involved the use of many new substances such as ethanol and buffers.

Procedure:

  • Remove supernatant from test tube containing cell pellet
  • Watch cells with 200 microliters of PBS
  • Remove the PBS and put another fresh 200 microliters of PBS
  • Place 5 drops of microliters on a concavity slide and then place 20microliter of iodine in the drops
  • Examine the drops under a microscope and conduct cell counts
  • Add 25 microliter of protease solution and vortex
  • Add 220 microliter of BL Buffer which aids in denaturing proteins
  • Incubate tube at 70 degrees Celsius for 5 minutes in a heating block, and then vortex briefly
  • Add 22o microliter of 100% ethanol, and then vortex thoroughly
  • label tubes and store in freezer

Data and Observations

  • Unfortunately, my group was only able to complete up to step 8 of the procedure due to complications at the beginning of the procedure
    • The pellet from last week never accumulated, so we had to remove the supernatant from the tube and then add PBS
    • After adding the PBS, we had to centrifuge test tube again to produce a pellet
    • Pellet still did not completely isolate
    • Steps to remove the supernatant were repeated
    • Began the assigned protocol 20 minutes after other groups had started
    • Fortunately, the pellet we collected was fairly large and easy to analyze
  • Cell Counts for 2 microliter drops
    • Drop 1: 20
    • Drop 2: 7
    • Drop 4: 16
    • Drop 5: 24
  • The test tube is labeled 21-1 TCA and the protocol will be continued through open lab

Conclusion

Unfortunately, my group was not able to finish the protocol and see if the results were for accurate than previous protocols. However, from the literature review about this protocol, I have a good amount of hope that it will be a better protocol than past ones. In the future, I know my group hopes to be able to complete these protocols within the timeline of the scheduled lab time. We need to be very punctual, especially because vortexing and centrifuging take a lot of time.

February 9

Lab 5: Serological Pipettes & Ludox Protocol 02/08/2018

Print Friendly, PDF & Email

 Purpose 

The purpose of this lab was to become more familiar with serological pipettes. As a group, we practiced transferring different amounts of water using serological pipettes and then weighing the water to see how accurately the pipettes were calibrated. We then performed the same thing using P100 and P1000 pipette. We then began the Ludox protocol already designed and worked on it until the end of class. Another purpose of this lab was to try and find a more effective method of Ludox gradient centrifugation that allows us to see the organic layer easiest and isolate it.

Procedure

Pipetting 

  • With a serological pipette, place 1mL of water in a weighing dish and record mass
  • Repeat step 1 but this time place 0.1mL of water in the dish
  • Repeat step 1 but this time place 0.01mL of water in the dish
  • Repeat steps 1-3 but use P100 or P1000 pipette

Ludox Protocol 

  • Put 5g of top soil and 10mL  of water in a jar, and then mix for 5-10 minutes using a vortex
  • Allow the soil to settle by letting the sample sit for about 2 minutes and then transfer 3.68mL of the soil water to a clean glass tube
  • Add 368 microliters of 25% glutaraldehyde, and vortex the tube several times for about 30 seconds
  • Add 16mL of Ludox to a 50mL conical tube Inject 4mL of the fixed sample into the Ludox using a P1000 pipette and inject it right below the surface
  • Add a layer of colored water on top of the Ludox and prevent mixing
  • Label and weigh the tube, then centrifuge at 4300 x gravity in a swinging bucket rotor for 15 minutes
  • Remove the liquid from the cell layer and place it in 2 separate microfuge tubes using a P1000 pipette

Data and Observations 

Pipette Observations 

The mass of the 1mL and 0.1mL drops weighed exactly 1g and 0.1 respectively with both types of pipettes  0.01mL drops were to small for the scale to pick up  Ludox Observations  The protocol proved successful in producing a visible cell layer  We were able to remove it successfully and place it in 2 separate microfuge tubes  We did not have enough time to finish the predetermined protocol

Concial tube data 

Labeled: 21-1 TCA

Weight: 40.9 grams

Tube was stored in tube rack at the back of the laboratory

Microfuge tube data 

Both labeled : 21-1 TCA

Weight: 3.94 grams and 4.2 grams

Stored in rack and placed in refrigerator for examination

Conclusion 

After placing the organic layer in 2 separate microfuge tubes, we will be able to re-examine the tubes in the following lab. Due to limited time, we were not able to finish the protocol, so next week will will start with the process of isolating the pellet. The protocol we determined proved very successful in the fact that we had a great separation of cell layer.