April
26
April
19
Workshop day 4/19/18
April
13
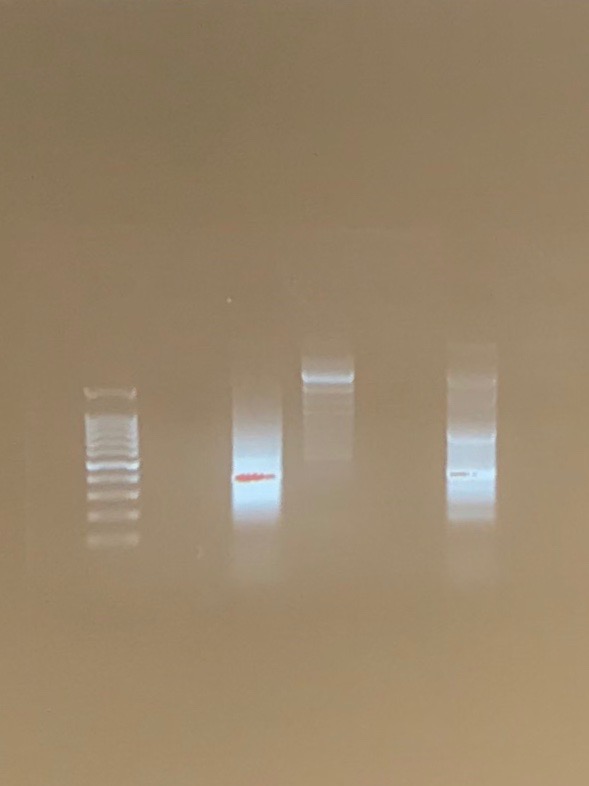
4/13 gel analysis


Title: 4/13 gel analysis
Rationale: The purpose of this procedure today was to run the gels so that way we can figure out if any DNA bands were found. The + PCR and eDNA should have bands.
Methods:
- Add 5µL of DNA ladder to the 1.8% agarose gel.
- Add 10 µL of the -, +, and eDNA to the agarose gel.
- Run the electrophoresis at 100 V for 30 minutes.
- The image was developed containing the bands of our DNA (not all had bands).
Mistakes: Negative results or no DNA bands for the eDNA and positive DNA incidates an error.
Data/conclusion: Our bp was located at 450 for the bands. This inicates a good range for V4 primers. There were bands in the + PCR and eDNA. This means that the results were positive and DNA was found in our sample. The amplification of DNA enables the DNA to run through the illumina and then metabarcoding. Metabarcoding can store DNA in a database which helps identify DNA and provides others with guidance. Our next step would be to create our posters and present our findings from the semester and determine which protocol was the best for extracting DNA.
Where its stored: from the lab room (from the rock)
22-2 +/-/eDNA
CLK 22-2 chDNA
April
6
4/5/18 chelex part 2
Date/Title: 4/5, Chelex
Purpose: improve upon our previous trials of the DNA extraction procedure. The chelex procedure yielded the best results from the last trial which is why everyone replicated this procedure again, instead of the MoBio method.
Methods:
- remove 1.5 ml of liquid from the non-flooded plate. spin @ 6000xg for 5 minutes and remove supernatant. repeat procedure (3 ml of pellet).
- add 200 µL 5% chelex to the pellet and vortex for 1 minute.
- add 15 µL of proteinase K
- incubate for 30 minutes in 56 degree C water bath.
- boil for 8 minutes in 100 degree C heat block
- vortex for 1 minute
- centrifuge @ 16,000xg for 3 minutes to pellet cellular debris and chelex beads
- transfer 100 µL of supernatant to a clean microcentrifuge tube.
- Label the top
- Negative control PCR: add 1.25 µL of V4 primer and 11.25 µL of water
- postive control: add 1.25 µL of V4 primer and 10.25 µL of water
- eDNA: add 1.25 µL of V4 primer and 10.25 µL of water
- add all PCR’s to the labelled microfuge tube with the supernatant.
- perform the nanodrop test.
- add 10 µL of PCR and water mixture to calibrate.
- Place 0.5 µL of supernatant onto the spectrophotometer and record the ng/µL .
Mistakes:
I spilled my supernatant on myself. Katy accidentally added the liquid from the non-flooded plate to the V4 primer, instead of the supernatant that we placed in the water bath.
Data: eDNA comes from the non-flooded plate and the DNA template is paramecium.
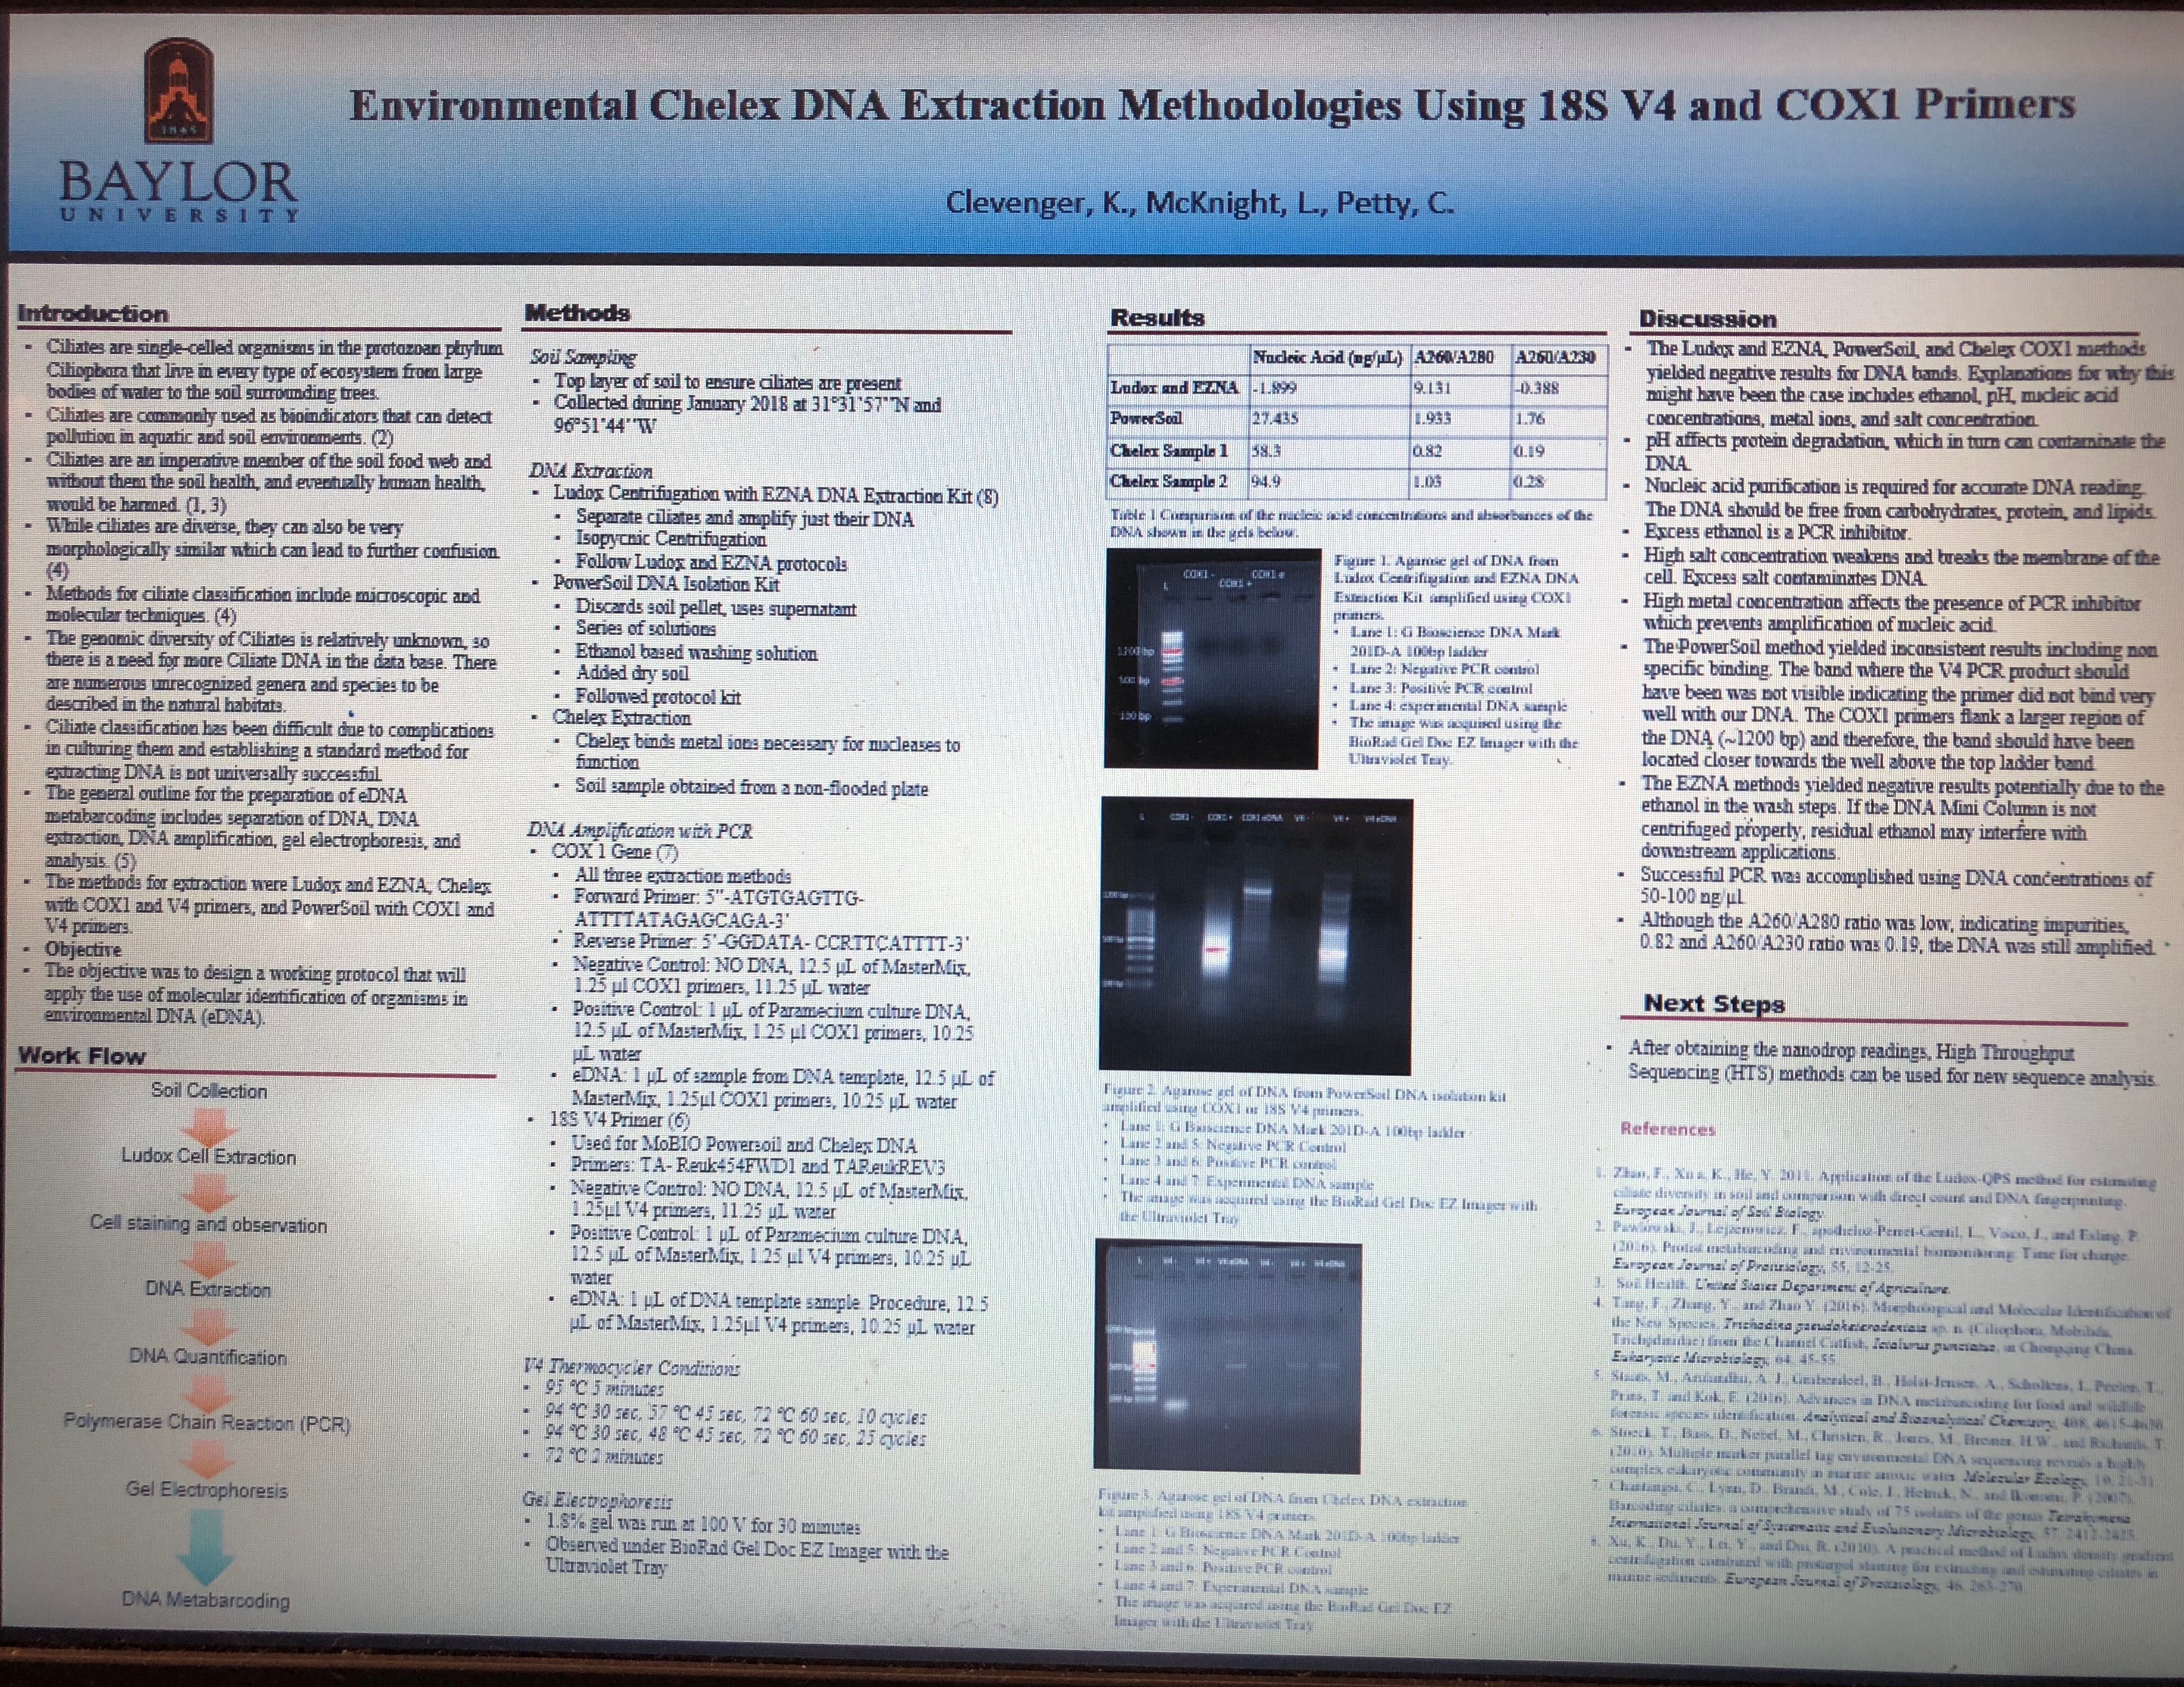
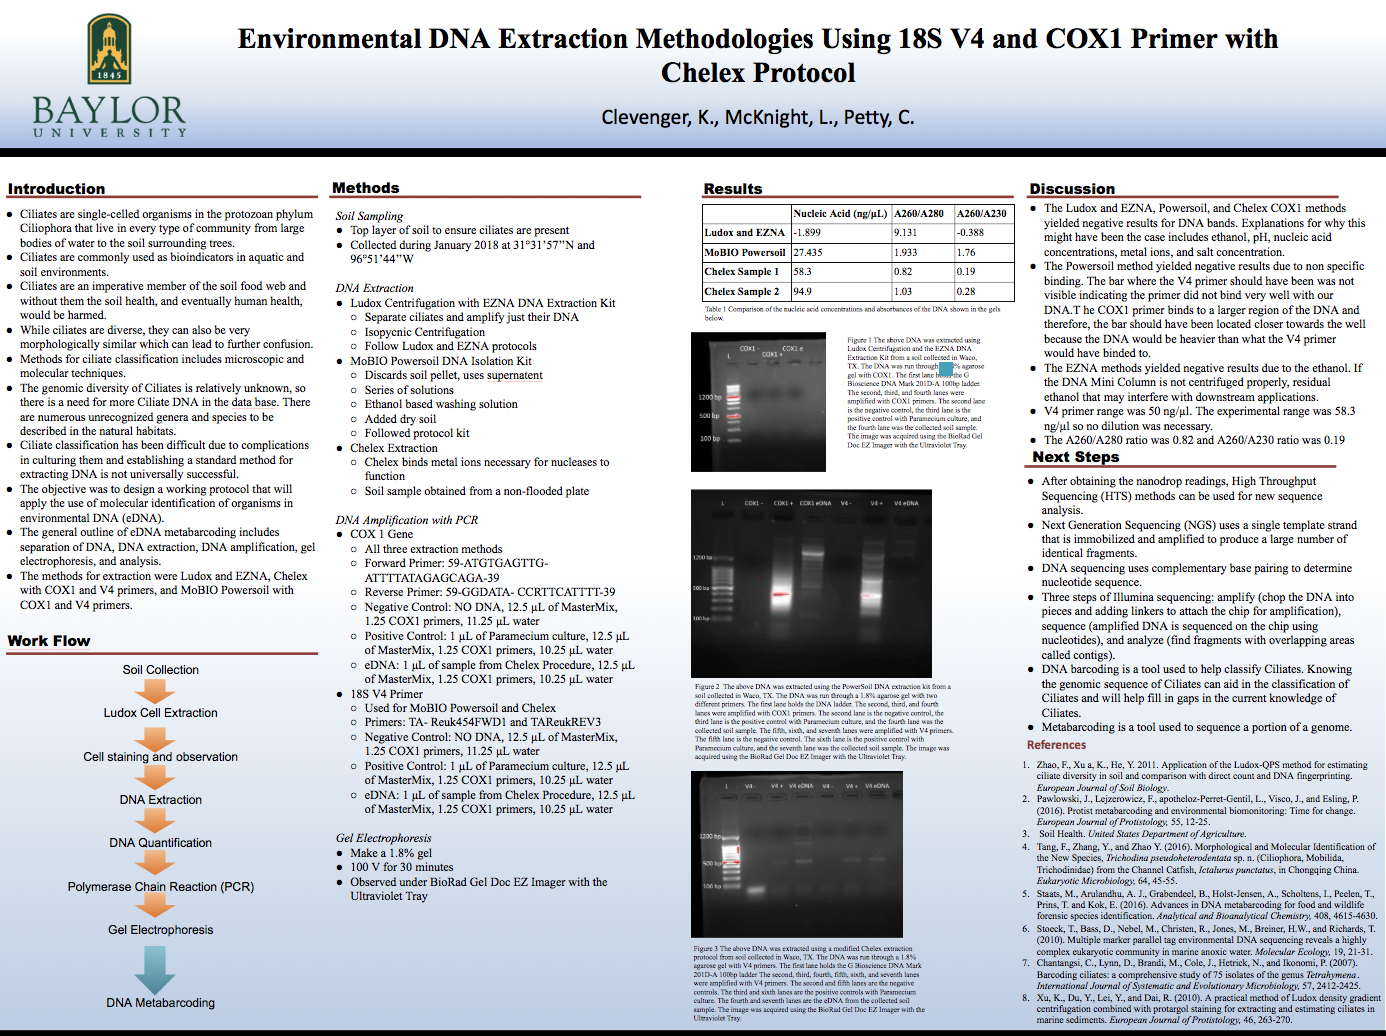
- 58.3 ng/µL
- A260/A280: 0.82
- A260/A230: 0.19
Conclusion:
The range for positive chelex was estimated to be 50 ng/µL. Our chelex was 58.3 ng/µL. This means that there was an error somewhere (due to pH change or salt from the beads), but this number is very close to the baseline. No dilution is necessary. The next step is running the DNA again to try and obtain more positive DNA results. Positive DNA results would be thick and distinct bands. The goal of the chelex experiment was to hopefully create DNA that will be suitable to analyze .
Labelled: CLK 22-2 chDNA and it is in the green rack on the front table. Our PCR tubes were labelled 22-2 +, 22-2 -, and 22-2 e/ entry for our ng/µL is D4 (1-3) -,+,e


March
30
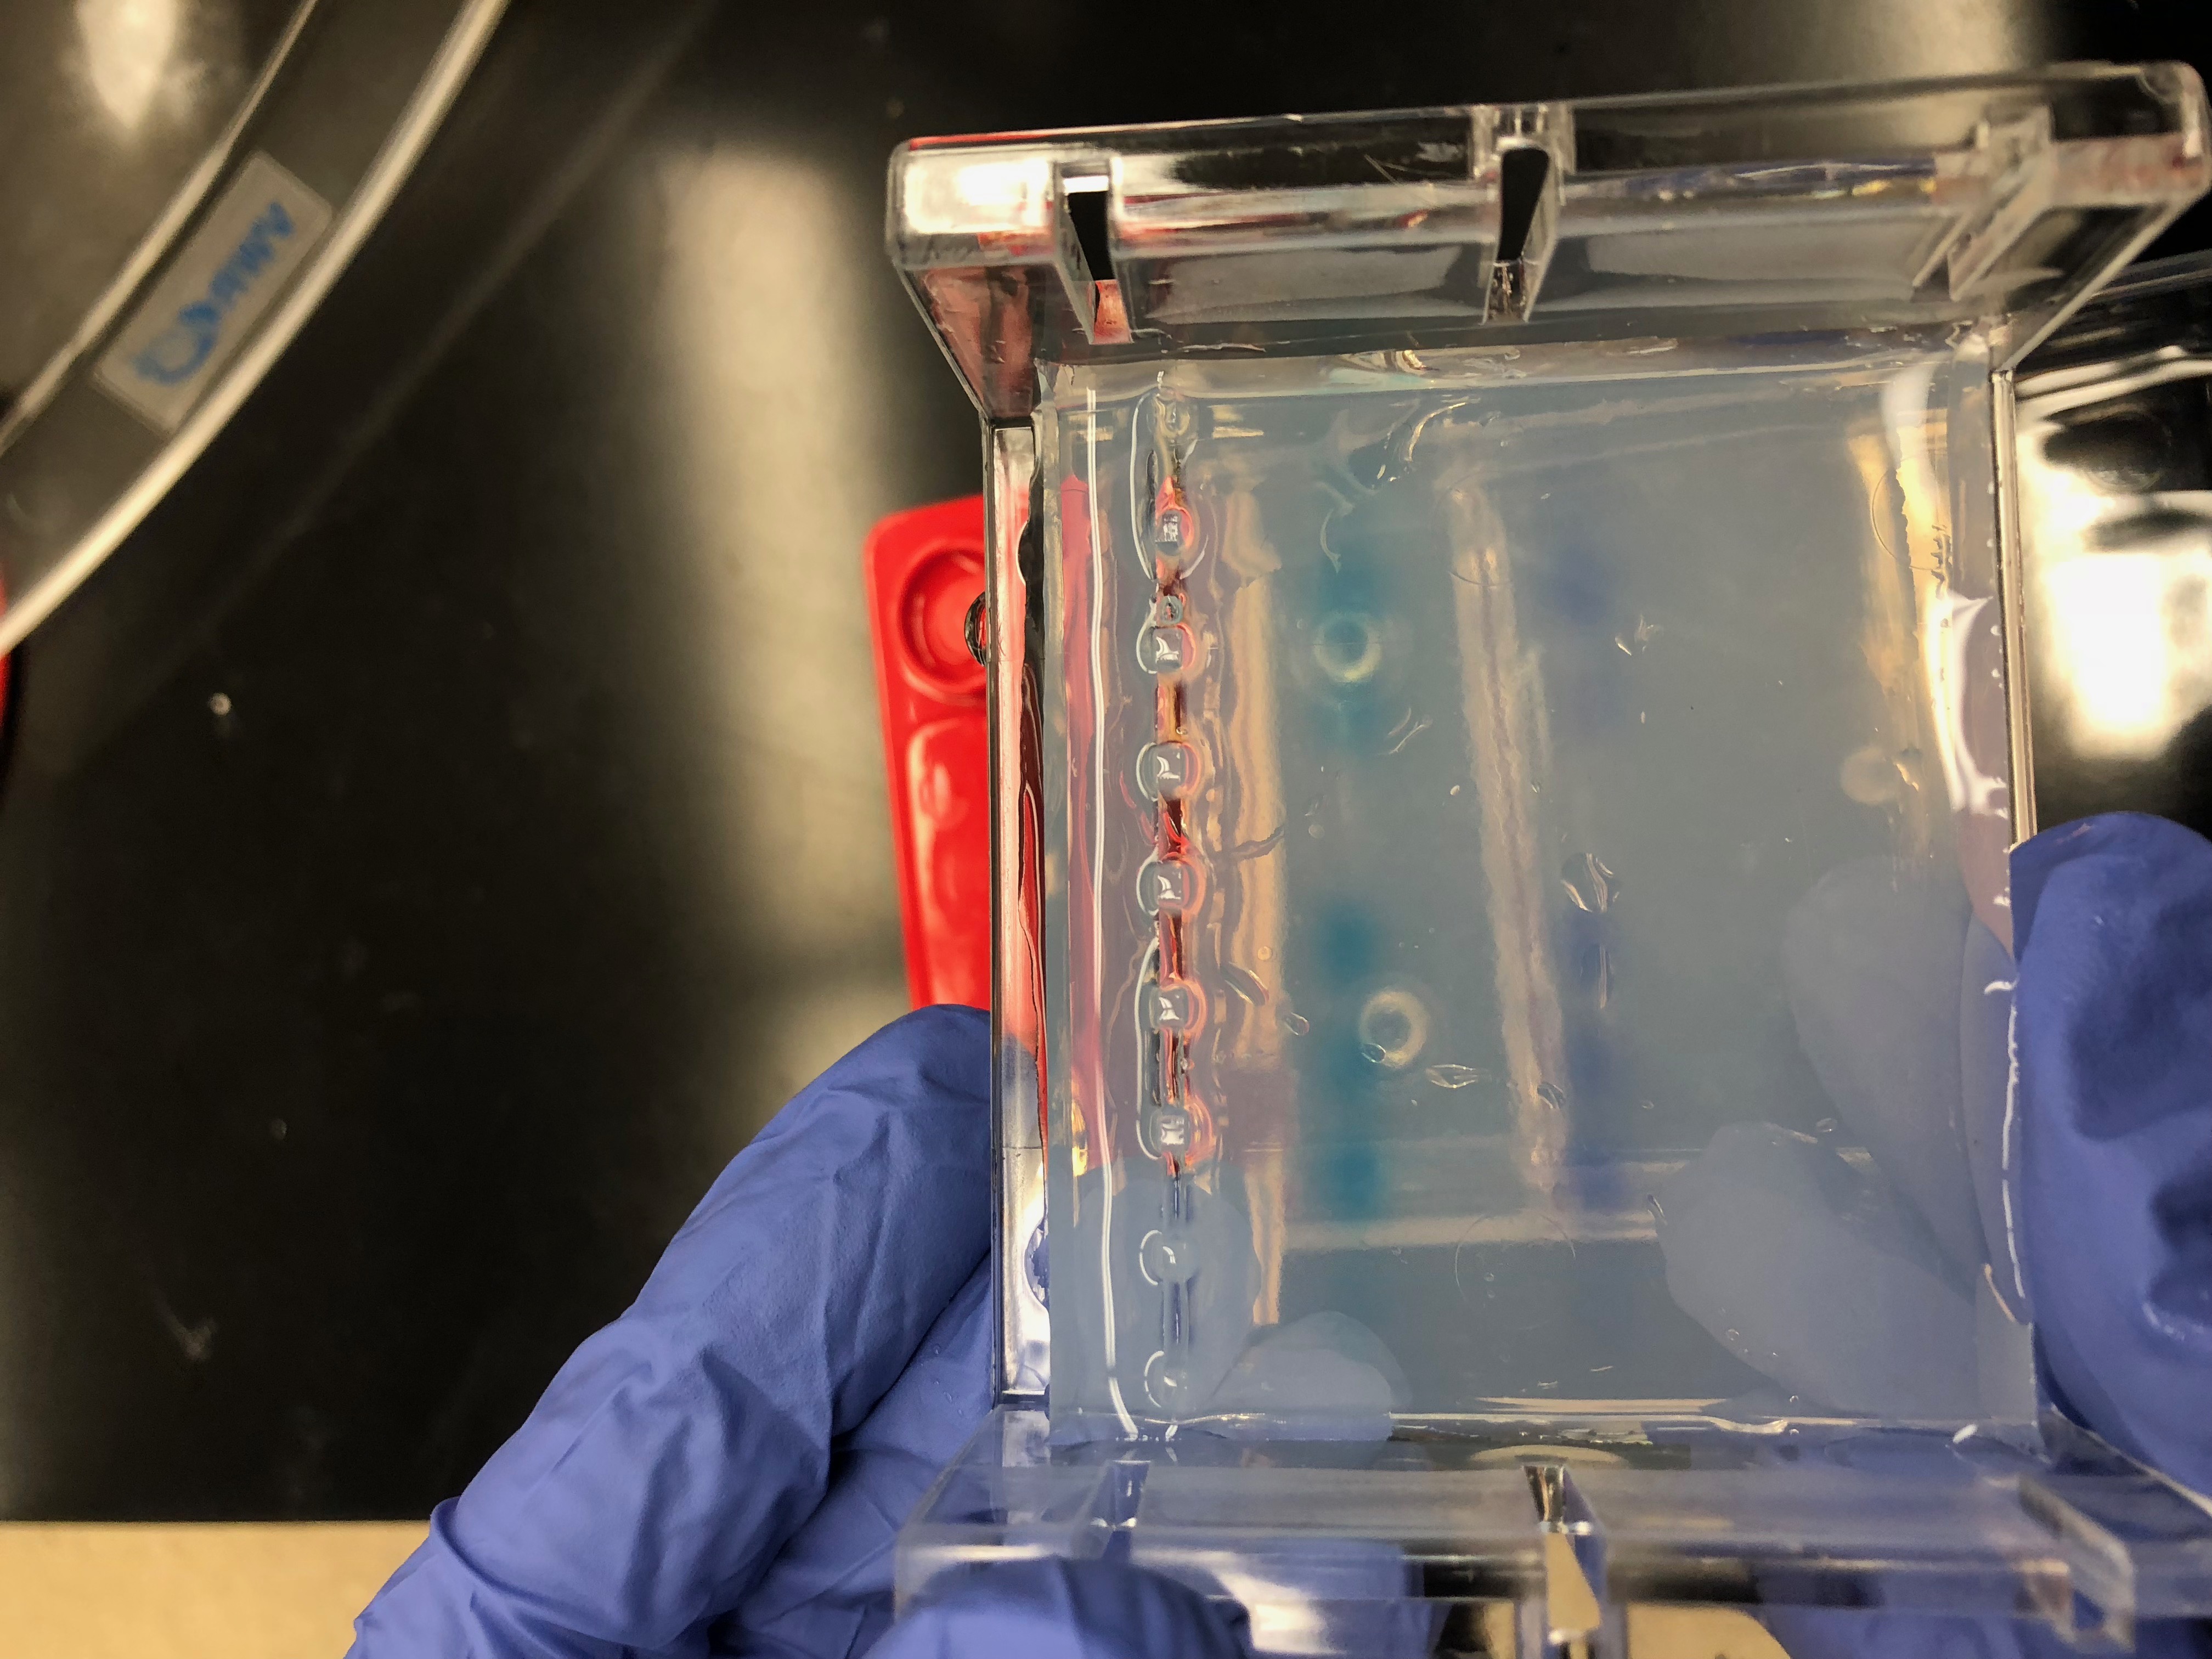
Gel electrophoresis and DNA sequencing 3/29
Date/Title: 3/29/18 Gel electrophoresis and DNA sequencing
Purpose: The purpose of this lab was to run the gel electrophoresis to find out if there was any DNA. Once we found the DNA, we could amplify the DNA and observe any overlapping areas that can help us identify the DNA.
Materials:
- Gel with cell wells
- electrophoresis apparatus
- Loading Buffer
Procedure:
- Make 400 ml of a 1X TAE buffer using 10X TAE stock solution (40 ml).
- Add gel to gel electrophoresis chamber and pour in the buffer.
- Add 5 μL of Ladder to a cell well (for comparison)
- Add 10 μL of each PCR product to their designated wells.
- Put the lid on the chamber with the wires connected.
- Set the power supply to 95 volts. Run for 30 minutes.
- Remove the gel and scan with UV imaging to search for DNA.
Next Generation Sequencing:
- add adaptors to ends of DNA fragments
- attach fragments to flowcells
- The strand should bend in the PCR extension and attach to a second oligo, forming a bridge.
- A polymerase synthesizes the reverse strand
- Each strand forms a new bridge and this results in DNA strand clones.
Data:


results/conclusion:
The chelex procedure was the most successful. This was surprising because the powersoil method was supposed to yield the best results. A reason why the powersoil method may have been less successful could be the use of dry soil (instead of the non-flooded plate like the chelex procedure). We completed the powersoil procedure and received positive results from the positive V4 primer and eDNA. There was a source of error because the location of our DNA was too far back. The V4 primers should be further up and the COX1 should be further back. Also our DNA was not very distinct and it was very fuzzy. This also indicates a possible error that may or may not be due to our protocol. We sequenced the amplified DNA and the next step would be to analyze the DNA and find overlapping areas. This is important because these overlapping areas can be used to classify the DNA and match it with a ciliate.
Storage: lab room, labeled CLK.
March
23
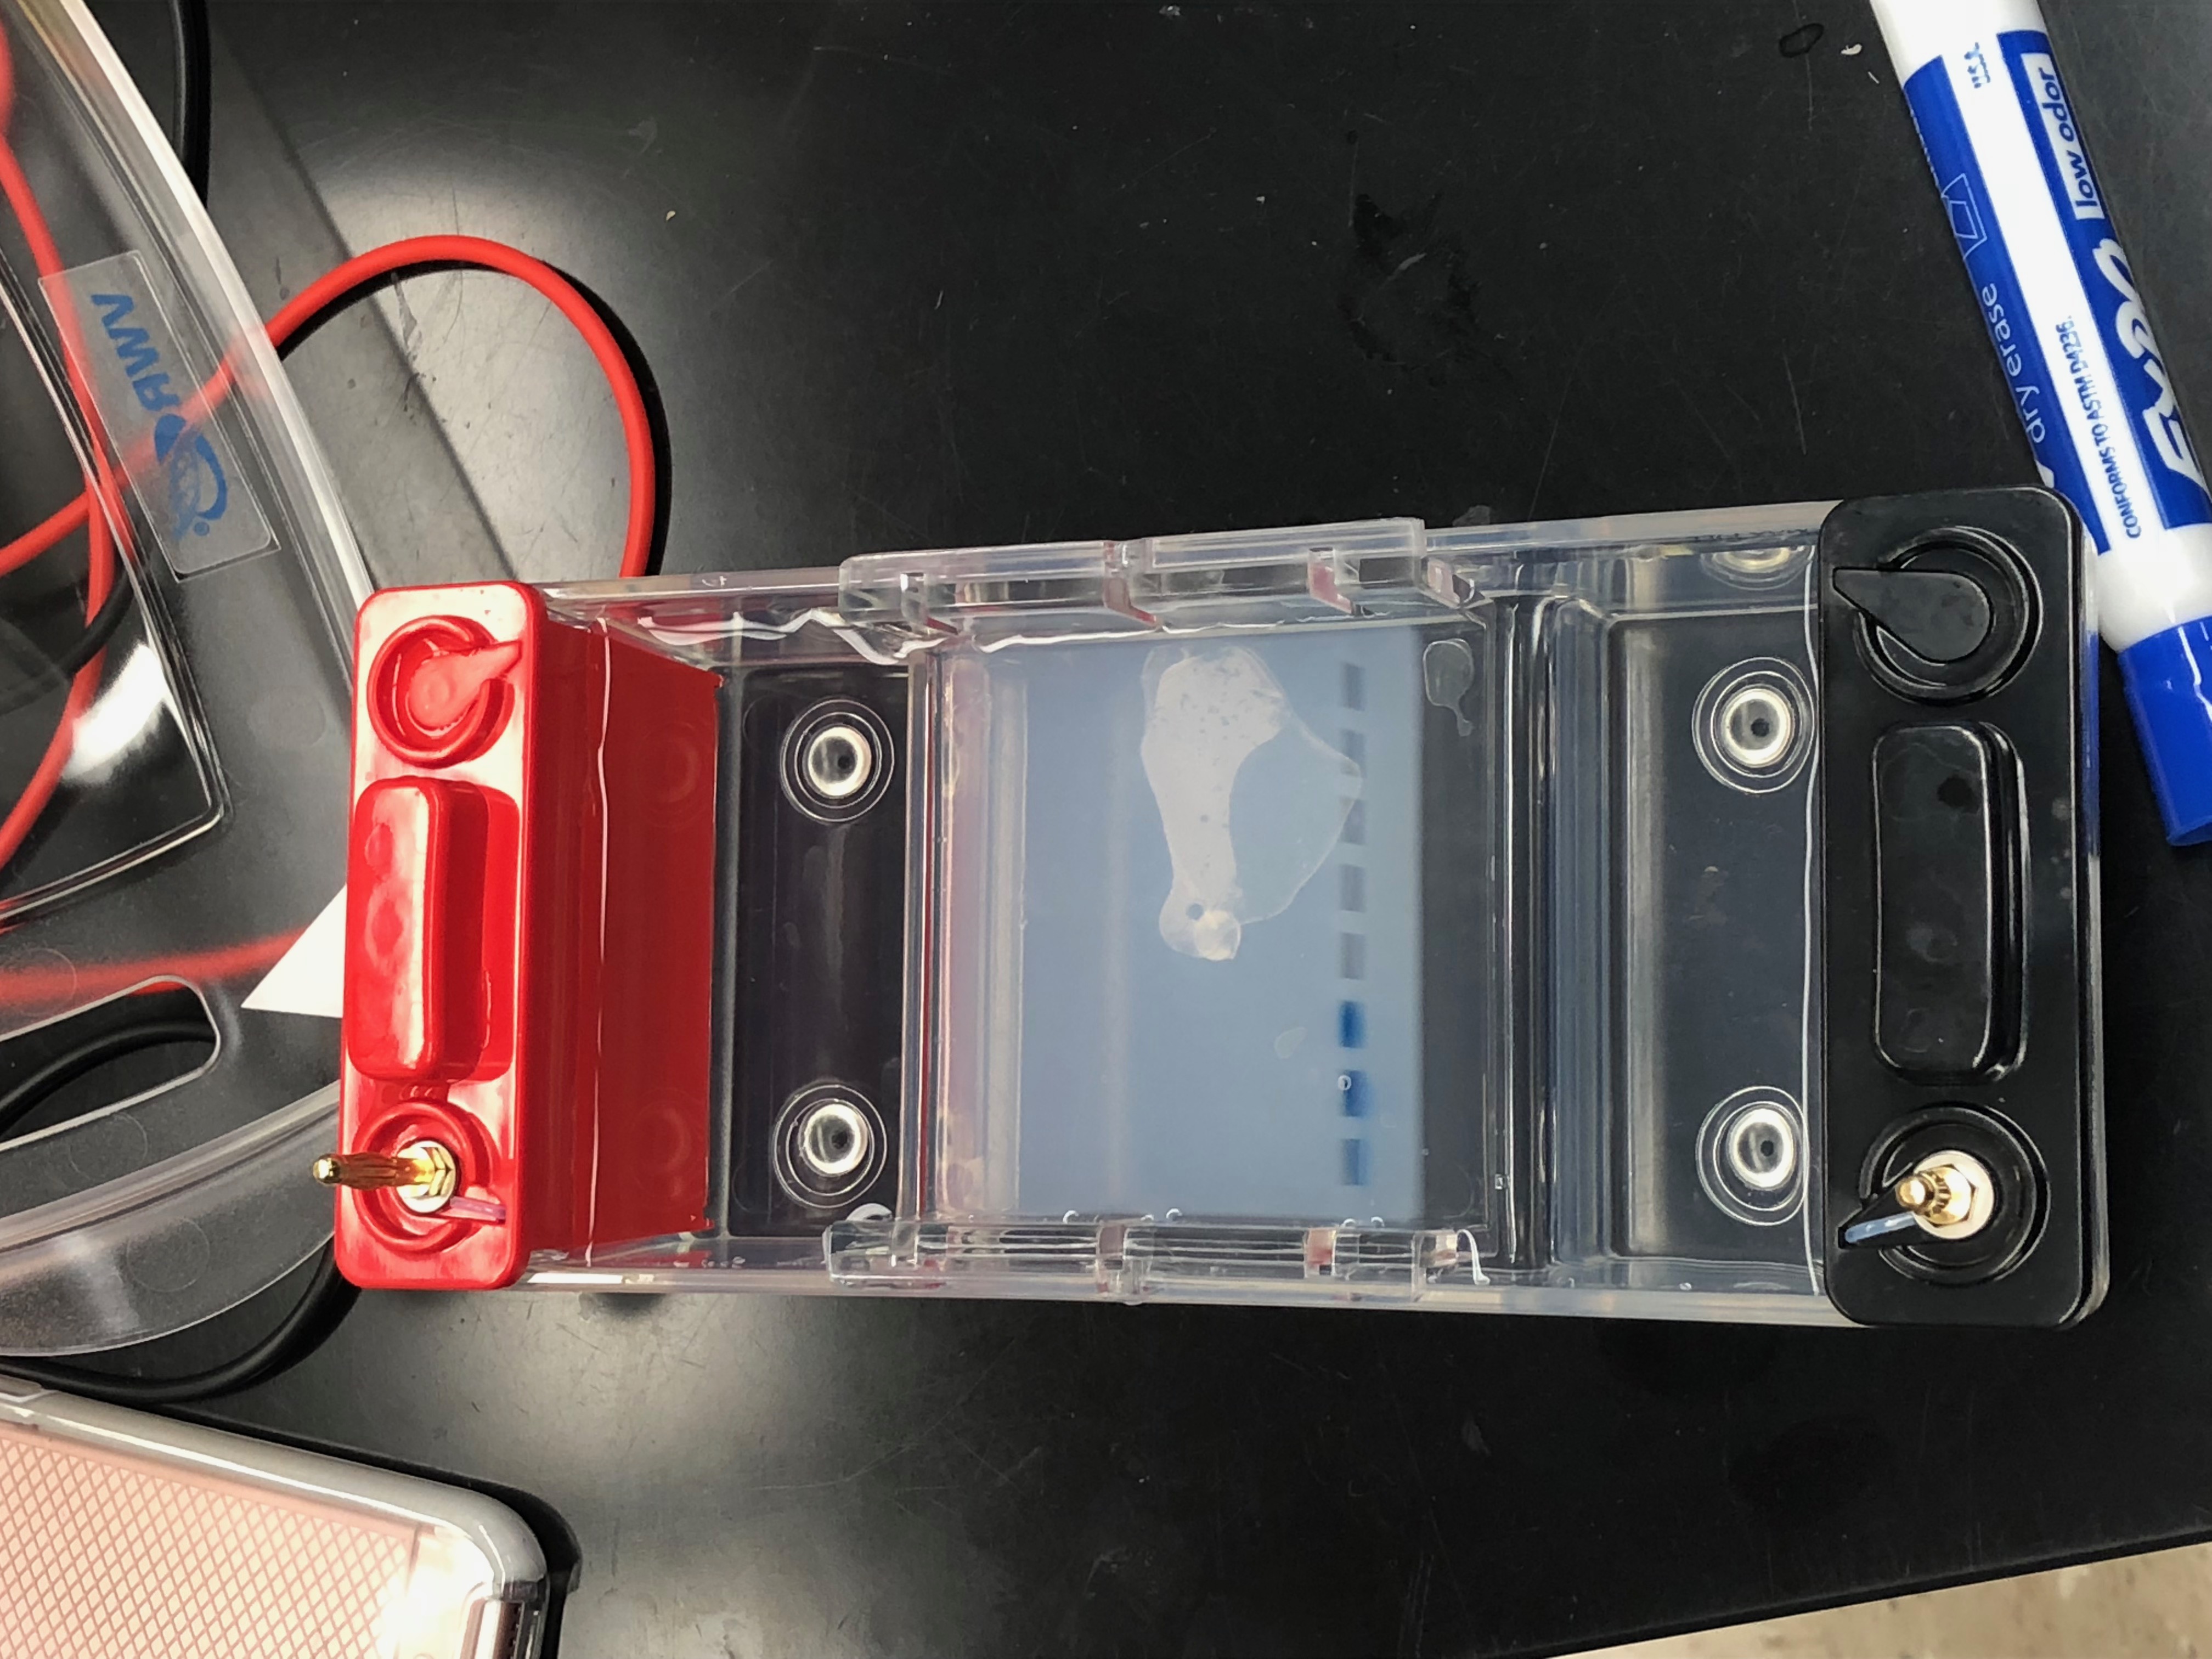
Agarose Gel 3/22/18
Date/title: 3/22/18 Making Agarose Gel (part 2)
Objective: Set up the agarose gel so we can perform the electrophoresis and read the DNA.
Materials:
- 1xTAE
- Erlenmeyer flask
- Ethidium Bromide
- PCR product
- Loading Buffer
- Agarose
- DI water
Procedure:
- Add 35 mL 1xTAE to 0.6g Agarose in small Erlenmeyer flask. (add 90 mL of DI water)
- Cover lightly with weighing paper and a loose-fitting cap.
- Heat until solution is clear and small bubbles come off the bottom when gently swirled.
- Allow to cool until the flask is comfortable to hold.
- Have your TA add 2 µL ethidium bromide, swirl gently.
- Set up gel electrophoresis box, making sure the open ends are sealed.
- Pour agarose gel smoothly into prepared mold, with as few bubbles as possible. Allow to solidify for at least 25-30 minutes.
- Cover gel with prepared 1xTAE buffer solution so that it will not dry out.
- Carefully remove the comb and turn gel so that the wells are furthest away from positive electrode.
- Using a micropipette, add 5 µl of the ladder and 10 µl of each PCR product + loading buffer. If the loading buffer is not included in the Taq polymerase used in the PCR, add 5µl loading buffer to the PCR product and mix thoroughly before transferring to the gel.
- After you have loaded your sample, place the lid on your box and turn on the power supply to approximately 100 volts. Allow to run for 30 minutes or more, allowing the loading dye to run approximately halfway across the gel before turning off the power.
- Image with UV light.
Data:
| Tubes | Negative control (1) | Positive control (2) | eDNA (3) |
| DNA template (µl and total ng) | 0 (mL) | 1 µl | 1 µl |
| 2X master mix (µL) | 12.5 | 12.5 | 12.5 |
| 10 µM COX1 Primers | 0.63 µl | 0.63 µl | 0.63 µl |
| Water (µL) | 11.87 µl | 10.87 µl | 10.87 µl |
| Tubes | Negative control (3) | Positive control (4) | eDNA (5) |
| DNA template (µl and total ng) | 0 (mL) | 1 µl | 1 µl |
| 2X master mix (µL) | 12.5 | 12.5 | 12.5 |
| 10 µM V4 Primers | 0.63 µl | 0.63 µl | 0.63 µl |
| Water (µL) | 11.87 µl | 10.87 µl | 10.87 µl |
Mistakes:
A mistake could be not calculating the correct amount of agarose in grams that must be added to make the gel. Another mistake would be not ensuring that the comb does NOT touch the bottom of the gel electrophoresis box.
Results:
Our eDNA was 1.098 ng and our control was 1.03 ng. The goal is to obtain a 260/280 ratio and we want a ratio that’s on the higher side.
Conclusion:
Obtaining the 260/280 ratio is important because it means that we will have pure DNA which is what we want. The next step would be to perform the gel electrophoresis and see if we can isolate and identify the DNA.
Storage/label: Stored on the blue rack in the lab room. Labeled CKL and they also have the corresponding numbers on them that align with the data table (see data portion of blog).
March
16
Chelex/MoBio 3/16
Date: 3/16/18
Title: Chelex, MoBio
Purpose: Our goal is to extract DNA from cells to identify ciliates and learn more about the diversity of ciliates.
Materials:
(MoBio)
- Microcentrifuge (10,000 x g)
Pipettors (50 μl – 500 μl)
Vortex-Genie® 2 Vortex
Vortex Adapter, powerBead tubes, ethanol
(Chelex)
- Chelex Beads, non-flooded plate, vortex, centrifuge
Procedure:
(MoBio)
1. add 0.2-0.3 grams of soil sample to powerbead tube
2. Gently vortex to mix
3. Check Solution C1. If Solution C1 is precipitated, heat solution to 60°C until
the precipitate has dissolved before use
4. Add 60 μl of Solution C1 and vortex
5. Secure PowerBead Tubes horizontally using the MO BIO Vortex Adapter
tube holder, Vortex at maximum speed for 10
minutes
6. Centrifuge tubes at 10,000 x g for 30 seconds
7. Transfer the supernatant to a clean 2 ml Collection Tube
8. Add 250 μl of Solution C2 and vortex for 5 seconds. Incubate at 4°C for 5
minutes
9. Centrifuge the tubes for 1 minute at 10,000 x g
10. transfer up to 600 μl of supernatant to a clean 2 ml
Collection Tube
11. Add 200 μl of Solution C3 and vortex, Incubate at 4°C for 5 minutes
12. Centrifuge the tubes for 1 minute at 10,000 x g
13. Transfer up to 750 μl of supernatant to a clean 2 ml Collection Tube
14. Add 1.2 ml of Solution C4 to the supernatant, vortex for 5
seconds
15. Load 675 μl onto a Spin Filter and centrifuge at 10,000
x g for 1 minute, Discard the flow through and add an
additional 675 μl of supernatant to the Spin Filter and centrifuge at 10,000 x g
for 1 minute, Load the remaining supernatant onto the Spin
Filter and centrifuge at 10,000 x g for 1 minute
16. Add 500 μl of Solution C5 and centrifuge for 30
seconds at 10,000 x g
17. Discard the flow through from the 2 ml Collection Tube (avoid traces of ethanol)
20. Add 100 μl of Solution C6 to the center of the white filter membrane
21. Centrifuge for 30 seconds at 10,000 x g
22. Discard the Spin Filter, the DNA in the tube is ready for any downstream
application
Chelex
- Transfer 1.5 ml of liquid (from non-flooded plate) to a microcentrifuge tube
- label tube with your initials and section
- Centrifuge @6000xg for 5 minutes, discard supernatant
- repeat procedure 2-3 times to concentrate the cells in the liquid into a pellet
- Weigh 0.5 g Chelex and transfer to a 15 ml conical tube. Add di water to 10 ml.
- Add 200µL 5% Chelex to pellet, vortex for 1 minute/ use large-bore micropipette tip
- Add 15 µl of proteinase K
- Incubate for 30 minutes in 56oC water bath or heat block
- Boil for 8 minutes in 100oC water bath or heat block
- Vortex for 1 minute
- Centrifuge @ 16,000xg for 3 minutes to pellet cellular debris and Chelex beads
- Transfer supernatant with DNA in solution to clean microcentrifuge tube
- Label top and side of microcentrifuge tube with ID!!!
Data:
Our group completed the MoBio protocol. The wieght of the dry soil was 0.2g.
Mistakes: Issues with pipetting can be a source of error and it results in the layers of the tube being less distinct. Another issue would be accidentally pipetting the pellet.
Location: Lab room, labeled PSCLK
Conclusion:
We did not complete the procedure so there are no conclusive results to report.
next step: We will be creating the electrophoresis gel. This is how we will test to see if there is DNA. If the test comes back postitive, then we can begin to classify the ciliates based on the DNA that was read.
March
2
Gel Electrophoresis 3/1/2018
Title: Gel Electrophoresis 3/1/2018
Materials:
- Gel with cell wells
- electrophoresis apparatus
- Loading Buffer
Procedure:
- Add 30 mL of 10X TAE to 270 mL DI water.
- Add gel to gel electrophoresis chamber and pour in the buffer.
- Add 25 μL of water and 5 μL of Loading Buffer into a tube and mix thoroughly.
- Practice adding 5 μL of the Buffer to the cell wells.
- Add 5 μL of Ladder to a cell well (for comparison)
- Add 5 μL of dye to PCR products (+/- control, and experiment sample)
- Add 10 μL of each PCR product to their designated wells.
- Put the lid on the chamber with the wires connected.
- Set the power supply to 110 volts. Run for 30 minutes.
- Remove the gel and scan with UV imaging to search for DNA.
Results:
We were not able to complete the protocol so there are no results to report.
Mistakes:
We did not get any PCR products, which indicates that there was a mistake or error in the PCR procedure. It is possible that the genes were not amplified enough to read the DNA.
Conclusion:
The next step would be to check for DNA using the UV light. If the DNA is positive, then we will begin attempting to classify the information and use the DNA to identify ciliates. Identifying DNA is important because it will enable us to figure out the type of cilitates we are dealing with.
Stored: Our cell wells are stored in the lab room. It is labelled KCLMCK.

February
23
PCR/ Gel Electrophoresis 2/22/18
PCR/Gel Electrophoresis 2/22/2018
Materials:
- 1xTAE
- Erlenmeyer flask
- Ethidium Bromide
- PCR product
- Loading Buffer
Procedure:
- Add 40 mL 1xTAE to 0.6g Agarose in small Erlenmeyer flask.
- Cover lightly with weighing paper and a loose-fitting cap.
- Heat until solution is clear and small bubbles come off the bottom when gently swirled.
- Allow to cool until the flask is comfortable to hold.
- Have your TA add 2 µL ethidium bromide, swirl gently.
- Set up gel electrophoresis box, making sure the open ends are sealed.
- Pour agarose gel smoothly into prepared mold, with as few bubbles as possible. Allow to solidify for at least 25-30 minutes.
- Cover gel with prepared 1xTAE buffer solution so that it will not dry out.
- Carefully remove the comb and turn gel so that the wells are furthest away from positive electrode.
- Using a micropipette, add 5 µl of the ladder and 10 µl of each PCR product + loading buffer. If the loading buffer is not included in the Taq polymerase used in the PCR, add 5µl loading buffer to the PCR product and mix thoroughly before transferring to the gel.
- After you have loaded your sample, place the lid on your box and turn on the power supply to approximately 100 volts. Allow to run for 30 minutes or more, allowing the loading dye to run approximately halfway across the gel before turning off the power.
- Image with UV light.
Data:
What did not work (Ludox and cell washing): There was not very much DNA found in any of our samples after the previous steps in this experiment.
There is no data to report since we were not able to finish this portion of the experiment.
Conclusion:
The next step would be to put our DNA into the cell wells containing the gel electrophoresis. We will also need to image with UV light. This will enable us to start the process of reading the DNA.
Storage:
Our sample is on the rack and it is labelled CKLMKC
February
16
EZNA 2/15/2018
E.Z.N.A.® Tissue DNA Kit Protocol 2/15/2018
Materials:
- Tabletop microcentrifuge capable of 13,000 x g
- Nuclease-free 1.5 mL microcentrifuge tubes
- Heat block capable of 70°C
- Vortexer
- 100% ethanol
- 100% isopropanol
- PBS (or other wash buffer)
Mistakes:
We did not see a pellet after centrifuging the tube once, so we spun it again at 10,000g for 2 minutes.
Procedure:
Frozen cell samples should be thawed before starting this protocol.
- Spin for 5 minutes at 3000g.
- Remove the supernatant.
- Add 1 mL 1x PBS, resuspend.
- Spin for 5 minutes at 3000g.
- Remove the supernatant.
- Resuspend cells in 100 μL PBS.
- Add 20 μL of iodine and 20 μL of cells into one tube.
- Observe 5 2 μL drops and count the cells.
- Add 25 μL OB Protease Solution. Vortex to mix.
- Add 220 μL BL Buffer
- Incubate at 70°C for 10 minutes in the heat block. Vortex the tube once during incubation.
- Add 220 μL 100% ethanol. Vortex to mix thoroughly.
- Insert a HiBind. DNA Mini Column into a 2 mL Collection Tube.
- Transfer the entire sample to the HiBind. DNA Mini Column including any precipitates that may have formed.
- Centrifuge at maximum speed (≥10,000 x g) for 1 minute.
- Discard the filtrate and reuse the collection tube.
- Wash and Dry
- Add 500 μL HBC Buffer to the column.
- Centrifuge at maximum speed for 30 seconds
- After the HBC Buffer wash, discard the filtrate and collection tube.
- Insert the HiBind® DNA Mini Column into a new 2 mL Collection Tube.
- Add 700 μL DNA Wash Buffer.
- Centrifuge at maximum speed for 30 seconds.
- Discard the filtrate and reuse the collection tube.
- Repeat the steps for a second DNA Wash Buffer wash step.
- Centrifuge the empty HiBind® DNA Mini Column at maximum speed for 2 minutes to dry the column.
- Transfer the HiBind® DNA Mini Column into a nuclease-free 1.5 mL microcentrifuge tube.
- Add 100μL Elution Buffer heated to 70°C.
- Let sit at room temperature for 2 minutes.
- Centrifuge at maximum speed for 1 minute.
- Store eluted DNA at -20°C.
Data:
Cells counts: 66, 44, 40, 5, 7
Centrifuging our pellet did not work the first time around.
Conclusion:
This portion of the experiment was performed to extract the DNA. The next step is the PCR protocol. PCR is used to find the RNA primer for reading DNA. This is significant because the primers will help us unravel the DNA so it can be read and analyzed.
Errors: Our group accidentally threw out our filtrate which contained the DNA for this experiment.
Unexpected findings: We had to use 500 μL instead of 1x PBS.
Storage: Our sample is labelled KCLMKL and it is on the rack with the other samples in the lab room.