November 30

SEA Phage Lab Day 30

Day 30: 11/30/16 TEM

Purpose: To see my phage.

Materials: high titer lysate, parafilm, sterile water, tweezers, copper grids, 2% uranyl acetate

Procedure:

  1. I transferred 100 microliters of my lysate into a micro-centrifuge tube.
  2. I stretched out a piece of parafilm.
  3. Then I put 20 microliters of the lysate on the left corner of the parafilm.
  4. Then next to it I put 20 microliters of sterile water.
  5. Next to the water, I put another 10 microliters of sterile water.
  6. Lastly, I put 20 microliters of uranyl acetate on the right corner of the parafilm.
  7. After I set up my work area, I put a small circular copper sheet in the lysate for about 5 minutes so that the phages would attach to the copper sheet.
  8. After 5 minutes, I transferred the copper sheet to the first drop of water for 1 minute.
  9. After 1 minutes, I transferred the copper sheet to the second drop of water for 1 minute.
  10. After 1 minute, I transferred the copper sheet to the uranyl acetate for 30 seconds.
  11. Then I dabbed the copper sheet on a piece of paper to get rid of the excess liquid.
  12. Then Jennifer put my copper sheet into the section of the small rectangular box labelled 1E.
  13. Afterwards, I went to the TEM machine to look for my phage.
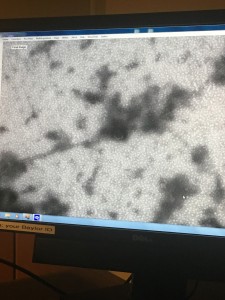
  14. The Dr. Burnd who was looking for the phage said that he could not find anything on my copper sheet except one that looks very weird. So he found two phages on Andrea’s plate and took pictures for me since I adopted her phage.

img_5507

Conclusion: We can’t really tell in this picture where the tail ends and where the head attaches. It looks like there are two tails coming out from the head, which is not an accurate image of a phage. So, we decided that we can’t get a clear image of my phage. Although I adopted Andrea’s phage, I cannot just use Andrea’s pictures because on her plates she had plaques of different sizes so our plaque may not be the same.

Next Step: Run gel.
November 30

11/28/16 Day 34: Restriction Digest (Soil Sample A)

Observations: Since I was able to get a high enough number for the concentration of my DNA from the nanodrop, I will be able to do the restriction digest procedure. Last time I calculated that I will need 5 microliters of my DNA to add to 5 different microcentrifuge tubes, and then I will add the enzymes necessary for each one.

Goals: To use restriction enzymes to cut the DNA at the restriction sites.

Materials:

  • phage DNA (being stored in the freezer)
  • ddH2O (water)
  • restriction enzymes with corresponding buffers
  • 65 degrees C heat block
  • 5 microcentrifuge tubes
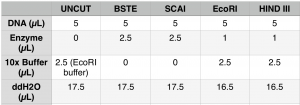
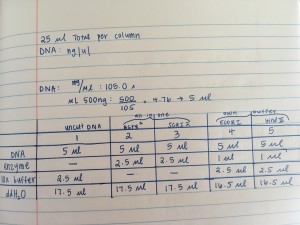
This is the chart I made in order to determine the amount of enzymes I would be using for this procedure. Each column had to add up to 25 microliters, which is how I found the amounts of ddH2O I would be using.

This is the chart I made in order to determine the amount of enzymes I would be using for this procedure. Each column had to add up to 25 microliters, which is how I found the amounts of ddH2O I would be using.

Procedure:

  1. Incubate the DNA at 65 degrees C for 10 minutes
  2. Label 5 microcentrifuge tubes with CMA 1-5
  3. Add 17.5 microliters of ddH2O to tubes 1-3 and 16.5 microliters of ddH2O to tubes 4-5
  4. Add 2.5 microliters of EcoRI buffer to tubes 1 and 4
  5. Add 2.5 microliters of HIND III buffer to tube 5
  6. Add 2.5 microliters of BSTE to tube 2
  7. Add 2.5 microliters of SCAI 2 to tube 3
  8. Add 1 microliter of EcoRI to tube 4
  9. Add 1 microliter of HIND III to time 5
  10. Remove the DNA tube from the incubator, place it on ice, then centrifuge for less than a minute
  11. Pipette 5 microliters of DNA to all 5 tubes
  12. Vortex each tube for a few seconds
  13. Incubate the tubes at 37 degrees C
  14. Remove the tubes two hours later (at 6:00pm) and place in refrigerator for 48 hours

Next Steps: During this lab I was able to digest 0.5 microliters of my phage DNA, which was possible using 5 microliters of my phage DNA. Now that I have completed the restriction digest, I will be be making a gel next class.

November 30

Sessa Bacteriophage Lab: Day 25 (11.14.16) Picking a plaque from 10^-2 plate and performing serial dilution

Goals:

  • I will pick a plaque from the 10^-2 plate and perform another dilution

Results from Previous Day:

  • The plates were still grainy but there were clear lyse spots on the 10^-2 plate!
    • Interestingly, the 10^-2 plate showed much clearer than the 10^-1 and 10^0 plate. Since these plates are more concentrated, one would think they would have the clearest spots.
img_3832

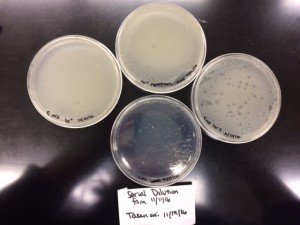
These are my 10^0, 10^-1, and 10^-2 plates and control from 11/11. The 10^-2 showed the most clear spots.

img_3833

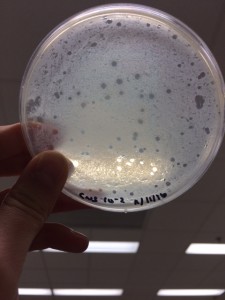
This is a close-up picture of the 10^-2 plate


img_3834

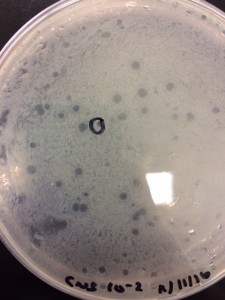
I will pick the spot outlined in black marker


Materials/Procedures

  • Microcentrifuge tubes
  • Micropipettes
  • Phage Buffer
  • Vortex
  • Four plates
  • 8 mL 2xTA
  • 6 mL PY broth
  • 40 μL Dextrose
  • 52 μL CaCl2
  1. Fill 3 microcentrifuge tubes (labeled 10^0, 10^-1, 10^-2) with phage buffer
    1. Put 100 μL of phage buffer in 10^0
    2. Put 90 μL of phage buffer in 10^-1
    3. Put 90 μL of phage buffer in 10^-2
  2. Pick plaque from 10^-2 plate
    1. Take a micropipette and touch the tip to the lysed spot
    2. Put the tip in the 10^0 tube and pipette up and down multiple times to release the plaque
  3. Vortex 10^0 tube to sufficiently mix the phage and the phage buffer
  4. Take 10 μL from 10^0 and transfer it to the 10^-1 tube
  5. Vortex 10^-1 tube to sufficiently mix the phage and phage buffer
  6. Take 10 μL from 10^-1 and transfer it to the 10^-2 tube
  7. Vortex 10^-2 tube to sufficiently mix the phage and phage buffer
  8. Put 50 μL from each microcentrifuge tube into separate vials of 0.5 mL arthro
    1. Let these tubes sit for 15 minutes, occasionally swirling them
  9. Make TA solution and label 4 plates while waiting for arthro and phage to sit
    1. TA Solution (for 4 plates):
      1. 8 mL 2x TA
      2. 6 mL PY Broth
      3. 40 μL dextrose
      4. 52 μL CaCl2
    2. Label three plates with microcentrifuge label (10^0, 10^-1, 10^-2) and date; label one plate as the control with the date
  10. Once the arthro and phage have set for 15 minutes, use a pipette to put 3.5 mL of the prepared TA solution into each vial
    1. To conserve pipettes, use a 10 mL pipette and fill it with 10.5 mL (enough for all three vials)
  11. Quickly pour each vial into its correctly labeled plate after putting the TA solution in the vial
  12. Store the plates in the incubator once the agar has settled


Anticipation:

I will continue trying to isolate a phage until I can calculate a high titer and proceed to DNA extraction of my phage.

Note- The arthro was lighter in color and did not look as concentrated as it usually does

I do not know why the 10^-2 plate had the clearest results. It’s possible I mislabeled the plates however this also happened to another student so there may be an explanation for these unexpected results.

November 30

Sessa Bacteriophage Lab: Day 24 (11.12.16) Picking a plaque from CMA 10^0 plate from 10/19 and performing serial dilution

Goals:

  • I will pick a plaque from CMA’s plate from 10/19 and perform a serial dilution

Results from Previous Day:

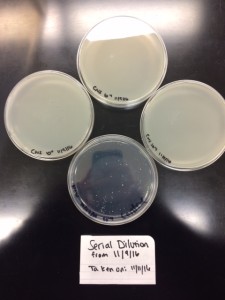
  • The dilution did not show any lyse spots
  • The control showed many contamination spots
  • Since I have not had success with a plaque from HSM’s plate, I will adopt another phage and pick a plaque from CMA’s plate
img_3814

These are my 10^0, 10^-1, and 10^-2 plates from 11/9. None of the diluted plates showed plaques. The control plate shows contamination spots.

img_3815

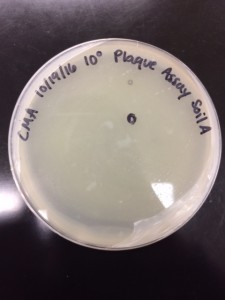
I picked the spot from CMA’s plate outlined in the marker

Materials/Procedures

  • Microcentrifuge tubes
  • Micropipettes
  • Phage Buffer
  • Vortex
  • Four plates
  • 8 mL 2xTA
  • 6 mL PY broth
  • 40 μL Dextrose
  • 52 μL CaCl2
  1. Fill 3 microcentrifuge tubes (labeled 10^0, 10^-1, 10^-2) with phage buffer
    1. Put 100 μL of phage buffer in 10^0
    2. Put 90 μL of phage buffer in 10^-1
    3. Put 90 μL of phage buffer in 10^-2
  2. Pick plaque from CMA plate
    1. Take a micropipette and touch the tip to the lysed spot
    2. Put the tip in the 10^0 tube and pipette up and down multiple times to release the plaque
  3. Vortex 10^0 tube to sufficiently mix the phage and the phage buffer
  4. Take 10 μL from 10^0 and transfer it to the 10^-1 tube
  5. Vortex 10^-1 tube to sufficiently mix the phage and phage buffer
  6. Take 10 μL from 10^-1 and transfer it to the 10^-2 tube
  7. Vortex 10^-2 tube to sufficiently mix the phage and phage buffer
  8. Put 50 μL from each microcentrifuge tube into separate vials of 0.5 mL arthro
    1. Let these tubes sit for 15 minutes, occasionally swirling them
  9. Make TA solution and label 4 plates while waiting for arthro and phage to sit
    1. TA Solution (for 4 plates):
      1. 8 mL 2x TA
      2. 6 mL PY Broth
      3. 40 μL dextrose
      4. 52 μL CaCl2
    2. Label three plates with microcentrifuge label (10^0, 10^-1, 10^-2) and date; label one plate as the control with the date
  10. Once the arthro and phage have set for 15 minutes, use a pipette to put 3.5 mL of the prepared TA solution into each vial
    1. To conserve pipettes, use a 10 mL pipette and fill it with 10.5 mL (enough for all three vials)
  11. Quickly pour each vial into its correctly labeled plate after putting the TA solution in the vial
  12. Store the plates in the incubator once the agar has settled

Anticipation:

Hopefully I will have success with CMA’s plaque. It’s possible that HSM’s plate did not work because it was older and the plaques were no longer fresh and viable.

Notes: The agar was grainy after I poured it. I may have left it out too long before pouring the plates, resulting in the grainy looking texture.

November 30

Sessa Bacteriophage Lab: Day 23 (11.9.16) Picking a plaque from spot test and performing serial dilution

Goals:

  • I will pick from one of the small spots from the spot test and perform a serial dilution to hopefully isolate the phage

Results from Previous Day:

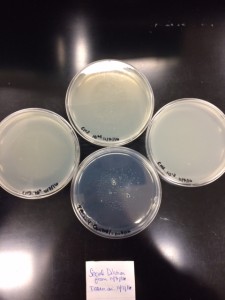
  • Although the top agar was much clearer than the plates from 11/7, these dilutions did not show lyse spots either
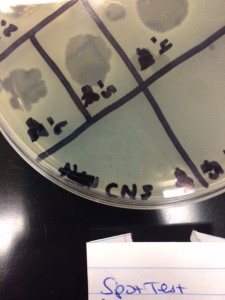
  • The spot test showed very small spots that may be lyse spots.
    img_3800

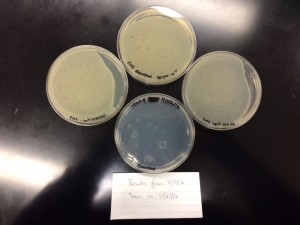
    These are the 10^0, 10^-1, 10^-2 dilutions from 11/7 and the control. None of the dilutions showed any lyse spots.

    img_3804

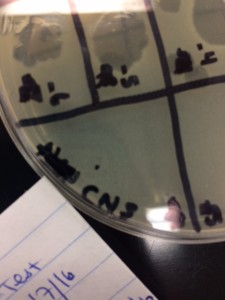
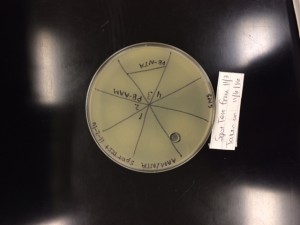
    Spot test from 11/7. There are extremely small (possibly) lyse spots in the section labeled “CNS”

    img_3805

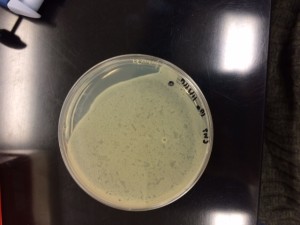
    I will pick the spot outlined in black marker

Materials/Procedures

  • Microcentrifuge tubes
  • Micropipettes
  • Phage Buffer
  • Vortex
  • Four plates
  • 18 mL 2xTA
  • 13.5 mL PY broth
  • 90 μL Dextrose
  • 162 μL CaCl2
  1. Fill 3 microcentrifuge tubes (labeled 10^0, 10^-1, 10^-2) with phage buffer
    1. Put 100 μL of phage buffer in 10^0
    2. Put 90 μL of phage buffer in 10^-1
    3. Put 90 μL of phage buffer in 10^-2
  2. Pick plaque from spot test
    1. Take a micropipette and touch the tip to the lysed spot
    2. Put the tip in the 10^0 tube and pipette up and down multiple times to release the plaque
  3. Vortex 10^0 tube to sufficiently mix the phage and the phage buffer
  4. Take 10 μL from 10^0 and transfer it to the 10^-1 tube
  5. Vortex 10^-1 tube to sufficiently mix the phage and phage buffer
  6. Take 10 μL from 10^-1 and transfer it to the 10^-2 tube
  7. Vortex 10^-2 tube to sufficiently mix the phage and phage buffer
  8. Put 50 μL from each microcentrifuge tube into separate vials of 0.5 mL arthro
    1. Let these tubes sit for 15 minutes, occasionally swirling them
  9. Make TA solution and label 4 plates while waiting for arthro and phage to sit
    1. TA Solution (for 9 plates):
      1. 18 mL 2x TA
      2. 13.5 mL PY Broth
      3. 90 μL dextrose
      4. 162 μL CaCl2
    2. Label three plates with microcentrifuge label (10^0, 10^-1, 10^-2) and date; label one plate as the control with the date
    3. The remaining five plates were shared with other students at my bench
  10. Once the arthro and phage have set for 15 minutes, use a pipette to put 3.5 mL of the prepared TA solution into each vial
    1. To conserve pipettes, use a 10 mL pipette and fill it with 10.5 mL (enough for all three vials)
  11. Quickly pour each vial into its correctly labeled plate after putting the TA solution in the vial
  12. Store the plates in the incubator once the agar has settled


Anticipation:

Each dilution will show a progression in lyse spots. The 10^0 will be the most concentrated solution of phage while 10^-2 will be the least concentrated. From these plates, I will pick another plaque and try to further isolate a phage.

The spot I picked was extremely small and difficult to pick. Hopefully it was truly a lyse spot and I was able to successfully pick it.

November 30

Sessa Bacteriophage Lab: Day 22 (11.7.16) Picking a plaque from 10^0 plate and performing serial dilution and spot test

Goals:

  • I will pick from one of the small spots on the 10^0 plate and perform another serial dilution to try to isolate a phage
  • I will also perform a spot test with 10 μL of my 10^0

Results from Previous Day:

  • The Top Agar did not completely cover the plates and appeared to have spots from improper pipetting/agitated agar
  • There were some very small (but possibly viable) spots on the edge of the 10^0 plate
  • There were no lyse spots on the spot test


img_3788

These are the 10^0, 10^-1, and 10^-2 plates and control that were made on 11/2. The agar did not fully cover the plate and had many bubbles.

img_3790

This is the spot test from 11/2. The section labeled “CNS” contains my 10 μL of my 10^0 spot however there does not appear to be any lyse spots.

img_3791

I picked the circled lyse spot from this plate and performed a serial dilution .


Materials/Procedures

  • Microcentrifuge tubes
  • Micropipettes
  • Phage Buffer
  • Vortex
  • Four plates
  • 20 mL 2xTA
  • 15 mL PY broth
  • 100 μL Dextrose
  • 180 μL CaCl2
  1. Fill 3 microcentrifuge tubes (labeled 10^0, 10^-1, 10^-2) with phage buffer
    1. Put 100 μL of phage buffer in 10^0
    2. Put 90 μL of phage buffer in 10^-1
    3. Put 90 μL of phage buffer in 10^-2
  2. Pick plaque from 10^0 plate
    1. Take a micropipette and touch the tip to the lysed spot
    2. Put the tip in the 10^0 tube and pipette up and down multiple times to release the plaque
  3. Vortex 10^0 tube to sufficiently mix the phage and the phage buffer
  4. Take 10 μL from 10^0 and transfer it to the 10^-1 tube
  5. Vortex 10^-1 tube to sufficiently mix the phage and phage buffer
  6. Take 10 μL from 10^-1 and transfer it to the 10^-2 tube
  7. Vortex 10^-2 tube to sufficiently mix the phage and phage buffer
  8. Put 50 μL from each microcentrifuge tube into separate vials of 0.5 mL arthro
    1. Let these tubes sit for 15 minutes, occasionally swirling them
  9. Make TA solution and label 4 plates while waiting for arthro and phage to sit
    1. TA Solution (for 10 plates):
      1. 20 mL 2x TA
      2. 15 mL PY Broth
      3. 100 μL dextrose
      4. 180 μL CaCl2
    2. Label three plates with microcentrifuge label (10^0, 10^-1, 10^-2) and date; label one plate as the control with the date
    3. The remaining six plates were shared with other students at my bench
  10. Once the arthro and phage have set for 15 minutes, use a pipette to put 3.5 mL of the prepared TA solution into each vial
    1. To conserve pipettes, use a 10 mL pipette and fill it with 10.5 mL (enough for all three vials)
  11. Quickly pour each vial into its correctly labeled plate after putting the TA solution in the vial
  12. Store the plates in the incubator once the agar has settled

Spot Test

  1. Shared a plate with NCW
  2. I spotted 10 μL of my 10^0

Anticipation:

Each dilution will show a progression in lyse spots. The 10^0 will be the most concentrated solution of phage while 10^-2 will be the least concentrated. From these plates, I will pick another plaque and try to further isolate a phage.

Hopefully the spot I picked was truly a lyse spot. Although it looked like a lyse spot, there were not many other spots on the plate and it is questionable whether it is truly a lyse spot or just another agar problem. If it is not a lyse spot and is an agar problem, none of my plates will show lysing.

November 30

NW 11/07/2016 – Serial Dilution Spot Test

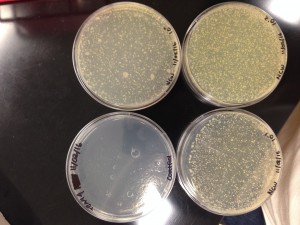
Results – Great results! No contamination in the control and all three plates were webbed. Although, it turns out this was not the experiment I need to perform, and this experiment does nothing for me… oops. The experiment I needed to be doing was a spot test to determine the titer of my lysate. I’m not sure how I got so off track but today I’ll start moving in the correct direction.

img_6069

Goal – Perform a serial dilution spot test out to 10^-8 to determine the titer of my lysate

Materials – 2xTA (group 4), PY Broth (group 4), Dextrose, CaCl2, lysate, Phage buffer, artho

Procedure: 

  1. For serial dilution: put 90 microliters of phage buffer into each of 9 micro centrifuge tubes
  2. Pipette 10 microliters of lysate into the 10^0 tube and vortex
  3. Pipette 10 microliters of the 10^0 solution into the 10^-1 solution and vortex (repeat this step, continuing the serial dilution out to 10^-8)
  4. Make top agar solution for 10 plates (my group made one top agar solution for all of us) containing: 20 mL 2xTA, 15 mL PY, 100 microliters Dextrose, and 180 microliters CaCl2
  5. Pour 3.5 mL TA solution into .5 mL arthro and pour onto plate, let solidify
  6. Pour 4 mL of TA solution without arthro onto the control plate
  7. Spot 10 microliters of each diluted solution onto the plate in each designated square
  8. Incubate but do not invert

Summary – I feel good now that I’m back on track to where I should be. I’m hoping to be able to calculate my medium titer from these results so that I can move forward in making 5 webbed plates with the goal of getting a high titer

November 29

Lab Notebook: 11/28 Gel Electrophoresis

Name: Roshni Jaffery

Date: 11/28/16

Lab: Bacteriophage Lab – Day 27

Results: I used restriction enzymes in my last lab.

Goal: To perform gel electrophoresis on my phage DNA.

Materials:

  • 0.36 g agarose
  • 1x phage buffer
  • 50 mL beaker
  • 1.5 µL ethidium bromide
  • gel apparatus
  • gel box
  • restriction enzyme micro centrifuge tubes from last lab
  • pipette

Procedure:

  1. Microwave the agarose and phage buffer in the beaker until it boils and the solution is clear.
  2. Add the ethidium bromide and stir.
  3. Let it cool so that it is warm to the touch but not hot enough to burn
  4. Pour into gel plate/apparatus.
  5. Put gel comb in gel plate, let the gel harden and remove the gel comb.
  6. Place gel apparatus in gel box so that the gel wells created by the gel comb is near the negative charge (black electrode).
  7. Fill gel box with phage buffer (until the phage buffer fills over the gel plate but less than the max line).
  8. Add 5 µL of DNA Loading Buffer to the uncut, EcoR1, and HindIII micro centrifuge tubes.
  9. Fill the wells using a pipette in the following order and volumes in the table below.
  10. Plug electrodes appropriately. Turn on power supply. Set voltage to 100 V for 1 hour. (we initially put it at 120 V but it started making curves so we changed it about midway to 100 V to correct it).
  11. Turn off the power supply.
  12. Photograph the gel using electrophoresis chamber.
Well 1 5 µl DNA Ladder
Well 2 10 µl Uncut
Well 3
Well 4 10 µl BstE
Well 5 10 µl Scal
Well 6 10 µl EcoR1
Well 7 10 µl HindIII
Well 8 5 µl DNA Ladder

roshni-jaffery

Labels: RTJ 11/28 @(wherever Dr. Adair stored our gels for us this day)

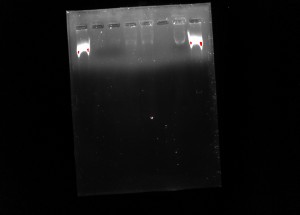
Observations: Our gel apparatus was made of agarose with water instead of TBE buffer which can cause the gel to melt and denature our DNA because it would get too hot when exposed to a charge since it conducts electricity well.

Next Steps: I will redo the gel electrophoresis experiment to get better results.

November 29

Lab Notebook: 11/21 Restriction Enzyme Digests

Name: Roshni Jaffery

Date: 11/21/16

Lab: Bacteriophage Lab – Day 26

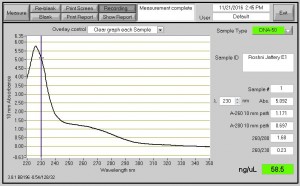
Results: I extracted my phage’s DNA in my last lab and we measured my nano drop which was 58.5 ng/µl.

roshni-jaffery-e1

Goal: To cut DNA into fragments based on the DNA’s sequence.

Materials:

  • Phage DNA
  • Restriction Enzymes with buffers
  • microcentrifuge tubes
  • water bath/ incubator
  • heat block

Procedure:

  1. Flick the DNA sample to prepare it.
  2. Incubate the DNA at 65 degrees Celsius for 10 minutes and quickly place it on ice.
  3. Micro centrifuge for less than a minute.
  4. Set up reaction in each of the micro centrifuge tubes as shown in the table below.
  5. Micro centrifuge each tube for less than a minute.
  6. Incubate all the micro centrifuge tubes at 37 degrees Celsius for an hour.
  7. Store in the freezer.
Centrifuge 1 Centrifuge 2 Centrifuge 3 Centrifuge 4 Centrifuge 5
(NOTE: units in µl) Uncut BstE Scal EcoR1 HindIII
DNA 9 9 9 9 9
Enzyme 0 2.5 2.5 1 1
10x EcoR1 Buffer 2.5 2.5 2.5
Water 13.5 13.5 13.5 12.5 12.5

Labels: Uncut or enzyme used, RJ, 11/21 @ freezer

Next Steps: Perform a gel electrophoresis.

November 29

SEA Phage Lab Day 29

Day 29: 11/28/16 DNA Restriction Digest

Materials: 4 different enzymes, buffers, ddH2O, DNA, micro-centrifuge tubes, pipettes

Purpose: To cut my phage’s genome into a lot of pieces based on its DNA’s sequence.

Procedure:

  1. We first calculated how much DNA, enzyme, water, and buffer we needed to put in each tube.

img_5498

2. I labelled 5 micro-centrifuge tubes with my table and the numbers 1-5.

3.  First, I added the correct amounts of ddH2O in each of the micro-centrifuge tubes.

4. Then, I retrieved my DNA and put it in the incubator for 10 minutes at 37 degrees celsius.

5. While I was waiting for 10 minutes, I added the 10x buffer in tubes 1, 4, and 5.

6. After 10 minutes, I centrifuged the DNA for about 30 seconds.

7. Then, I added 5 micro-liters of the DNA is each of the five tubes.

8. Then, I put the DNA tube back in the ice.

9. Afterwards, I added the BSTE1 enzyme in tube 2, the SCaI2 enzyme in tube 3, the ECORI enzyme in tube 4, and the Hind III enzyme in tube 5.

10. I stored my micro-centrifuge tubes in the incubator at 3:52 pm.

11. Dr. Adair took out my micro-centrifuge tubes from the incubator at 6 pm, and she put them in the bottom drawer of the fridge.

Next Step: Run the gel.