https://baylor.app.box.com/folder/95486318690
Category: Blog Posts
Posts for the “student developer blog”
Area 51 Simulator
Ever wondered what would have happened if the Area 51 raid on September 20th actually happened? Well, now you don’t have to be curious anymore! We would like to introduce to you: The Area 51 Simulator!

In this game, you play as a guard attempting to stop the raid and protect the secrets of Area 51.
Controls:
A moves left
D moves right
W jumps
Point and click to fire your taser
Press enter to change trials
Psst… Press Q to activate your ultimate ability!
This game was made by Sam Holden, Isaiah Clayborn, and Legacy McDowell.
Game Maker Game 1 – Space Hook

Description:
Space Hook is a side-scrolling shooter set in space where you maneuver around with a grappling hook. Using that grappling hook, you need to eliminate all of the monsters in each level, and then the boss in the final level to win.
Controls:
Left Click: Shoot Grappler
Scroll Wheel Down: Move forward when grappling
Team Members:
Trae, Alicia, and Cole
Download Link
Seth Dziuk
 {Seth Dziuk}
[How did you get here?]
Career Goals: Screenwriter
Experience: Limited, as I used Game Maker 1 about a decade ago, but also have used RPG Maker. I have limited use hacking basic PC games, and modding other games.
Games Created
| Waffles 2 |
| Project Arcturus |
Favorite Games [Mother 3, Kirby Super Star Ultra/Kirby Nightmare in Dreamland, Pokémon Heart Gold/Soul Silver/DPP, Mario and Luigi Bowser’s Inside Story(original), The Coin Game, Super Smash Bros., and many more.] Classes Taken
- CSI 1337
- Game Pitch: https://baylor.app.box.com/file/521177878426
- Game 2: https://baylor.app.box.com/folder/95486318690
Isaiah Clayborn (2023)

{Isaiah Clayborn}
[Short Description]
Career Goals
I want to be a professional game designer.
Experience
Favorite Games
[Overwatch, Apex Legends, NBA2k,]
Classes Taken
STRAKH Game Pitch
Here is a hypothetical game pitch I put together with my classmate, Josh Godwin.
Griffin DeClaire and Josh McKone: DD&D Gaming Pitch
The video file size is too large to upload so here is the box link to the video
https://baylor.app.box.com/file/521051812907
Griffin DeClaire (2020)
 Griffin DeClaire
Griffin DeClaire is a Baylor Theatre Performance Major with Minors in English and Entrepreneurship. He has been playing games since he was a kid and has alwasy ahd a passion for design. He has decided to go into graduate school for game design to work as a level designer/writer for video games.
Career Goals
- Go to SMU for Graduate Game Design
- Work at a video game company as a Level Designer
- Create a wholly single player narrative game
- Work as a story writer on a video game
- Speak at GDC
Experience
| Dungeons and Dragons Dungeon Master (8 Years) | ||
Games Created
| DD&D Pitch Video: https://baylor.app.box.com/file/521051812907 |
| Wizard Wrangler: https://baylor.app.box.com/file/534238264623 |
| Bank Buster: https://baylor.app.box.com/file/571198543566 |
Favorite Games
- Hollow Knight
- Alan Wake
- The Souls Series
- Witcher 3
- Banner Saga
- Divinity: Original Sin 2
- The Stanley Parable
- Darkest Dungeon
Classes Taken
Trae Stevens, 2023, Game Pitch Video
Alicia Maddox (2020)
Alicia Maddox
I am a Film and Digital Media major, graduating hopefully next year. I’m a Texas and Waco native.
Career Goals
I hope to take my experiences in many different directions. Right now, I’m not sure what to do, but I would like to work in screen writing, editing, acting, and video game production.
Experience
| Little to no professional video game experience outside of an indie game company I am involved in. | ||
| I have created my own short film student projects and and edited my own short FMVs on YouTube. | ||
Games Created
| Working on a game with Rumrunner Entertainment called O’Ink. I am one of the scenario writers and gameplay testers. |
Favorite Games
Kingdom Hearts
Final Fantasy
The Last of Us
Uncharted
Journey
Flower
Classes Taken
Video game related classes
RAGE: Really Awesome Game Engine
REALLY AWESOME GAME ENGINE
Welcome to the webpage for RAGE, the Really Awesome Game Engine.
YOUR FIRST GAME
Let’s make a game using the Really Awesome Game Engine!
CREATING THE PLAYER
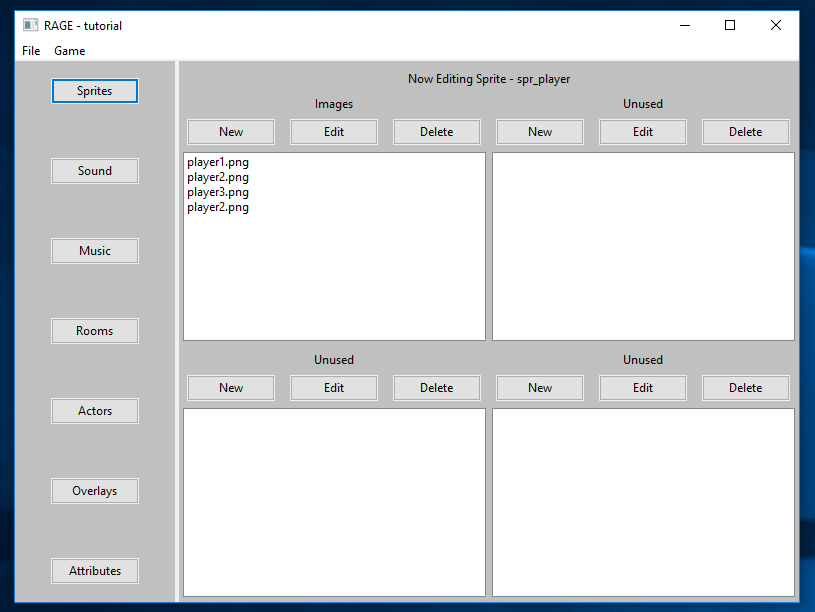
Let’s begin by creating a sprite for the main character. Open the Sprites editor by clicking on the “Sprites” button in the left menu and click “New” to create a new sprite. Name it spr_player and click “Ok”.
In the attribute editor, you will upload the various sprite images for your character. At the top of the editor, it should say “Now Editing Sprite – spr_player”. If not, open the Sprites menu again and click on the player sprite in the menu.
Click “New” in the top left box of the attribute editor to upload your sprite images. Navigate to the tutorial resources directory in your file system, open the sprites directory, and select the image named player1.png. This will upload this image as your first sprite animation frame.
By uploading multiple sprite images, you can create a detailed movement animation for your game actors. The number and order of the images is completely customizable.
Repeat the image uploading process for the images player2.png, player3.png, and player2.png again (for a smooth animation).
Great! We now have a player sprite! Now we need to make an actor that will use that sprite and actually have some in-game abilities.
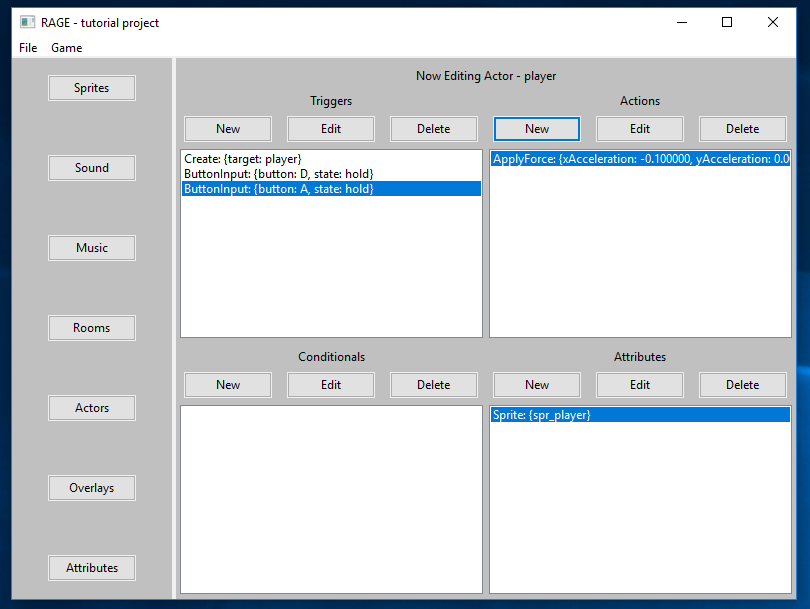
Open the Actors editor by clicking on the “Actors” button in the left menu. Create a new actor and name it player. The attribute editor should now say “Now Editing Actor – player” at the top; if it does not, open the Actors editor again and select the player actor.
We need to link the player sprite to its actor. Your actor will already have an existing attribute named Sprite. Attributes for the player can be added in the bottom right window of the attribute editor, under the “Attributes” header. Select this attribute and click “Edit”; this will you give you a list of all available sprites in your project that you have created. Select the sprite for your player, spr_player, and click “OK”.

The last thing we need to do to fully create the player is make a new Create trigger. A trigger is an event that can occur within the game. Click “New” in the top left window of the attribute editor, select Create from the list, and set the target as player. We need to associate a timer with the player, so in the Actions window in the top right of the attribute editor, click “New”, select Set Timer, enter 0 for the index, and 0.100000 for the time.


Let’s allow the player to register keyboard input by creating a new trigger. Create a new ButtonInput trigger. Choose button “D” corresponding to the D key on the keyboard, and set the state to Hold. Select the trigger you just created, and in the Actions window, create a new Apply Force action and set xAcceleration to 0.100000 and yAcceleration to 0.000000.


Now you try! Create another button input using A that applies the same force as the input we just created, but in the opposite horizontal direction (xAcceleration = -0.100000).
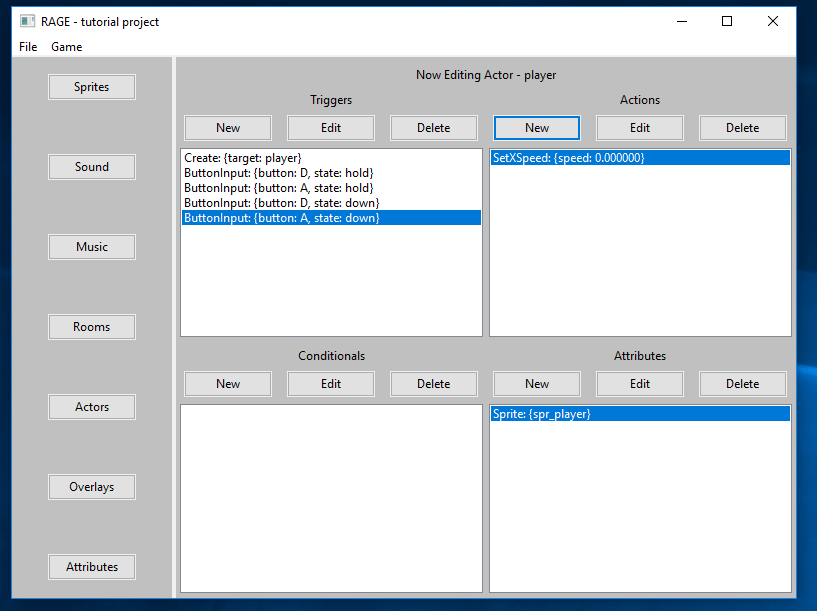
Next we’ll create a couple of triggers to stop the horizontal movement of the player. Create two new ButtonInput triggers using D and A and set their states to Press. For both triggers, create a Set X Speed action with a value of 0.000000.
Before we create an input that will allow the player to jump, we need to create a couple new attributes.
Create a new attribute and name it touchingGround. It will be created with a default value of 0, so we do not need to change it. Also create an attribute named jumpsLeft, setting its default value to 1 by editing it in the Attributes window.

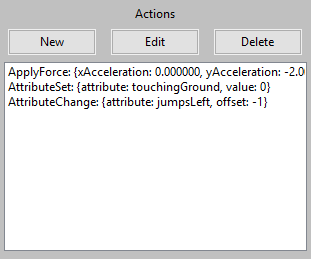
Now that we have those attributes set, we can create a trigger to allow the player to jump when W is pressed. Use the attribute editor to create a new ButtonInput trigger with three actions: an Apply Force action with xAcceleration set to 0.000000 and yAcceleration set to -2.000000; a Set Attribute action using the touchingGround action and a value of 0; and a Change Attribute action on jumpsLeft and an offset value of -1.
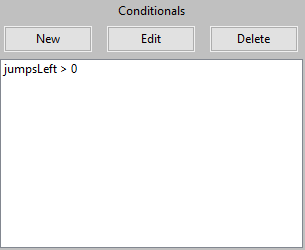
We also need to create a condition for this trigger. Conditionals can be set in the “Conditionals” window in the bottom left of the attribute editor, and can be used for values that should be checked for certain triggers and actions. Create a new conditional for each of the three jump actions using the jumpsLeft attribute, use a greater-than (>) comparison, and set the comparison value to 0.
Great! We now have a player character with basic input handling.
CREATING A START ROOM
We need to create a room for our game to actually be played in. Where else would we put all of the game elements?
Create a new sprite name spr_background and give it the background.png resource image from the tutorial_resources/sprites directory.
Next, create a new actor named background. Assign the background sprite that you just created to it’s Sprite attribute. Then, create two triggers: a Create trigger and a Step trigger. For the Create trigger, create a Collidable action and set it’s value to False. For the Step trigger, create two actions: a Move To Nearest actions with the actor type set to player, and a Move action with X set to -200.000000 and Y set to -1500.000000.

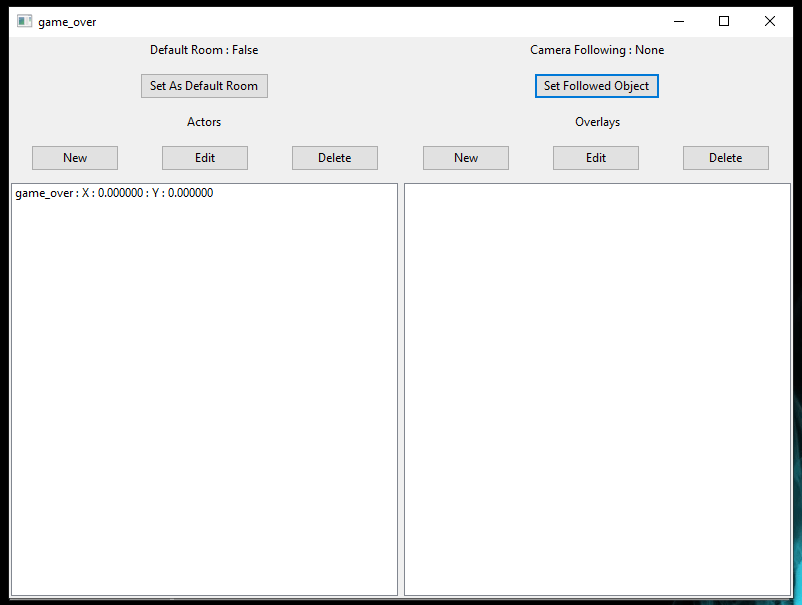
Open the room control editor by clicking the “Rooms” button in the left menu and create a new room named start_room.
Set this room as the default room by clicking the “Set As Default Room” button in the room editor. This will make that room the first room that is shown when your game is launched. If successful, the text above the button will say “Default Room: True”.

We also want the in-game camera to follow the player, so click the “Set Followed Object” object button and select the player object.

Add the player to the room by clicking the “New” button on the left-side Actors window of the room editor, select the player actor, and set its position to X = 200.000000 and Y = 200.000000.
Next, add the background to the room at position X = 0.000000 and Y = 0.000000.

CREATING A WALL
We need to create something for the player to stand on. Create a new sprite called spr_brick and upload the img_brick.png resource as an image. Then create a new actor called wall, and set the sprite you just created to the actor’s Sprite attribute.
Add a new Create trigger for the wall. Here we need to define some actions for how the wall is created. Add a Set X Scale action with a value of 10.000000, and a Set Y Scale action with a value of 5.000000. Finally, we want this wall to not obey the laws of gravity, since floating platforms are cool. To do this, add a Uses Gravity action with a value of False.

In the start_room, add the wall actor at position X = 200.000000 and Y = 400.000000.
We want to change some of the player’s attributes if they touch the ground, and maybe also play a sound whenever they land. Let’s begin by creating the sound. In the sound editor, create a new sound named sound, and select the demoSound.wav file in the tutorial_resources/sounds directory.
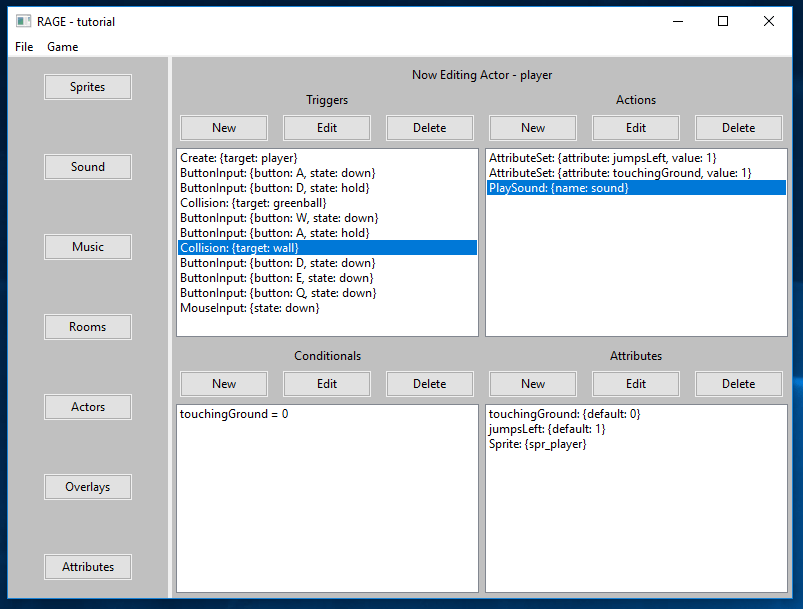
In the player actor, create a new Collision trigger with the actor type set to wall. With that trigger selected, create three new actions: a Set Attribute action with the attribute to change set to jumpsLeft and the value set to 1; another Set Attribute action with the attribute to change set to touchingGround and the value set to 1; and a Play Sound action with the sound sound that you just created.
For the PlaySound action on this trigger, create a new conditional on attribute touchingGround using an equals (==) comparison and a value of 0.
CREATING AN ENEMY
Let’s create an enemy. We’ll create one that simply follows the player and fires balls straight at it.
Create a new sprite name spr_straight_enemy and upload the images straight_enemy1.png, straight_enemy2.png, straight_enemy3.png, and straight_enemy2.png. This will be our enemy.

Create another sprite named spr_greenball and upload the image greenball.png. This will be the enemy’s weapon.

Create actors for both the enemy and the ball, naming them straight_enemy and greenball, respectively. Set the respective sprite in the Sprite attribute of each actor.
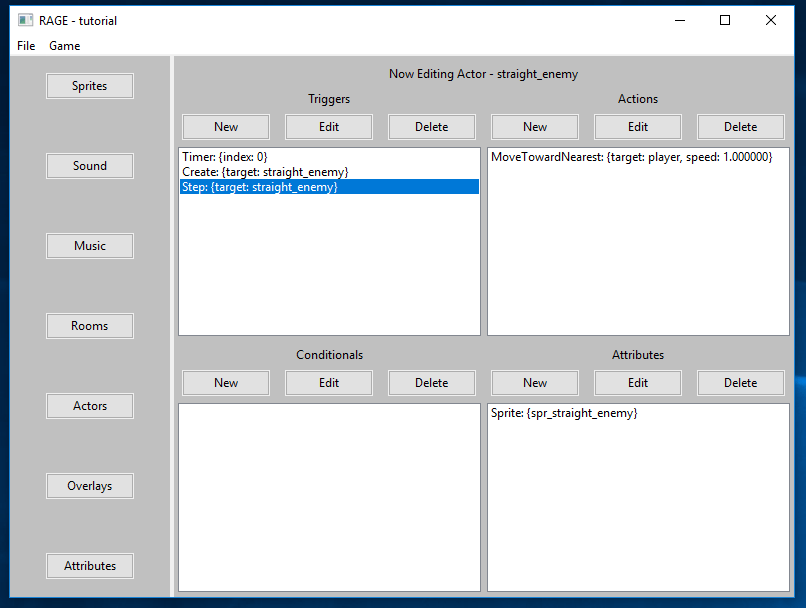
In the straight_enemy actor, create a Create trigger. Then make the following actions: a Set Timer action with index of 0 and time of 5.00000; a Uses Gravity action with value of False; a Set Animation Speed action with value 0.100000; and a Set Max X Speed action with a value of 0.000000.

Next, create a Step trigger with a Move Toward Nearest action, setting the target actor to the player actor and the speed to 1.000000.
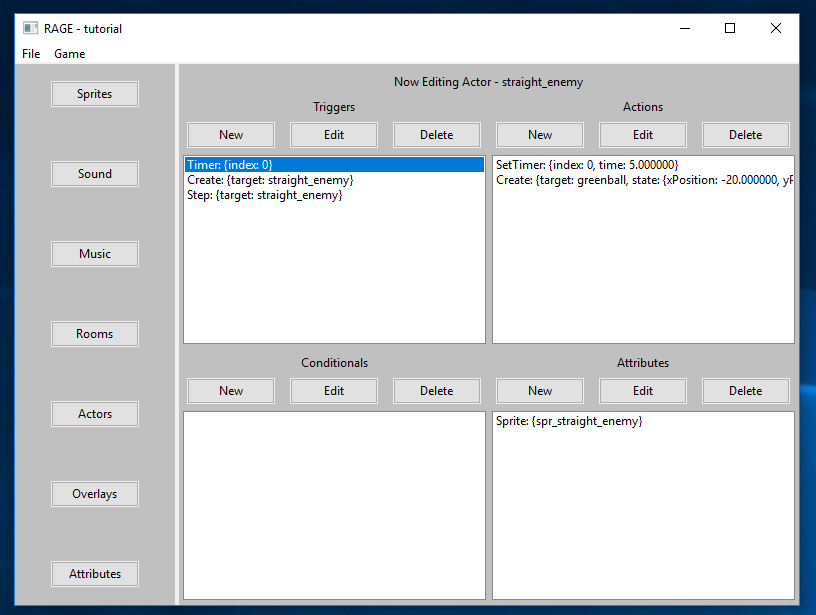
Next, create a Timer trigger with an index of 0. Create a Set Timer action with an index of 0 and a time of 5.000000. Then create a Create action using the greenball actor and an xPosition = -20.000000 and yPosition = 0.000000.
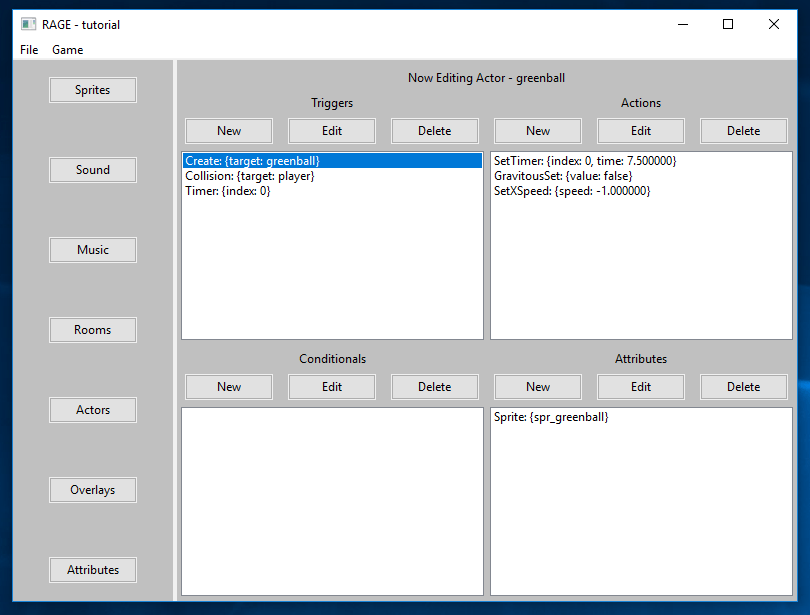
We now have all of the triggers for the enemy set, so now we will make the triggers for the enemy’s weapon. Select the greenball actor from the actor editor, and create the Create trigger. Create the following actions for this trigger: a Set Timer action with index 0 and time 7.500000; a Uses Gravity action with value False; and a Set X Speed action with speed -1.000000.
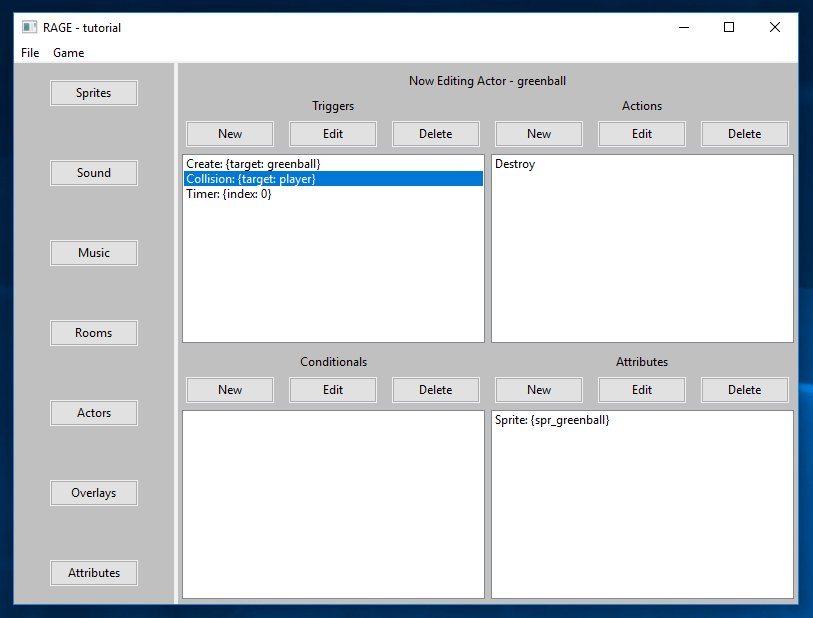
Create a Collision trigger targeting the player actor. When the ball collides with the player, we want it to destroy itself, so create a Destroy action for this trigger. Finally, make a Timer trigger with an index of 0, and add a Destroy action to it.
Now that we have the enemy set up, we can add it into the game. Open the start_room and add the straight_enemy actor at position X = 450.000000 and Y = 0.000000.
TRACKING PLAYER HEALTH
Our game feels like it’s missing something, doesn’t it? Oh that’s right, we don’t have any player stats, or a way to view them in game! Let’s fix that.
Let’s create a heads-up display, or HUD, for our game. This will allow you to display attributes such as the score or player’s lives on the screen. The HUD will be created as an Overlay in our engine, and the elements of the HUD will therefore not act like solid objects nor interfere with the gameplay.
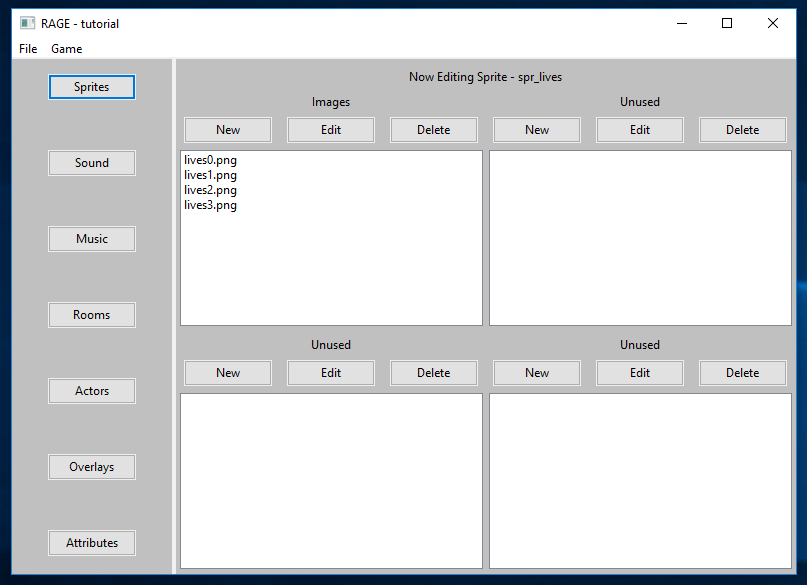
One element of our head will display that player’s remaining health/lives, and will be represented with hearts in the top left of the game window. Create a new sprite named spr_lives and upload the images lives0.png, lives1.png, lives2.png, and lives3.png.
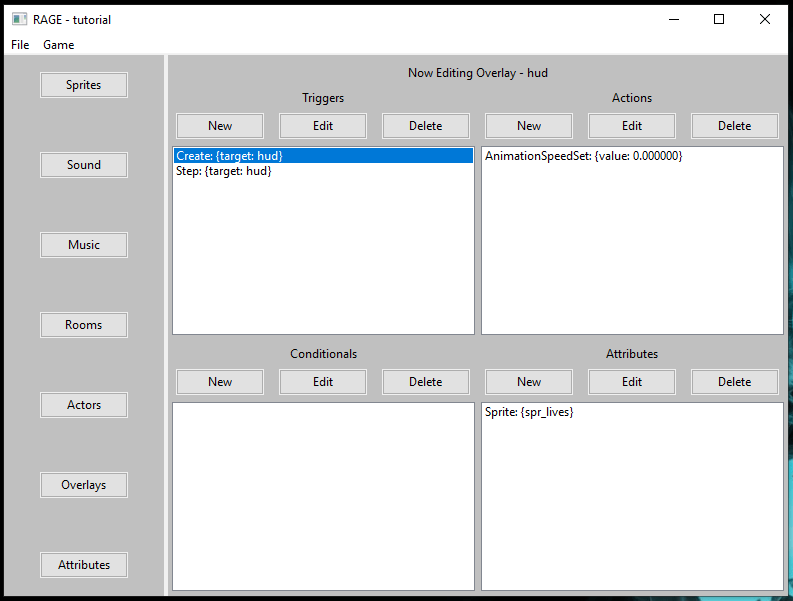
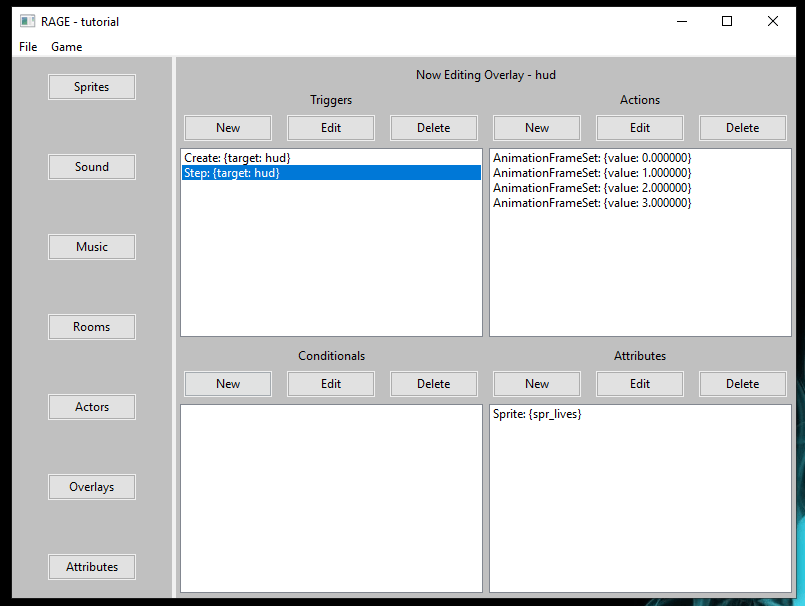
Create a new overlay in the overlay editor and name it hud. Set it’s sprite to spr_lives, and then create a Create trigger. For the Create trigger, create a Set Animation Speed action with a speed value of 0.000000. Next, create a Step trigger with four Set Animation Frame actions, and set the frame values to 0, 1, 2, and 3, respectively.
Each of the actions we just created will have conditionals based on the number of lives the player has remaining. However, we do not have anything in the game that denotes the number of lives the player has. We will do this by creating a global attribute. By creating a global attribute, every object in the game will have access to the attribute value instead of just the actor that the attribute is a member of.
To create a global attribute, click on the “Attributes” button in the left side menu. This will switch the attribute editor to the Attributes attribute editor. In the Attributes window in the bottom right of the attribute editor, add a new attribute named lives and set its default value to 3.

Reopen the hud overlay in the attribute editor and select the Step trigger. For the AnimationFrameSet action with value 0, add the conditional lives <= 0. You also need to add the conditional
We need to implement triggers in the player that will actually change the number of lives the player has. Open the player actor and create a new Collision trigger with the greenball actor as the target. Create a Change Attribute action targeting the lives attribute and an offset value of -1. This will decrease the number of lives the player has by 1 every time it is hit by a ball.

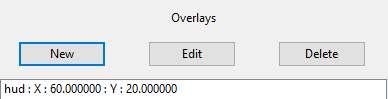
Now all we need to do is add the HUD to the game. Open the start_room and add the hud as a new overlay in the Overlays menu on the right side of the room editor. Set its X postion to 60.000000 and its Y position to 20.000000.
Great! Now we have a HUD that displays the number of lives the player has.
ADDING THE GAMEPLAY
So what exactly is the object of this game? We have a player and an enemy that shoots at it, as well as a lives tracker, but we have not objective in the game. How do you win? How do you lose?
Let’s create some more functionality in the game to give the player a purpose. First, we will create some stars that the player will need to jump and collect to increase their score. The stars will be placed at increasing heights for the player to reach, so the player will have to ability to spawn small bricks to build platforms to reach these heights. We will also create a line that, once the player crosses it, they win! However, the player will also need to protect themself from enemy attacks; when their lives reaches 0, it’s game over. So let’s get started!
Create a new sprite named spr_star and upload the star.png image from the sprites directory. Create a new actor names star, set its sprite to spr_star, and then create the Create trigger. For this trigger, make a Uses Gravity action with a value of False. Then create a Collision trigger targeting the player. Add a Change Attribute action on the score attribute with an offset value of 1, and a Destroy action to remove the star from the game once the player has collected it.

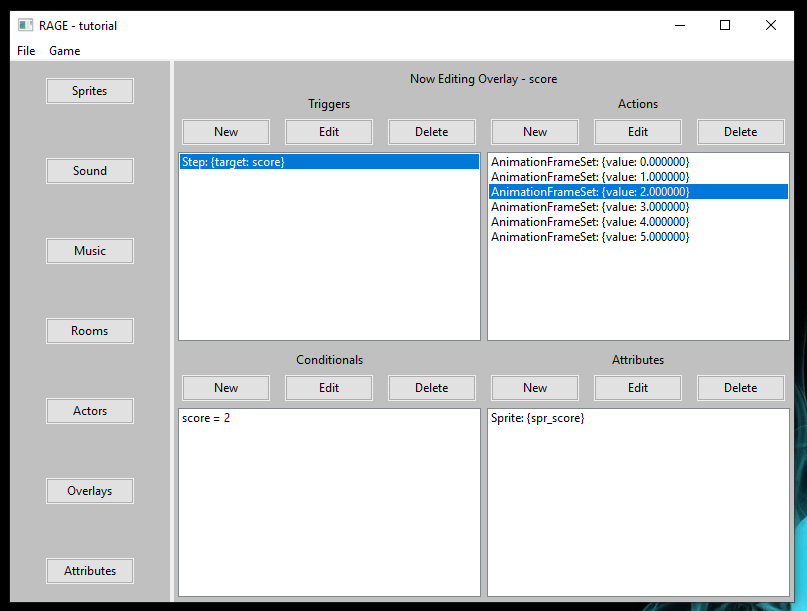
Create a new global attribute called score. This will track the number of stars that the player has collected. Make a new sprite named spr_score and upload images 0.png, 1.png, 2.png, 3.png, 4.png, and 5.png. Then create a new overlay named score and set its sprite to spr_score. Add a Create trigger, and create six Set Animation Frame actions with values 0 through 5. For each of these actions, create an equals (==) conditional with score and the value set to the frame value for that action. So for example, the Set Animation Frame action with frame value 2 should have the conditional score == 2.
Add the score overlay to the start_room at position X = 20.000000 and Y = 20.000000. Then add 5 star actors to the room with the following positions:
- X = 200.000000, Y = 0.000000
- X = 300.000000, Y = -200.000000
- X = 100.000000, Y = -400.000000
- X = 400.000000, Y = -600.000000
- X = 500.000000, Y = -800.000000

As a note, the Y-axis is reversed, such that more negative values are towards the top of the game window and more position values as towards the bottom of the game window.
Now we’ll give the player the ability to spawn small bricks on their left or right side to reach greater heights. We’ll also make another overlay that shows which side of the player the bricks will be spawned on.
Create a new global attribute named dir and set it’s default value to -1. This will determine the side of the player bricks are spawned on.
We will be using the spr_brick sprite that we created for use as the ground as the sprite for the bricks that the player will spawn. Create a new actor named ball and assign spr_brick to it’s Sprite attribute.
Open the player actor, and add a new ButtonInput trigger using E and state Press. Add a Set Attribute action using the dir attribute as a target and the value 1. This will change the spawn side to the right of the player when the E key is pressed.
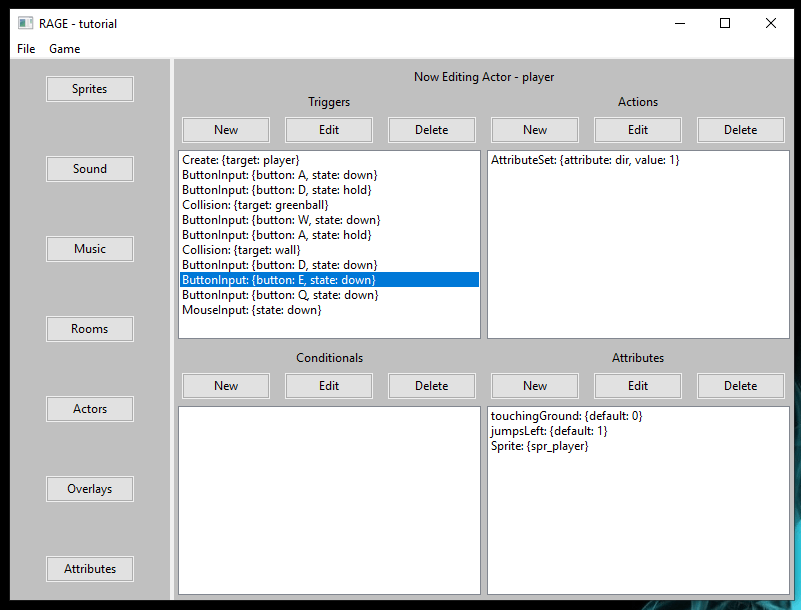
Now create another ButtonInput trigger using Q and state Press that has a Set Attribute action on the dir attribute that sets the value to -1. This will change the spawn side to the left of the player with the Q key is pressed.
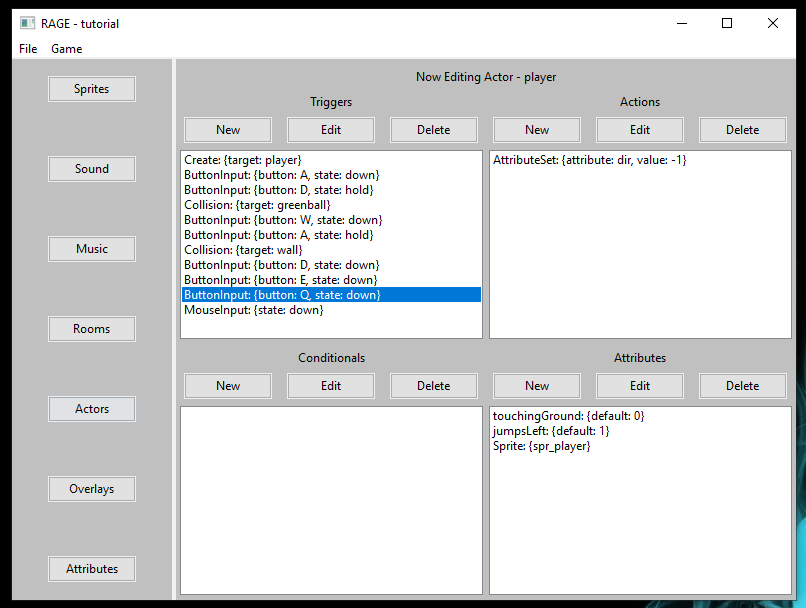
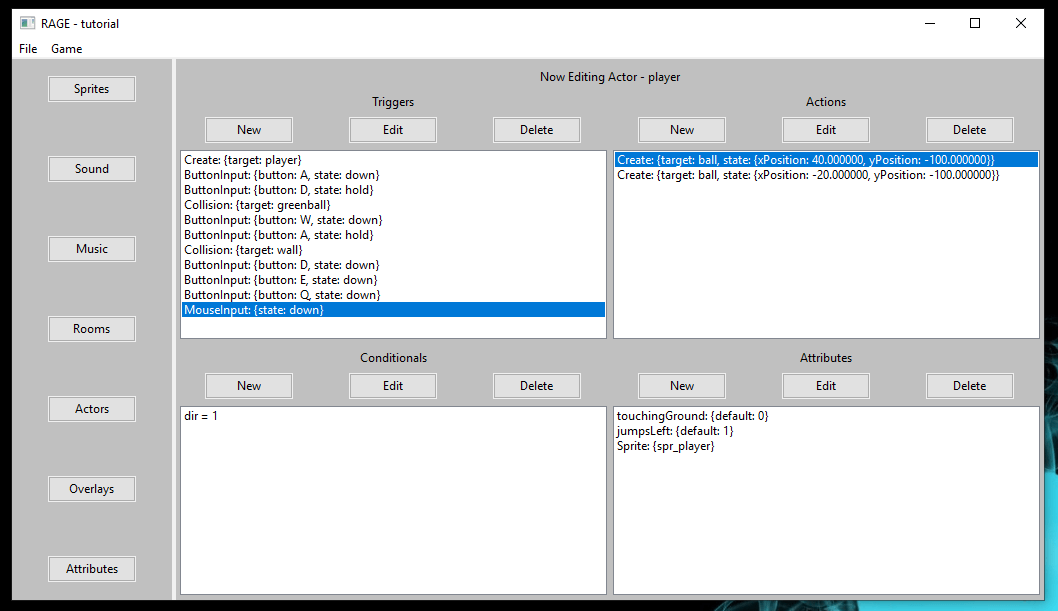
We want the player to spawn new bricks when they click the left mouse button. Create a new MouseInput trigger in the player actor with state Press (NOT Press on Actor). Add two Create actions to this trigger both using the ball actor as targets. Set the position of the first one to X = 40.000000 and Y = -100.000000, and the position of the second one to X = -40.000000 and Y = -100.000000. For the first action (xPosition = 40.000000), add a conditional dir == 1, and for the second action (xPosition = -40.000000), add a conditional dir == -1.
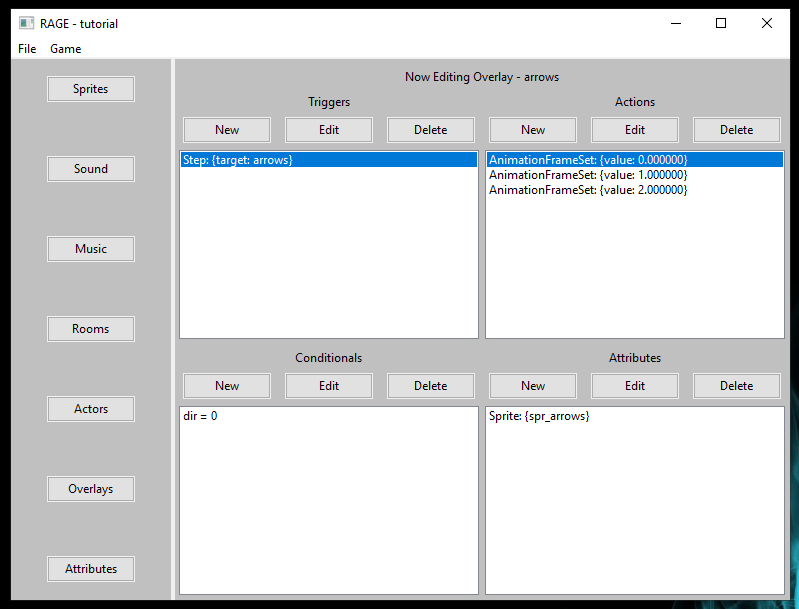
Create a new sprite named spr_arrows and upload the images arrows.png, arrows_left.png, and arrows_right.png. Then make a new overlay named arrows and set the sprite to spr_arrows. Add a Step trigger, and three Set Animation Frame actions with values 0 through 2. Add a conditional to each action: dir == 0 on animation frame 0, dir == -1 on animation frame 1, and dir == -1 on animation frame 2.
Add the arrows overlay to the start_room at position X = 500.000000 and Y = 20.000000.
Now we will add the win line, the line that, when the player crosses it, they win! This will also show how in RAGE, you can add multiple rooms and change between them when certain events occur.
Start by creating a new sprite name spr_line and upload the image winline.png to this sprite. Then create a new actor named win_line and set its sprite to spr_line.
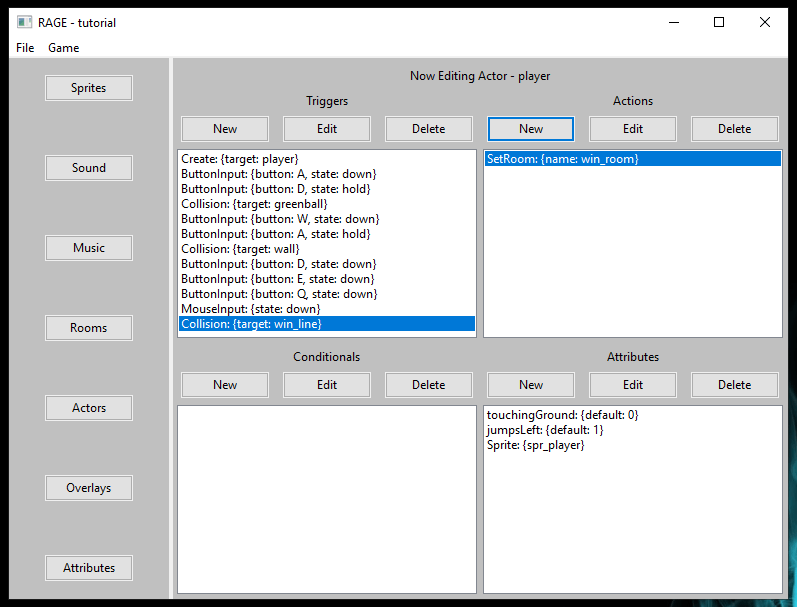
Open the player actor and add a Collision event targeting the win_line actor. For this trigger we will create an action that changes the current game room when the player collides with the win line, but first we need to create the room that we will change to.
Create a new sprite named spr_win. Upload the winscreen.png image to this sprite. Then create a new actor named win and assign its sprite as spr_win. Add a Create trigger with a Uses Gravity action with value False.

Now we’ll create the win room. Create a new room named win_room, and then open its room editor. Add the win actor at position X = 0.000000 and Y = 0.000000, and the score overlay at position X = 430.000000 and Y = 400.000000. Also make sure that the followed object for the room is set to the win actor.

Go back to the player actor and select the Collision trigger with win_line we created earlier. Add a Set Room action to this trigger, selecting win_room from the list of rooms when prompted.
Now that we have the winning functionality built in, lets add the losing functionality. As stated before, the player should lose when their lives reach 0. We will create a room that the game will switch to when the player loses.
Create a sprite named spr_gameover and upload game_over.png. Then make an actor named gameover and set its sprite to spr_gameover. Now make a room named game_over, open its room editor, and add the gameover actor at position X = 0.000000 and Y = 0.000000. Make sure the followed object for this room is set to gameover.
Open the player actor and select the Collision trigger that targets the greenball actor. Add a new Set Room action, selecting the game_over room when prompted. To this action, add a conditional lives <= 0, so that the room will only be changed once the player reaches 0 lives.

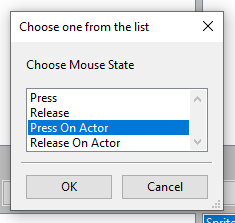
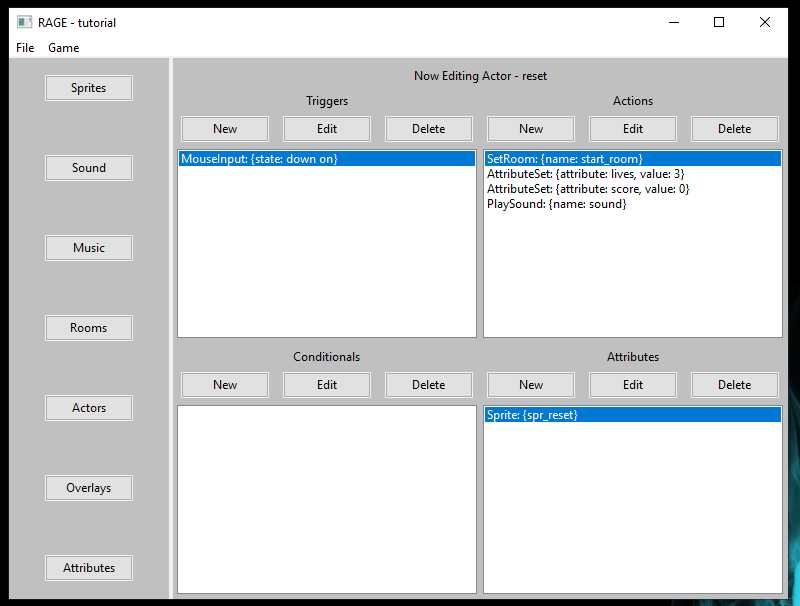
Let’s add the ability to reset the game when you lose. This will be in the form of a button on the gameover screen that the player can click to restart the game. Create a new sprite named spr_reset and upload reset.png. Then make a new actor named reset and set its sprite to spr_reset. Add a MouseInput trigger, setting the state to Press On Actor. This will ensure that the actions we are about to create are only triggered when the player clicks on the button and nowhere else in the game window.
To the trigger we just created, add a Set Room action that calls start_room. Then add two Set Attribute actions that reset lives to 3 and score to 0. Finally, add a Play Sound action that plays the sound we created earlier.
Add this reset actor to game_over room at position X = 300.000000 and Y = 400.000000.
And that’s it! We have a working game. Click Game>Play in the engine window to test out your game.

INVINCIBILITY
Our enemy fires pretty quickly, doesn’t it? To mediate that, let’s add timed invincibility to the player. By adding this, we can make the player immune to enemy fire for a certain amount of time after getting hit.
Open the player actor and give it a new attribute named invincible. Then select the Collision trigger that targets the greenball actor. Here we will add two actions: a Set Timer action with index 1 and time 2.000000, and a Set Attribute action that sets the value of invincible to 1. Add a conditional to the Set Timer action of invincible == 0.

Now create a new Timer trigger with index 0, and add a Set Attribute action to that trigger that resets the value of invincible to 0.

So what did we just do? Well, we added a new attribute to the player that determines if they are invincible to enemy fire. By default, the player is vulnerable to enemy attacks. When the player is hit by enemy fire, their invincibility attribute is set to true (1), and a timer is created that will run for 2 seconds. After those 2 seconds, the player will become vulnerable again.
CHALLENGES
Using the skills you developed while creating this game, we have a few challenges for you to try.
- Advanced Enemy AI: Create a new enemy named homing_enemy that follows the player and fires slow-moving fireballs at the player. Make the fireballs move directly towards the player instead of in a straight-line path.
- Bad Bricks: Randomly make the player create bad bricks that causes damage to the player (i.e. takes away a life if they touch it). The chance that the player will spawn a bad brick should be 10% for each frame of gameplay. Hint: Try adding a new attribute to the player whose value is randomly generated every 0.100000 seconds. Depending on this value, the player will spawn either a normal brick or a bad brick.
- Additional User Inputs: Add additional input handling to the player that allows the player to use either the arrow keys OR the A and D keys to move in the game.
The resources for the above challenges are all included in the tutorial_resources directory. Feel free to complete these challenges, as well as seeing what other functionality you can add to your game in the engine.
We hope you enjoy using RAGE!
Gaming Pitch Mechana
Welcome to Mechana below is a brief vide describing the pitch for the potential game “Mechana”. This pitch was done by me and Daniel Trayner.
https://baylor.app.box.com/file/316427367350
CSI 1337: Marketing to Current Game Trends 2018
The students were given an opportunity to create a video pitch for the next big game idea. Based on their research of currently popular games and the constraints of one year of development and a small team, we had lots of creative game ideas. Congratulations to the winners!
Winner
Matthew McCaskill, Mohsen Soltani, and Joshua Huertas
Runners Up
Eric Jaroszewski and Makin Schilling
Other Videos
Addisyn Burlage and April Yang
Stevie Damrel and Daniel Trayler
Adrian Rodriguez and Stacy Dodson
Andrew Ammentorp and Alejandro Gil
Brandon Alcaraz and Daniel Clute
Welcome to the Baylor Gaming WordPress website!

Hello visitors! Sam and I (Amy) are the developers of the updated website pages for Baylor University’s Gaming Concentration. We would like to launch the site by detailing some of our process and the features we developed!
Developing the website involved a unique goal: We wanted to make sure that students, faculty and others could dynamically update the pages with content. For example, we wanted to let them create profiles and add personal flair, images, and more. Other examples include pages for courses and for game projects. This lead to the use of a WordPress (abbreviated as “WP”) blog which gives flexible access while still allowing administrative duties such as post approval. The WordPress uses the service from Blogs @ Baylor University.
In contrast, the portion of the site on the main Baylor website involves more complex permissions. It uses its Baylor’s own content management system, or “CMS”. Thus, we integrated the dynamism of this blog with the officialism of the Baylor website. This led to a good amount of effort in “syncing” the content so that updates on the blog could appear on the main site as well.
For those curious, we mainly utilized JavaScript, HTML, and CSS. We used WordPress’s RSS feeds to pull content. The experience lead to a idiosyncratic blurring of “front-end” and “back-end”. We learned a lot about the complexity and challenges of these content management systems.
In the end, we’re glad to share this with you all! Please feel free to contact us and the rest of the gaming department at our group e-mail, gaming@baylor.edu.
