How to Pick A Good Watermelon


  • Look for the Large Yellow Spot – This is where the watermelon was laying in the field. Make sure it’s a decent size and is yellow.
  • Give it a Good Thump – You want to make sure it sounds hollow.
  • Dull Outside – You want to make sure the outside of the watermelon looks dull and not shiny. A shiny watermelon means its not ripe.
  • Lift it Up – You want to make sure it’s heavy for it’s size, which means it has a ton of water in it (what you want!!)
  • Nice Oval Shape – A uniform-shaped watermelon shows that it got the perfect amount of sunshine and water.
  • Bee Stings and White Scars – Look for these little guys. These little marks show that it’s sweet enough that even the bees were trying to get to the inside. The stings look like brown lines or dots on the melon.

What-to-look-for-in-picking-out-a-good-watermelon-lilluna.com-


Summer Vegetable Pasta Salad


Ingredients

  • 12 oz. bow tie pasta
  • 2 medium roma tomatoes
  • 1 medium summer squash
  • 1 medium zucchini
  • 1 medium broccoli crown
  • ½ medium red onion
  • 1 red bell pepper
  • ½ bunch parsley

VINAIGRETTE

  • ¼ cup vegetable oil
  • ¼ cup olive oil
  • ⅓ cup red wine vinegar
  • 1 Tbsp dijon mustard
  • 1 tsp dried oregano
  • 1 tsp minced garlic
  • ¾ tsp salt
  • to taste fresh cracked black pepper

Pasta Salad plate

Instructions

  • Bring a large pot of lightly salted water to a boil. Add the pasta and boil for 5-7 minutes or until tender. Drain in a colander.
  • While you’re waiting for the pasta water to boil and the pasta to cook, prepare the vegetables (squash, zucchini, broccoli, tomato, onion, parsley, red pepper). Give the vegetables a good wash and then cut into bite sized pieces (onions and red pepper thinly sliced; parsley removed from stems and chopped).
  • While the pasta is cooling, prepare the vinaigrette. In a small bowl whisk together the vegetable oil, olive oil, red wine vinegar, dijon mustard, oregano, minced garlic, salt, and pepper.
  • Combine the cooked pasta, chopped vegetables, and vinaigrette. Stir until everything is well mixed and coated with vinaigrette. Serve immediately or refrigerate until ready to eat.


Blueberry and Kiwi Tart


Ingredients
  • 2 cups raw almonds
  • 2½ cups pitted medjool dates, divided
  • 1½ teaspoons cinnamon, divided
  • 1 vanilla bean, caviar removed
  • pinch of nutmeg
  • 1 tablespoon water
  • 1 cup raw cashews
  • 1 ripe banana
  • 2 tablespoons fresh lemon juice, divided
  • 6 kiwis, peeled and divided
  • 1½ cups blueberries, divided
10-DSC_8965
Instructions
  1. Add the raw almonds, 2 cups medjool dates, 1 teaspoon cinnamon, vanilla bean caviar, and a pinch of nutmeg to a food processor. Pulse 8-10 times and then let everything process into a fine meal for 3-5 minutes. Add in the tablespoon of water and continue to process for another minute or until the mixture rolls in a ball within the food processor.
  2. Line the bottom of a 10-inch round tart pan with parchment paper (I usually trace the tart pan insert and then cut the parchment paper out).
  3. Dump the crust mixture into the tart pan and press into the pan and up the sides. Be patient with this step as it will take several minutes to get it spread evenly and pressed into the pan. If the mixture is too sticky, dip your fingers in water to repel the mixture as you’re pressing it into the pan.
  4. Place the tart pan in the freezer for at least 30 minutes to let the crust set (the crust can be made a day ahead of time and stored in the freezer).
  5. While the crust is chilling, soak 1 cup of raw cashews in warm water for at least 30 minutes. Drain.
  6. Add the cashews, banana, 3 pitted dates, ½ teaspoon cinnamon, and 1 tablespoon of lemon juice to the food processor. Process for 5-7 minutes or until completely smooth.
  7. Pour the banana-cashew cream into the tart shell and place in freezer for 10 minutes to set.
  8. While the cashew cream is setting, add 2 kiwis, ½ cup of blueberries, and 4 pitted dates to a blender. Blend until a smooth glaze forms (approximately 2 minutes).
  9. Pour blueberry-kiwi glaze over the banana-cashew cream and carefully spread across surface.
  10. Thinly slice 4 kiwis. Add kiwis and 1 cup blueberries to a bowl and toss in 1 tablespoon of lemon juice.
  11. Arrange the blueberries and kiwis in circles working your way inward from the outer edge of the tart.
  12. Refrigerate or freeze for 15 minutes to set before slicing. Slice with a sharp knife, serve, and enjoy.
  13. Refrigerate leftovers.

White Chocolate Raspberry Cheesecake


Of all the recipes on this blog, this doesn’t exactly follow the “healthy” motto, but cheesecake is one of my favorite desserts, so I couldn’t pass up this opportunity. Here is a great chance to use fresh raspberries!

Ingredients

For the graham crumb base

  • 1⅓ cups graham wafer crumbs
  • 3 tbsp sugar
  • ⅓ cup melted butter

For the cheesecake batter

  • ⅓ cup whipping cream
  • 1 cup good quality white chocolate chips
  • 3 eight ounce packages ounces cream cheese
  • ½ cup sugar
  • 3 eggs
  • 3 tsp vanilla extract
  • 1 cup whipping cream

Topping

  • 3 – 4 cups fresh raspberries
  • ½ cup white chocolate chips, melted (for garnish, optional)

86f0ea840fe889356638c477fe6f33c3

Instructions

To make the crumb crust

  • In a small bowl combine the graham crumbs, sugar and melted butter.
  • Press into the bottom of a lightly greased springform pan. (Grease bottom only! I also like to line the bottom with parchment paper for easy release of the cheesecake from the pan when it has cooled.)
  • In a double boiler, melt together the ⅓ cup whipping cream and 1 cup pf white chocolate chips. You want this just at the melting point, so be careful not to overheat it. Let it cool to lukewarm if necessary after melting. Set aside to cool while you prepare the rest of the cheesecake batter.
  • Cream together the cream cheese and ½ cup sugar for a few minutes, scraping the bowl often.
  • Add the eggs, one at a time, beating well after each addition.
  • Stir in the vanilla extract and melted white chocolate.
  • Finally blend in the 1 cup of whipping cream until smooth.
  • Pour over the prepared base and bake in a bain marie (See Note) at 325 degrees F for 60 to 70 minutes. The cheesecake may be beginning to lightly brown at the edges but a cheesecake does not need to brown at all to be fully baked. The surface of the cheesecake should lose any shine when the cake is properly baked. It can still be slightly wobbly just at the center at this point.
  • Remove the cake from the oven and run a sharp knife completely around the edge of the pan. This will allow for the cheesecake to shrink as it cools and hopefully not crack (but who cares if it does? I am never bothered by a crack or two in the surface)
  • Allow the cheesecake to cool thoroughly on a wire rack at room temperature. (Do not put a hot cheesecake into the fridge to cool quickly, this may result in an under baked cheesecake because the residual heat actually continues to set the cheesecake after it comes out of the oven).
  • When completely cool cover the top with fresh raspberries and garnish with melted white chocolate if desired.

Chill completely in the refrigerator until ready to serve.

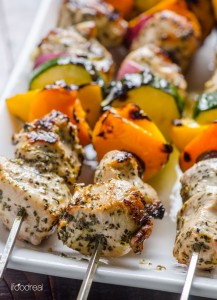
Greek Style Chicken Kebabs


Ingredients

  • 2 lbs boneless & skinless chicken breasts, cut into 1″ pieces
  • 20 olives, cut in halves
  • 1 large red onion, cut & separated into 1″ pieces
  • 2 large garlic cloves, grated & divided
  • 1 lemon, juice and zest of
  • 2 tbsp basil or oregano, dried
  • 1 + 1/2 tsp salt, divided
  • 1 + 1/2 tsp ground black pepper, divided
  • 2 tbsp olive oil, extra virgin
  • 1 large zucchini, cut into 1/2″ thick rounds
  • 3 large bell peppers, cut into 1″ pieces
  • Cooking spray

closeup-greek-style-chicken-kebabs-recipe

Directions

  • If using wooden skewers, soak in water for at least 30 minutes.
  • In a large bowl add chicken, olives, onion, 1 garlic clove, lemon juice + zest, basil or oregano, 1 tsp salt and 1 tsp black pepper. Toss to combine and coat the chicken evenly. Let marinate at least 30 minutes. The longer meat marinates, the more flavourful it is and less cooking time is required. I left the meat to marinate as little as 30 minutes and as long as overnight.
  • Toss zucchini and bell peppers with remaining 1/2 tsp salt and 1/2 tsp black pepper. If marinating meat overnight, you can do this step right before grilling.
  • To make garlic oil, combine olive oil and 1 garlic clove in a small bowl and set aside.
  • Skewer the meat alternating with olives, red onion and vegetables onto each skewer. I ended up using 5 – 6 pieces of chicken, 2 zucchini slices, 3 – 4 bell pepper slices on each out of 10 long metal skewers. Discard remaining marinade.
  • Preheat the grill on low – medium heat, around 500 degrees F, and spray with cooking spray. Grill skewers with lid closed turning every 2 – 3 minutes for even grilling. Kebabs are ready when chicken is cooked through, about 8 minutes.* Remove from the grill and brush each skewer with garlic oil. Serve hot with your favourite whole grain and/or salad.
  • Storage Instructions: Refrigerate covered (remove from skewer and transfer to a container) for up to 2 days.

Summer Vegetable Casserole


Farmers_Market__July__2010_027


Ingredients:

  • 1 Tbsp olive oil
  • 1 medium yellow onion
  • 1 tsp minced garlic
  • 1 medium zucchini
  • 1 medium yellow squash
  • 1 medium potato
  • 1 medium tomato
  • 1 tsp dried thyme
  • to taste salt & pepper
  • 1 cup shredded Italian cheese

Summer-Vegetable-Tian

Instructions

  • Preheat the oven to 400 degrees. Finely dice the onion and mince the garlic. Saute both in a skillet with olive oil until softened (about five minutes).
  • While the onion and garlic are sauteing, thinly slice the rest of the vegetables.
  • Spray the inside of an 8×8 square or round baking dish with non-stick spray. Spread the softened onion and garlic in the bottom of the dish. Place the thinly sliced vegetables in the baking dish vertically, in an alternating pattern. Sprinkle generously with salt, pepper, and thyme.
  • Cover the dish with foil and bake for 30 minutes. Remove the foil, top with cheese and bake for another 15-20 minutes or until the cheese is golden brown.


Spring Vegetables In Season


Here is the list of spring fruits and vegetables:

This means they will be most plentiful in stores, best tasting, and least expensive. I would suggest going to local farmer’s markets in order to buy your product, but it is whatever fits your lifestyle best!

vegetables

  • Apricots
  • Artichokes
  • Arugula
  • Asparagus
  • Broccoli
  • Celery
  • Cabbage
  • Green Onions
  • Kale
  • Peas
  • Radishes
  • Spinach
  • Squash
  • Snow Peas
  • Strawberries
  • Zucchini

Stay tuned for the summer fruit and vegetables.