November 9

11/7/18 Flooding Titer Test Plate

11/7/18 Flooding Titer Test Plate

Objective:

The goal of this procedure is to assist Lucy P. in getting a large amount of high titer lysate. This is achieved by webbing and then flooding plates. This procedure will detail the process of flooding the titer test plate which was webbed. We will add this to the lysate creating during the previous lab, and then we will do serial dilutions and plating to test the titer. While this procedure was being done, another group was using the newly created lysate to try to create two backup webbed plates.

The overarching question this test seeks to address is: Is the presence of phage determined by species of oak tree from which soil was collected?

In other words, are specific oak tree species more likely to have Arthrobacter bacteria phages in the soil surrounding them?

The question specific to my lab table is: Is the difference in the presence of phage between live oaks and red oaks on Baylor’s campus?

As a group, we hope to expand our question to include more species as we gather data so that we can better address our overarching question and we will look at our metadata to examine whether or not there are other factors that may determine phage presence.

Procedures and Protocols:

Materials for an Aseptic zone:

  • CiDecon
  • 70% Ethanol
  • Ethanol Burner

Materials for Flooding a Plate:

  • Phage buffer
  • Incubator/Shaker
  • Syringe Filter
  • 15 ml conical vial
  • Pipette

In order to complete the procedure, an aseptic zone was created.

  1. CiDecon was applied to the lab table with a squeeze bottle and wiped away with a paper towel
  2. 70% Ethanol was also applied with a squeeze bottle, spread with a paper towel, and allow to evaporate
  3. An ethanol burner was light in order to use the rising heat from the flame to form the aseptic zone

Them the previously created 10 µL titer test plate was flooded.

  1. 5 ml of phage buffer was pipetted onto the agar plate.
  2. The plate was left on the shaker at room temperature, to slowly shake for an hour.
  3. At an hour, a syringe filter was used to filter the resulting lysate
  4. ~3 ml of the lysate was transferred it into Monday’s vial to create a combined 6 ml lysate for future testing.
Results:

The results of this lab will not be visible until Friday’s lab, but I can say that flooding the plate seemed to occur without incident.

Analysis:

The idea behind the procedures as a whole is to enable us to create larger quantities of high titer lysate. In theory, this can be done after a plaque has been purified by creating webbed plates that can be flooded with phage buffer. The resulting mixture then holds many phage, and the titer can be tested with a plaque assay. However, when Lucy P. and I were unable to create a webbed plate, and we were running out of lysate we needed to make more. The solution to this problem was addressed in two ways, Lucy P. and I flooded the 14.1 µL plate because it had more phage on it so that we could create more lysate. While we were doing this, two others used the last of the remaining old lysate to try to web a plate. Strangely our titer test plate was webbed and the 30 μl test on the old lysate was not, which is what prompted the action of this lab.

Future:

During our next lab, we will perform serial dilutions to determine the titer of the resulting combined lysate from this lab and Monday’s lab procedure. We will then determine what steps need to be taken.

November 7

11/5/18 Flooding a Plate and Titer Test Plaque Assay

11/5/18 Flooding a Plate and Titer Test Plaque Assay

Objective:

The goal of this procedure is to assist Lucy P. in getting a large amount of high titer lysate. This is achieved by webbing and then flooding plates. This procedure will detail the process of flooding a phage heavy (but not webbed) plate in order to create more lysate because while we failed to web a plate, Lucy P. is almost out of lysate. After flooding the plate we decided to run a plaque assay in order to asses the titer of the new lysate so that can be used to attempt to web a plate next lab. While this procedure was being done, another group was also trying to web a plate with the existing 10^0 lysate by using 30 µL lysate.

The overarching question this test seeks to address is: Is the presence of phage determined by species of oak tree from which soil was collected?

In other words, are specific oak tree species more likely to have Arthrobacter bacteria phages in the soil surrounding them?

The question specific to my lab table is: Is the difference in the presence of phage between live oaks and red oaks on Baylor’s campus?

As a group, we hope to expand our question to include more species as we gather data so that we can better address our overarching question and we will look at our metadata to examine whether or not there are other factors that may determine phage presence.

Procedures and Protocols:

Materials for an Aseptic zone:

  • CiDecon
  • 70% Ethanol
  • Ethanol Burner

Materials for Flooding a Plate:

  • Phage buffer
  • Incubator/Shaker
  • Syringe Filter
  • 15 ml conical vial

Materials for Plaque Assay:

  • .5 ml Arthrobacter
  • incubator
  • Pipette
  • Test tube stand
  • 50 ml tubes
  • Culture tube
  • LB Broth
  • 2X TA
  • 1M Calcium Chloride
  • Agar plate
  • Serological pipette

In order to complete the procedure, an aseptic zone was created.

  1. CiDecon was applied to the lab table with a squeeze bottle and wiped away with a paper towel
  2. 70% Ethanol was also applied with a squeeze bottle, spread with a paper towel, and allow to evaporate
  3. An ethanol burner was light in order to use the rising heat from the flame to form the aseptic zone

Them the previously created 14.l µL agar plate was flooded.

  1. 5 ml of phage buffer was pipetted onto the agar plate.
  2. The plate was left in the incubator, set to room temperature, to slowly shake for an hour.
  3. At an hour, a syringe filter was used to filter the resulting lysate
  4. ~3 ml of the lysate was transferred it into a vial for future testing.

Then a plaque assay on the new lysate was performed.

  1. Two agar plates were labeled
  2. 10 µL of the new lysate were transferred into a culture tube containing .5 ml of Arthrobacter
  3. The culture tubes were set aside for 15 minutes.

While the lysate and bacteria are allowed to sit in the culture tube the agar was prepared.

  1. The agar was prepared according to the following recipe (makes two plates):
  2. 4.5 ml of the agar was transferred to the plate labeled “TA control”
  3. The plate was swirled and set aside
  4. 4.5 ml of the agar was transferred into the culture tube
  5. The resulting mixture was poured into the corresponding plates
  6. The was set aside for 10 minutes to allow agar to solidify.
  7. Plates were left to incubate until nest class
Results:

The results of this lab will not be visible until Wednesday’s lab, but I can say that all appeared to go well in both the flooding of the plate and the creation of a titer test plaque assay.

Update:

Our titer test webbed the plate, our control was very contaminated, and the 30 µL plaque assay on the old lysate did not web the plate. (pictured below in order mentioned)

Analysis:

The idea behind the procedures as a whole is to enable us to create larger quantities of high titer lysate. In theory, this can be done after a plaque has been purified by creating webbed plates that can be flooded with phage buffer. The resulting mixture then holds many phage, and the titer can be tested with a plaque assay. However, because Lucy P. and I were unable to create a webbed plate, and we were running out of lysate we needed to make more. The solution to this problem was addressed in two ways, Lucy P. and I flooded the 14.1 µL plate because it had more phage on it so that we could create more lysate. While we were doing this, two others used the last of the remaining old lysate to try to web a plate. This gives us two possible ways to get a high titer lysate and ensures that we won’t run out of lysate for testing. Once we succeed in webbing a plate, we will flood the plate in order to create a higher titer lysate.

Future:

During our next lab, we will likely calculate the titer of our new lysate based on the results of the plaque assay. We will then try to web a plate again so that we can flood and create a higher titer lysate.

Update:

Because our titer test plate was webbed we will flood that webbed plate, and then will perform serial dilutions in Friday’s lab.

October 25

10/24/18 Soil Washing and Enrichment of Soil with Known Phage

10/24/18 Soil Washing and Enrichment of Soil with Known Phage

Objective:

The goal of this procedure is to test the efficacy of PCR and Gel Electrophoresis. The way I will be testing this is by creating a newly enriched lysate using soil that already tested positive for phage in the previous testing. The purpose behind this is to test if different ways of cleaning the enriched lysate will affect the results of PCR. I will do this in future labs by using a syringe filter to filter half of the enriched lysate I create, and using chloroform to clean the other half, and then running PCR and Gel Electrophoresis on each sample.

The overarching question this test seeks to address is: Is the presence of phage determined by species of oak tree from which soil was collected?

In other words, are specific oak tree species more likely to have Arthrobacter bacteria phages in the soil surrounding them?

The question specific to my lab table is: Is the difference in the presence of phage between live oaks and red oaks on Baylor’s campus?

As a group, we hope to expand our question to include more species as we gather data so that we can better address our overarching question and we will look at our metadata to examine whether or not there are other factors that may determine phage presence.

Procedures and Protocols:

Materials for an Aseptic zone:

  • CiDecon
  • 70% Ethanol
  • Ethanol Burner

Materials For Soil Washing:

  • Syringe filter
  • .5 ml Arthrobacter
  • 50 ml conical vial
  • 15 ml conical vial
  • LB Broth
  • refrigerator
  • Incubator
  • Centrifuge
  • Pipette
  • Test tube stand

In order to complete the procedure, an aseptic zone was created.

  1. CiDecon was applied to the lab table
  2. 70% Ethanol was also applied

The soil was washed and enriched according to the following procedure:

  1. Gather previously positive soil
  2. ~2.5 ml of soil was added into a 15 ml conical vial
  3. 11 ml of LB broth was added
  4. The vial was vortexed for 15 minutes
  5. The vial was then centrifuged for 10 minutes
  6. ~ 1.5 ml were pipetted into a fresh 15 ml vial for a direct lysate and placed in the fridge
  7. ~9 ml of lysate were pipetted into a fresh 15 ml vial
  8. .5 ml of Arthrobacter was added to the 15 ml conical and put in the incubator
Results:

The results of this procedure will not be immediately clear because I am not testing for phage presence. After I do the two different procedures to clean the enriched lysate and then run PCR and Gel Electrophoresis I will report on my results. Aside from that, I can say that this appeared to go well and an enriched lysate was created.

Analysis:

PCR works by using polymerases to make many copies of specific strands of DNA  so that it is easier to analyze. Using PCR allows researchers to take small samples and amplify the genetic contents in order to conserve resources and determine what is present before future testing commences.  In this lab, using PCR allows people to determine whether or not there is phage DNA in an enriched lysate. Gel Electrophoresis works by using electricity to separate different strands/fragments of DNA in order to analyze the patterns that ensue.  When electricity is applied, DNA moves toward the oppositely charged end of the gel tray and brings the DNA dye with it. The question of my next few procedures seek to address is whether or not these procedures accurately indicate DNA presence and if they can be affected by different prep methods.

Future:

For my next three lab procedures I will be utilizing two different cleaning methods on my enriched lysate, then running PCR, and then doing Gel Electrophoresis.

October 24

10/22/18 Gel Electrophoresis of DNA from Soil Sample #3

10/22/18 Gel Electrophoresis of DNA from Soil Sample #3

Objective:

The goal of this procedure is to test the previously created enriched lysate for phage DNA. Gel Electrophoresis will help us determine if there is phage DNA present, which will determine whether or not we do future testing on soil sample #3.

The overarching question this test seeks to address is: Is the presence of phage determined by species of oak tree from which soil was collected?

In other words, are specific oak tree species more likely to have Arthrobacter bacteria phages in the soil surrounding them?

The question specific to my lab table is: Is the difference in the presence of phage between live oaks and red oaks on Baylor’s campus?

As a group, we hope to expand our question to include more species as we gather data so that we can better address our overarching question and we will look at our metadata to examine whether or not there are other factors that may determine phage presence.

Procedures and Protocols:

Materials for Gel Electrophoresis:

  • Agarose powder
  • 1X TBE
  • Microwave
  • Ethidium Bromide
  • Flask
  • Electrophoresis Tray
  • Electrophoresis apparatus and power supply
  • DNA ladder

The agarose gel was prepared:

  1. The gel was prepared according to the following recipe:
  2. The gel mixture was then microwaved until boiling
  3. The mixture was allowed to cool until warm
  4. 2 μl Ethidium Bromide was pipetted into the mixture
  5. The mixture was poured into an Electrophoresis tray and allowed to solidify

Gel Electrophoresis was run:

  1. The tray was placed into the electrophoresis apparatus and the apparatus was filled with solution to cover the gel
  2. 10 μl of each PCR sample and 5 μl of DNA ladder were pipetted into the gel slots
    • Samples were loaded into the Gel Slots according to the following image (my samples are group 2):
  3. The apparatus was plugged into a power source and turned on
  4. The gel was allowed to run until the DNA had fully traveled across the tray
  5. The results were imaged and recorded
Results:

The results of this Gel Electrophoresis came back negative for all 3 clusters of phage DNA tested. The positive controls however still tested positive, suggesting that there was nothing wrong with the Gel or procedure. These results confirm that there was no arthrobacter phage in my soil sample #3.

Analysis:

Gel Electrophoresis works by using electricity to separate different strands/fragments of DNA in order to analyze the patterns that ensue.  When electricity is applied, DNA moves toward the oppositely charged end of the gel tray and brings the DNA dye with it. While there was some concern that using DI water instead of DDI water during PCR would cause odd results, the positive control I created during the last lab still worked, suggesting that I received a true negative result. This means that my previously created PCR tubes did not have phage DNA in them, which means my soil sample #3 likely does not have phage.

Future:

The results of this procedure were disheartening, but also odd because every group received a negative result, and that seems unlikely based on the number of soil samples tested. As a result, I will be testing whether or not cleaning soil with chloroform (as was the case for some of the soil samples tested) effects the results of gel electrophoresis. I will do this by testing soil that has been confirmed to have phage in it. I will wash soil that is known to create phage in order to create an enriched lysate. Then, I will filter half of this lysate with a syringe filter, adn clean half of it with cloroform. I will then run PCR and Gel Electrophoresis on these two different lysates to see if the results are affected. This will likley take me multiple lab periods to complete.

October 19

10/17/18 PCR on Soil Sample #3

10/17/18 PCR on Soil Sample #3

Objective:

The goal of this procedure is to prep for and begin PCR on the enriched lysate created in the last lab. PCR will help us determine if there is phage DNA present, which will determine whether or not we do future testing on soil sample #3.

The overarching question this test seeks to address is: Is the presence of phage determined by species of oak tree from which soil was collected?

In other words, are specific oak tree species more likely to have Arthrobacter bacteria phages in the soil surrounding them?

The question specific to my lab table is: Is the difference in the presence of phage between live oaks and red oaks on Baylor’s campus?

As a group, we hope to expand our question to include more species as we gather data so that we can better address our overarching question and we will look at our metadata to examine whether or not there are other factors that may determine phage presence.

Procedures and Protocols:

Materials for an Aseptic zone:

  • CiDecon
  • 70% Ethanol
  • Ethanol Burner

Materials For PCR:

  • 15 ml conical vial
  • PCR Machine
  • DI Water
  • TAQ Polymerase
  • Centrifuge
  • microcentrifuge tube
  • pipette
  • Test tube stand

In order to complete the procedure, an aseptic zone was created.

  1. CiDecon was applied to the lab table
  2. 70% Ethanol was also applied

The enriched lysate was prepped for PCR:

  1. The previously created enriched lysate was spun in a centrifuge for 5 minutes to pellet the arthro
  2. ~1 ml of lysate was transferred to a  Microcentrifuge tube
  3.  The tube was boiled to release phage DNA

PCR tubes were created:

  1. 4 PCR tubes were created according to the following recipe:
  2. *note DI water instead of DDI water was used on accident*
  3. the tubes were placed in the PCR machine until next lab
Results:

The majority of the information that will be available from these procedures will not be visible until the next lab, so these results will be updated on Monday when the results of PCR will be visible and more testing can be conducted. However,  it seems as though PCR testing went well with the exception of the mistake in water.

Analysis:

PCR works by using polymerases to make many copies of specific stands of DNA  so that it is easier to analyze. Using PCR allows researchers to take small samples and amplify the genetic contents in order to conserve resources and determine what is present before future testing commences.  In this lab, using PCR will allow me and my partner to determine whether or not there is phage DNA  in our enriched lysates before we take the time to run spot tests and plaque assays. If everything went according to plan, and the PCR works correctly, then this will likely save us a great deal of time.   It is possible that the additional ions found in DI water as opposed to double distilled water may affect the results of the testing, and this will be something important to note if we receive weird results when we do gel electrophoresis.

Future:

This procedure might have been derailed because I accidentally used DI water instead of double DI water. If this interferes with the PCR then I will have to conduct PCR again, if it does not affect PCR, then I will be using gel electrophoresis to search for phage DNA.


October 19

10/15/18 Soil Washing and Enrichment of Soil Sample #3 Attempt 2

10/15/18 Soil Washing and Enrichment of Soil Sample #3 Attempt 2

Objective:

The goal of this procedure is to wash and enrich the soil for later testing, with the ultimate goal being to find a phage. I am redoing this procedure because there was bacterial contamination in my original enriched lysate. I am also finishing my metadata collection for %sand, silt, clay because I was unable to finish it previously and the bacterial contamination would not have effected these results.

The overarching question this test seeks to address is: Is the presence of phage determined by species of oak tree from which soil was collected?

In other words, are specific oak tree species more likely to have Arthrobacter bacteria phages in the soil surrounding them?

The question specific to my lab table is: Is the difference in the presence of phage between live oaks and red oaks on Baylor’s campus?

As a group, we hope to expand our question to include more species as we gather data so that we can better address our overarching question and we will look at our metadata to examine whether or not there are other factors that may determine phage presence.

Procedures and Protocols:

Materials for an Aseptic zone:

  • CiDecon
  • 70% Ethanol
  • Ethanol Burner

Materials For Soil Washing:

  • Syringe filter
  • .5 ml Arthrobacter
  • 50 ml conical vial
  • 15 ml conical vial
  • LB Broth
  • refrigerator
  • Incubator
  • Centrifuge
  • Pipette
  • Test tube stand

In order to complete the procedure, an aseptic zone was created.

  1. CiDecon was applied to the lab table
  2. 70% Ethanol was also applied

The soil was washed and enriched according to the following procedure:

  1. ~2 ml of soil was added into a 15 ml conical vial
  2. 11.5 ml of LB broth was added
  3. The vial was vortexed for 15 minutes
  4. The vial was then centrifuged for 10 minutes
  5. ~ 2ml were pipetted into a fresh vial for a direct lysate and placed in the fridge
  6. a .22 micron syringe filter was used to filter ~8 ml of lysate into a 50 ml conical
  7. .5 ml of Arthrobacter was added to the 50 ml conical and put in the incubator
Results:

The majority of these procedures will not have results until the next lab and this entry will be updated when results are available. That said, the % sand, silt, clay results are detailed in the table below.

In addition, the soil washing seems to have gone well with addition caution taken for it to be completed aseptically and has resulted in both enriched and direct lysate for future testing.

Update:

As can be seen from the comparison pictures, this soil enrichment was a success because it was not contaminated.

Analysis:

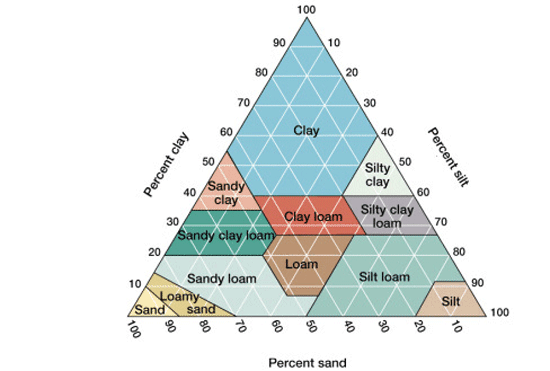
The procedures I’ve conducted over the last few labs were meant to allow me to learn more about our new soil samples and get us prepared for future testing. Based on my results as a whole I can assert that my soil sample is very dry. I can also assert that my soil sample was slightly acidic based on the results of my pH test. And, based on the conclusion of my sand, silt, clay analysis I can also say my soil is very sandy, to the point that it would be classified as sand according to the table below. This will help my group address our question further because having a collection of soil metadata will help us determine whether or not other factors besides tree species determine phage presence.

Image result for soil pyramid(https://samanthaapes.weebly.com/apes-in-a-box-soil-pyramid.html)

Future:

This entry has been updated to reflect the results of the metadata testing and soil enrichment. During my next lab testing period, I will begin PCR to test for phage DNA.


October 12

10/10/18 Soil Washing, Enrichment, and Metadata Collection of Soil Sample #3

10/10/18 Soil Washing, Enrichment, and Metadata Collection of Soil Sample #3

Objective:

The goal of this procedure is to wash and enrich the soil for later testing, with the ultimate goal being to find a phage. I will also be collecting metadata in order to help adress the overarching questions we are trying to answer as a class and as a table group.

The overarching question this test seeks to address is: Is the presence of phage determined by species of oak tree from which soil was collected?

In other words, are specific oak tree species more likely to have Arthrobacter bacteria phages in the soil surrounding them?

The question specific to my lab table is: Is the difference in the presence of phage between live oaks and red oaks on Baylor’s campus?

As a group, we hope to expand our question to include more species as we gather data so that we can better address our overarching question and we will look at our metadata to examine whether or not there are other factors that may determine phage presence.

Procedures and Protocols:

Materials for an Aseptic zone:

  • CiDecon
  • 70% Ethanol
  • Ethanol Burner

Materials For Soil Washing:

  • Syringe filter
  • .5 ml Arthrobacter
  • 50 ml conical vial
  • 15 ml conical vial
  • LB Broth
  • refrigerator
  • Incubator
  • Centrifuge
  • Pipette
  • Scale
  • Weigh Boat
  • Test tube stand

Materials for % Water Analysis:

  • Scale
  • Weigh Boat

Materials for % Sand, Silt, Clay Analysis:

  • Falcon Tube
  • Dispersion Fluid
  • Deionized (DI) water

Materials for pH Test:

  • pH vial
  • DI water
  • pH Paper
  • pH comparison color scale

In order to complete the procedure, an aseptic zone was created.

  1. CiDecon was applied to the lab table
  2. 70% Ethanol was also applied

The soil was washed and enriched according to the following procedure:

  1. ~2 ml of soil was added into a 15 ml conical vial
  2. 11 ml of LB broth was added
  3. The vial was shaken and vortexed intermittently for 15 minutes
  4. The vial was then centrifuged at 10,000 g for 10 minutes
  5. ~ 2ml were pipetted into a fresh vial for a direct lysate and placed in the fridge
  6. a .22 micron syringe filter was used to filter ~8 ml of lysate into a 50 ml conical
  7. .5 ml of Arthrobacter was added to the 50 ml conical and put in the incubator

% Water analysis was performed according to the following procedure:

  1. A weigh boat was weighed and the mass was recorded
  2. Then a small amount of dirt was poured into the weigh boat and the combined weight was recorded
  3. The weigh boat was labeled with initials and date and allowed to sit in the fume hood until next lab

% Sand, silt, clay analysis was performed according to the following procedure:

  1. 10 ml of soil was transferred into a falcon tube
  2. DI water was added until the total contents of the tube was 15 ml (the photo is an example from another lab)
  3. 3 drops of dispersion fluid were added to the tube
  4. The tube was covered with a hand and shaken for 30 seconds
  5. The liquid was poured into a second falcon tube
  6. Both tubes were then placed under the fume hood until next lab

The pH of the soil was collected according to the following procedure:

  1. A small amount of soil was scooped into a pH vial
  2. The rest of the vial was filled with DI water
  3. The vial was shaken for 10 seconds
  4. Then the contents of the vial was allowed to settle for 2 minutes
  5. A strip of pH paper was put in the vial for 45 seconds and then compared to the pH color scale

(The image shows the resulting color change of the DI water after the pH slip was removed)

Results:

The majority of these procedures will not have results until the next lab and this entry will be updated when results are available. That said, the pH of the tested soil sample was around 6.0, leading us to conclude that our soil was slightly acidic.

In addition, the soil washing seems to have gone well and has resulted in both enriched and direct lysate for future testing.

Update:

After checking on the results during open lab, I collected data for the percent water analysis (see chart), but I decided to allow the %sand, silt, clay falcon tubes sit until Monday to settle more.

Analysis:

These procedures were meant to allow us to learn more about our new soil samples and get us prepared for future testing. Based on my current results I can assert that my soil sample is very dry. I can also assert that my soil sample was slightly acidic based on the results of my pH test. This will help my group address our question further because having a collection of soil metadata will help us determine whether or not other factors besides tree species determine phage presence.

Future:

This entry has been updated to reflect the results of the metadata testing; however, when the procedures stated above were completed the initial future procedures were to simply check on the results of the experiments after the appropriate amount of time had elapsed. Now that this is completed a plaque assay will be performed using the enriched lysate created. Depending on the results of that plaque assay, I may chose to pick a plauqe and begin enrichment, or I may need to try yet another soil.

October 12

10/8/18 Plaque Assay and Plaque Picking

10/8/18 Plaque Assay and Plaque Picking

Objective:

The goal of this procedure is to do anything possible to try to find a plauqe and confirm that I do in fact have phage. This is necessary as my re-do of passage 2 yielded no plaques, and my spot test did not yield great results. The plaque assay I did most recently also yielded negative results, but after looking at older plates under the dissecting scope, I decided to try to pick to promising looking spots to see if I could make one last attempt to find phage.

The overarching question this test seeks to address is: Is the presence of phage determined by species of oak tree from which soil was collected?

In other words, are specific oak tree species more likely to have Arthrobacter bacteria phages in the soil surrounding them?

The question specific to my lab table is: Is the difference in the presence of phage between live oaks and red oaks on Baylor’s campus?

As a group, we hope to expand our question to include more species as we gather data so that we can better address our overarching question and we will look at our metadata to examine whether or not there are other factors that may determine phage presence.

Procedures and Protocols:

Materials for an Aseptic zone:

  • CiDecon
  • 70% Ethanol
  • Ethanol Burner

Materials for Plaque Assay:

  • .5 ml Arthrobacter
  • incubator
  • Pipette
  • Test tube stand
  • 50 ml tubes
  • Culture tube
  • LB Broth
  • 2X TA
  • 1M Calcium Chloride
  • Agar plate
  • Serological pipette

Materials for Plaque Picking:

  • Agar plates with plaques of interest
  • Micropipette tip
  • Phage buffer
  • Microcentrifuge tubes (incorrectly referred to as pipette caps in previous entries)

In order to complete the procedure, an aseptic zone was created.

  1. CiDecon was applied to the lab table
  2. 70% Ethanol was also applied

Then a phages were picked

  1. 100 µL of phage buffer was allocated into two microcentrifuge tubes.
  2. A pipette tip was used to collect the chosen plaques (see photo)
  3. The tip was swirled in the phage buffer and vortexed

Then a plaque assay was performed

  1. Four agar plates were labeled and set aside
  2. 20 µL from each microcentrifuge tube was transferred into a culture tube containing .5 ml of Arthrobacter
  3. The culture tube was set aside for 20 minutes.

While the lysate and bacteria are allowed to sit in the culture tube the agar was prepared.

  1. The agar was prepared according to the following recipe (makes four plates):
  2. 4.5 ml of this mixture was transferred to the plate labeled “TA control” and set aside
  3. 4.5 ml of the contents were transferred to each culture tube and poured into corresponding agar plates
  4. The agar was allowed to solidify for 10 minutes before being inverted and incubated
Results:

As can be seen from the images shown above, there were no plaque. The plaque assay that was performed on my P1 plaque was contaminated, and the plaque assay that was performed on my P2 plaque yielded negative results. These results suggest that there is no Arthrobacter phage present in my soil sample 2, or if there are, none were in the lysates I created using my second sample. I can assert this because I have done relatively exhausted testing and have continually gotten negative results, leading me to believe that they are accurate.

Analysis:

The results from this lab are somewhat confusing at first because I originally thought I had plaque and therefore phage. When I went back to old plates, there were spots that looked like plaque, and it my group members found similar spots. All of this led me to believe that it was highly unlikely that I did not have phage; however, after the negative results of this lab, I will conclude I do not have phage.

When considering why I originally thought I had plaques several explanations come to mind. The first is that in our inexperience my group members and I mistook air bubbles for a plaque. This could have caused us to pick them, and in our excitement, we could have overlooked signs that our plaques were not in fact not plaques but air bubbles. This explanation is possible and even probable, but it does not explain why other, more experienced lab workers, namely our TAs, also thought there was a possibility we had plaques. It is possible that everyone was wrong, but it is also possible that along the way we somehow managed to kill our phage. This could have occurred through mishandling or bad luck, and it will be impossible to confirm. Regardless of how this mistake happened, it necessitates testing soil 3, so that is what I will do.

Finally, these results will help us answer the overaching question our table seeks to answer; while we do not have enough data to difintevley say the Live Oak isn’t conducive for phage, we do now have one negative data point. Depending on the results of future testing, we may be able to make conclusions based off of this data.

Future:

My next steps will be to wash and enrich soil 3 so I will be able to run plaques assays using the enriched lysate. I will also collect soil metadata in an attempt to help me answer the big question. During my next lab period, I will perform the washing and enrichment, and I will start the metadata collection.

October 5

10/3/18 The 50 μl Plaque Assay

10/3/18 The 50 μl Plaque Assay

Objective:

The goal of this procedure is to do anything possible to try to find a plauqe to confirm that I do in fact have phage. This is necessary as my re-do of passage 2 yielded no plaques, and my spot test did not yield great results. This caused me to wonder whether or not phage were present and I decided doing a final assay with a lot more lysate would help me answer the question.

The overarching question this test seeks to address is: Is the presence of phage determined by species of oak tree from which soil was collected?

In other words, are specific oak tree species more likely to have Arthrobacter bacteria phages in the soil surrounding them?

The question specific to my lab table is: Is the difference in the presence of phage between live oaks and red oaks on Baylor’s campus?

As a group, we hope to expand our question to include more species as we gather data so that we can better address our overarching question and we will look at our metadata to examine whether or not there are other factors that may determine phage presence.

Procedures and Protocols:

Materials for an Aseptic zone:

  • CiDecon
  • 70% Ethanol
  • Ethanol Burner

Materials for Plaque Assay:

  • .5 ml Arthrobacter
  • incubator
  • Pipette
  • Test tube stand
  • 50 ml tubes
  • Culture tube
  • LB Broth
  • 2X TA
  • 1M Calcium Chloride
  • Agar plate
  • Serological pipette

In order to complete the procedure, an aseptic zone was created.

  1. CiDecon was applied to the lab table with a squeeze bottle and wiped away with a paper towel
  2. 70% Ethanol was also applied with a squeeze bottle, spread with a paper towel, and allow to evaporate
  3. An ethanol burner was light in order to use the rising heat from the flame to form the aseptic zone

Then a plaque assay on the solution in the tube labeled P1 (refred to as PA1 in previous lab and the rest of this lab) was performed

  1. Four agar plates were labeled. An agar plate was labeled with initials, date, and description for each group member, and one agar plate was labeled with data and “TA control”
  2. The remaining PA1 lysate, stored in a microcentrifuge tube, was gathered (like the tube in the picture below)
  3. 50 µL of the remaining PA1 lysate was aseptically transferred into a culture tube containing .5 ml of Arthrobacter using a Serological pipette
  4. The culture tube was capped and set aside for 15 minutes. This process was repeated twice more using different lysates for each group member).

While the lysate and bacteria are allowed to sit in the culture tube the agar was prepared.

  1. The agar was prepared according to the following recipe (makes four plates):
  2. Under aseptic conditions, 8.0 ml of LB broth was transferred into a 50 ml tube.
  3. Under aseptic conditions, 90 µL of 1 M CaCl2 was transferred into the same 50 ml tube.
  4. Under aseptic conditions,  10.o ml of 2X TA was transferred into the same 50 ml tube
  5. The mixture was pipetted several times to mix it (table set up seen below)
  6. 4.5 ml of the contents in the 50 ml tube was transferred to the plate labeled “TA control”
  7. The plate was swirled and set aside
  8. 4.5 ml of the contents in the 50 ml tube was transferred into the culture tube containing lysate and bacteria
  9. The mixture was pipetted several times to mix it
  10. Then the mixture was poured from the culture tube into the agar plate labeled with initials, date, and description
  11. The plate was swirled and then set aside for 10 minutes to allow agar to solidify. This procedure was repeated twice more, once for each group member.
  12. The agar failed to solidify after 20 minutes so the plates were placed in the incubator, but not inverted.
  13. Plates were left to incubate until nest class
Results:

The results of this lab will be crucial in light of the results of the 9/26 and 10/1 labs. The 9/26 procedure yielded a passage two plaque assay with no plaques and necessitated the 10/1 procedure, which yielded only one possible plaque. While it is impossible to know the results of this procedure immediately, I will assert that if I do not have plaque, I do not have phage. *Note: it is my goal to update this lab before the 5:00 Friday submission deadline, if that does not happen I will update the blog and not the submission on Monday. Becuase I do not have the results on hand right now I will write the next two sections without them and change them if I can.*

Analysis:

The odd results of the 9/26 and 10/1 procedures suggest that there is something potentially odd happening with my plates or that I just don’t have phage (a possibility that I find likely). Of the three possible explanations suggested in the last lab report, all three are all still possible. If it turns out that I do not have phage then it is likely that I have been picking air bubbles or somehow managed to kill my phage. In ether instance, this means I will need to be extremely careful in my next soil enrichment attempt and the following testing. In addition, if my group members don’t have phage, I might try to collect soil from an area that is less sandy with the hopes that the soil is more conducive to phage growth. I will need to change how I am conducting my procedures and what I am testing simply because I cannot do the same thing over and over again and expect different results.

Future:

My next steps will depend on the results of the plaque assay. If I have phage then I will pick the most promising one and passage it (in what will be its second passage) and I will spot test it and three or four other promising plaques just to ensure that they are in fact phage. If I do not have phage I will make an enriched lysate from my soil sample number three and probably collect a forth soil sample.

October 5

10/1/18 Spot Test of Five Lysates and Plaque Picking

10/1/18 Spot Test of Five Lysates and Plaque Picking

Objective:

The goal of this procedure is to use lysates from previous passages and old plates to perform a spot test to test for phage presence. This is necessary as my re-do of passage 2 yielded no plaques. This caused me to wonder whether or not phage were present and I decided a spot test would be my best option.

The overarching question this test seeks to address is: Is the presence of phage determined by species of oak tree from which soil was collected?

In other words, are specific oak tree species more likely to have Arthrobacter bacteria phages in the soil surrounding them?

The question specific to my lab table is: Is the a difference in the presence of phage between live oaks and red oaks on Baylor’s campus?

As a group we hope to expand our question to include more species as we gather data so that we can better address our overarching question and we will look at our metadata to examine weather or not there are other factors that may determine phage presence.

Procedures and Protocols:

Materials for an Aseptic zone:

  • CiDecon
  • 70% Ethanol
  • Ethanol Burner

Materials For Spot test

  • .5 ml Arthrobacter
  • refrigerator
  • Pipette
  • Test tube stand
  • 50 ml tubes
  • LB Broth
  • 2X TA
  • 1M Calcium Chloride
  • Pipette cap
  • Phage Buffer
  • Agar plate
  • Micropipette
  • Syringe Filter

Materials for Phage Picking:

  • Agar plates with plaques of interest
  • Micropipette tip
  • Phage buffer
  • Microcentrifuge tubes (incorrectly referred to as pipette caps in previous entries)

*Note: I had to erase my phone on Tuesday and I lost all photos from this lab before I could upload them, as a result, the images shown below are either taken after the fact or are examples from previous labs*

In order to complete the procedure, an aseptic zone was created.

  1. CiDecon was applied to the lab table with a squeeze bottle and wiped away with a paper towel
  2. 70% Ethanol was also applied with a squeeze bottle, spread with a paper towel, and allow to evaporate
  3. An ethanol burner was light in order to use the rising heat from the flame to form the aseptic zone

Then a phages were picked

  1. 100 µL of phage buffer was transferred into a microcentrifuge tube labeled with initials, date and the description ST1
  2. 100 µL of phage buffer was transferred into a microcentrifuge tube labeled with initials, date and the description ST2
  3. 100 µL of phage buffer was transferred into a microcentrifuge tube labeled with initials, date and the description ST3 *Note: this image was taken before the spot tests were labeled* 

  4. A pipette tip was used to stab the center of the chosen plaques on each plate  *Note: My hands shake and it is possible I contaminated my pipette tip with the surrounding agar when I tried to stab my plaque* 
  5. The (hopefully) phage-infected tip was swirled in the phage buffer and then the solution was vortexed and set aside.
  6. This was repeated for ST2 and ST3

Then the spot test could be performed.

  1. The bottom of an Agar plate was divided into six sections and label PA1 for passage one, PA2 for passage 2, ST1 for spot test one, ST2 for spot test two, ST3 for spot test three, and PB for phage buffer
  2. A separate Agar plate for a top agar (TA) control was created, labeled and set aside
  3. All of the previously created lysates were gathered
  4. Agar was prepared according to the following recipe: 
  5. 4.0 ml of LB broth was added to a 50 ml tube
  6. 45.0 μl 1M CaCl2 was added
  7. 5.0 ml of 2X Top Agar was added and pipetted to mix
  8. 4.5 ml of the mixture was pipetted into the agar plate labeled TA control, swirled, and set aside for 10 minutes
  9. Then the remaining mixture in the 50 ml tube (~4.3 ml) was pipetted into a culture tube and pipetted to mix
  10. The contents of the culture tube were poured into the labeled agar plate, swirled, and set aside for 10 minutes
  11. Once agar had solidified a Micropipette to pipette was used to transfer 10 μl of each lysate onto the section of the plate that corresponded to the correct label
  12. This was repeated with 10 μl of phage buffer
  13. The plates were set aside for 15 minutes before being placed in the incubator until next class
Results:

*Note: When I had to erase my phone I also lost my photos of the results of the 9/26 lab. I will be referencing these results here, but as of right now I do not have photos and the plates weren’t saved because they had negative results. If I am able to recover the photos I will update the labs appropriately.*

The results of this lab will be crucial in light of the results of the 9/26 lab. That procedure yielded a passage two plaque assay with no plaques and necessitated this procedure (possible reasons for no plaques will be discussed in the analysis section). While it is impossible to know the results of this procedure immediately, it is reasonable to assert that if all spots are negative then I do not have phage.

Update:

These results are not the most promising. There is one potential plaque in the section that was created using passage one lysate, and this will be confirmed with further testing (it is hard to see the potential plaque on the image below because of the glare and because it is close to the sharpie line). Based on these results I do not feel comfortable asserting that there is phage present definitively, but I cannot rule out phage presence ether. The results require further testing. I am also not sure if the TA control is contaimnated of if the agar just solidifed in an odd way.

Analysis:

Based on the results of this procedure and the 9/26 procedure, there are several possible explanations. The first possibility that would explain my results is that I have no phage and I’ve been picking air bubbles which looked a lot like plaque; however, this explanation seems unlikely as my other two group members appear to have phage, and we collected soil from the same tree. The second possibility is that my phage have all died somehow, which would explain why I suddenly stopped seeing plaques form when they seemed to form before. The third possibility is that I did pick an actual, phage containing plaque when I prepared they lysate for passage one, and I picked an air bubble instead of a plaque when I was picking for passage two. I will be unable to decide which of these possibilities makes the most sense until I complete further testing on the one potential plaque that appeared on my spot test, but once I do I will be able to figure out what likley happened.

Future:

The next step I have to take is to test my passage one lysate with a spot test. If I find plaque on this spot test I will pick one and passage it with the hopes of puriying it, if I do not then I will preform and enrichment on my third soil sample and start over.