September 28

Plaque Assay Redo 9/26/18

Rationale

Today we will reconduct the plaque assay from 9/26/18 due to possible contamination in the Arthrobacter used by the class.

Procedure

  • Established an aseptic zone.
  • The enriched lysate produced on 9/19/18 had formed a pellet near the bottom of the vial, therefore the lysate was separated into two tubes of equal mass and was spun again for 10 minutes to reproduce a new enriched lysate. The supernatant formed after spinning was syringe filtered through a 22 µm filter.
  • 8.4 mL of LB broth and 90 µL of 1M CaCl2 were added to a tube.
  • 10 µL of the new enriched lysate was added to a vial containing 0.4 mL of Arthrobacter. It sat for 10 minutes.
  • 2X TA was added to the first tube and 4.5 mL of the solution was added to the vial containing the new enriched lysate and 0.4 mL of Arthrobacter. The contents of the mixture were then poured onto a plate that sat for 10 minutes.

Observation

The cause of the pellets formed at the bottom of the enriched isolation from 9/19/18 is unknown. The proper technique was used, however the isolation was still unclear in color on 9/26/18. The TA poured onto the plate did not produce any air bubbles.

Conclusion

The results from the plaque assay will be observed again and a spot test will be conducted after.

September 28

09/26/18 Plaque Assay Redo

Rationale:

The goal for today was to analyze the results of the previously performed plaque assay and either perform a serial dilution if there were plaques present or perform another plaque assay.

Results of 09/24/18

  • Contamination of the group control plate yet again. Plaque assay was also negative.
  • It was also discovered that the lack of plaques and contamination could be due to the apparent contamination of the Arthobacter cultures in the lab. There were no plaques present because there was no Arthrobacter present to infect. This meant that a new plaque assay had to be performed with an older culture of Arthobacter to truly determine if the soil sample is negative.
  • LB Broth was clearly contaminated, contained a precipitant very similar to the past 2 contaminated plaque assays.
  • Contaminated LB Broth

    Uncontaminated LB Broth

    Contamination

    Empty Plaque Assay


Materials:

  • 2.5-mL 2X TA
  • 400-μL Arthobacter (Lab was low on uncontaminated Arthro so we had to lower amount used)
  • 2.1-mL LB Broth
  • 22.5-μL Calcium Chloride
  • Enriched Lysate

Procedure:

  • Established aseptic zone.
  • Aliquoted 2.1-mL LB broth into a conical vial.
  • Added 22.5-μL of calcium chloride to the LB broth.
  • After, added 2.5-mL of 2X TA to control top agar and plated immediately. Left to solidify and set in the incubator.
  • Combined 10-μL of lysate with the 400-μL of Arthobacter and left to infect for 15 minutes.
  • After time had passed, aliquoted 2.5-mL of 2X TA to broth mixture, added infected lysate, and plated immediately.
  • Left plate to solidify and put in the incubator until the next lab.

Results/Data:

  • Previous plaque assay had been negative, however careful measures were taken to ensure the experiment was performed aseptically. Additional burners were added and almost all equipment was wiped with 70% ethanol before use.
  • LB Broth also was examined before use and was completely clear before the experiment. If the broth is contaminated next week, there is contamination elsewhere.
  • Uncontaminated LB Broth


Conclusions:

  • If the plaque assay returns negative with no contamination, we will know that there is no phage present in the soil sample taken. Recently it’s been very difficult to tell due to the influx in contamination across the lab. Still unsure as to what is causing it as extra measures are taken to ensure that the experiment is performed aseptically.
  • Arthrobacter was contaminated, so using this guaranteed culture that was grown at the beginning of the year should yield legitimate results.

Next Steps:

  • Analyze the plaque assay’s results and either perform a serial dilution and pick a plaque, or find a new soil sample.
  • Finally find some phage in the lysate.
September 28

Plaque Assay and Soil Metadata 9/24/18

Rationale

Today we will conduct a plaque assay and collect soil metadata on the new soil collected.

Procedure

  • Established an aseptic zone.
  • 10 µL of enriched lysate was micropipetted into a vial containing 0.5 mL of Arthrobacter. It was set aside for 10 minutes.
  • 8 mL of LB broth was aliquoted into a tube along with 90 µL of CaCl2 and 2X TA. The solution was mixed by pipetting up and down, and 4.5 mL of the solution was pipetted into each tube containing the 10 µL of enriched lysate and 0.5 mL of Arthrobacter.
  • The mixed solution was then poured onto a petri dish and was set aside for 10 minutes.
  • The percent water in the soil was observed by massing the weigh boat, which was used to determine the % water in the soil.
  • The amount of sand/silt/and clay in the soil was observed by seeing the total amount of soil that was present in our falcon tubes , the amount of sand, the amount of silt, and the amount of clay.
  • The area was cleaned.

Observations

Percent water in the soil: ((3.88-3.231)/3.88) x 100= 16.7%

Total amount of soil in the falcon tube: 7 mL

Amount of sand: 5.5 mL

Amount of silt: 1 mL

Amount of clay: 0.5 mL

Percent sand: 78.57%

Percent silt: 14.28%

Percent clay: 7.14%

No air bubbles formed when pouring the top agar into the plate.

Conclusion/Next Steps

We will assess the results of the plaque assay and determine if there is phage presence or not. From there we will conduct a spot test to confirm our results.

September 28

09/24/18 Plaque Assay and Metadata Results

Rationale:

The purpose of today’s lab was to check on the metadata experiments that had been performed the week prior (water percentage and soil composition) and also perform a plaque assay with the newly enriched lysate to test for the presence of phage.

Materials:

  • 2.0-mL LB Broth
  • 2.5-mL 2X TA
  • 22.5-μL Calcium Chloride
  • 0.5-mL Arthrobacter
  • 0.22 micron syringe filter
  • Enriched Lysate

Procedure:

  1. Established an aseptic zone.
  2. Checked soil composition and weighed dry soil to calculate sand, silt, clay makeup of soil and water percentage of soil.
  3. After metadata was completed, aliquoted 2.0-mL Lb broth to conical vial.
  4. Filtered enriched lysate through 0.22 micron filter.
  5. Added 22.5-μL of calcium chloride to LB Broth.
  6. Combined 10-μL of filtered lysate with 0.5-mL of Arthobacter and left to infect for approximately 20 minutes.
  7. After 20 minutes had passed, added 2.5-mL 2X TA to broth, quickly added lysate mixture, and plated immediately.
  8. Let solidify and left to incubate for 48 hours.

Observations/Results/Data:

  • The soil composition did not vary as drastically as last samples. It did contain 4 different layers of the soil, but the fourth dark top layer was just additional organic matter that was not poured out.  It roughly had 1.5-mL of sand, 1.0-mL of silt, and 0.5-mL of clay. Making it 50% sand, 33.33% silt, and 16.67% clay.
  • Soil Composition 09/24/18 Bottom Layer: Sand Dark Middle Layer: Silt Light Layer: Clay

  • LB broth before use was not contaminated, no cloudiness was reported and there was no precipitate in the solution at the time of use.
  • The mass of the dry soil was 6.21 grams after being left out all weekend to encourage water evaporation. Therefore making the mass of water 3.91 grams.

Analysis/Conclusions:

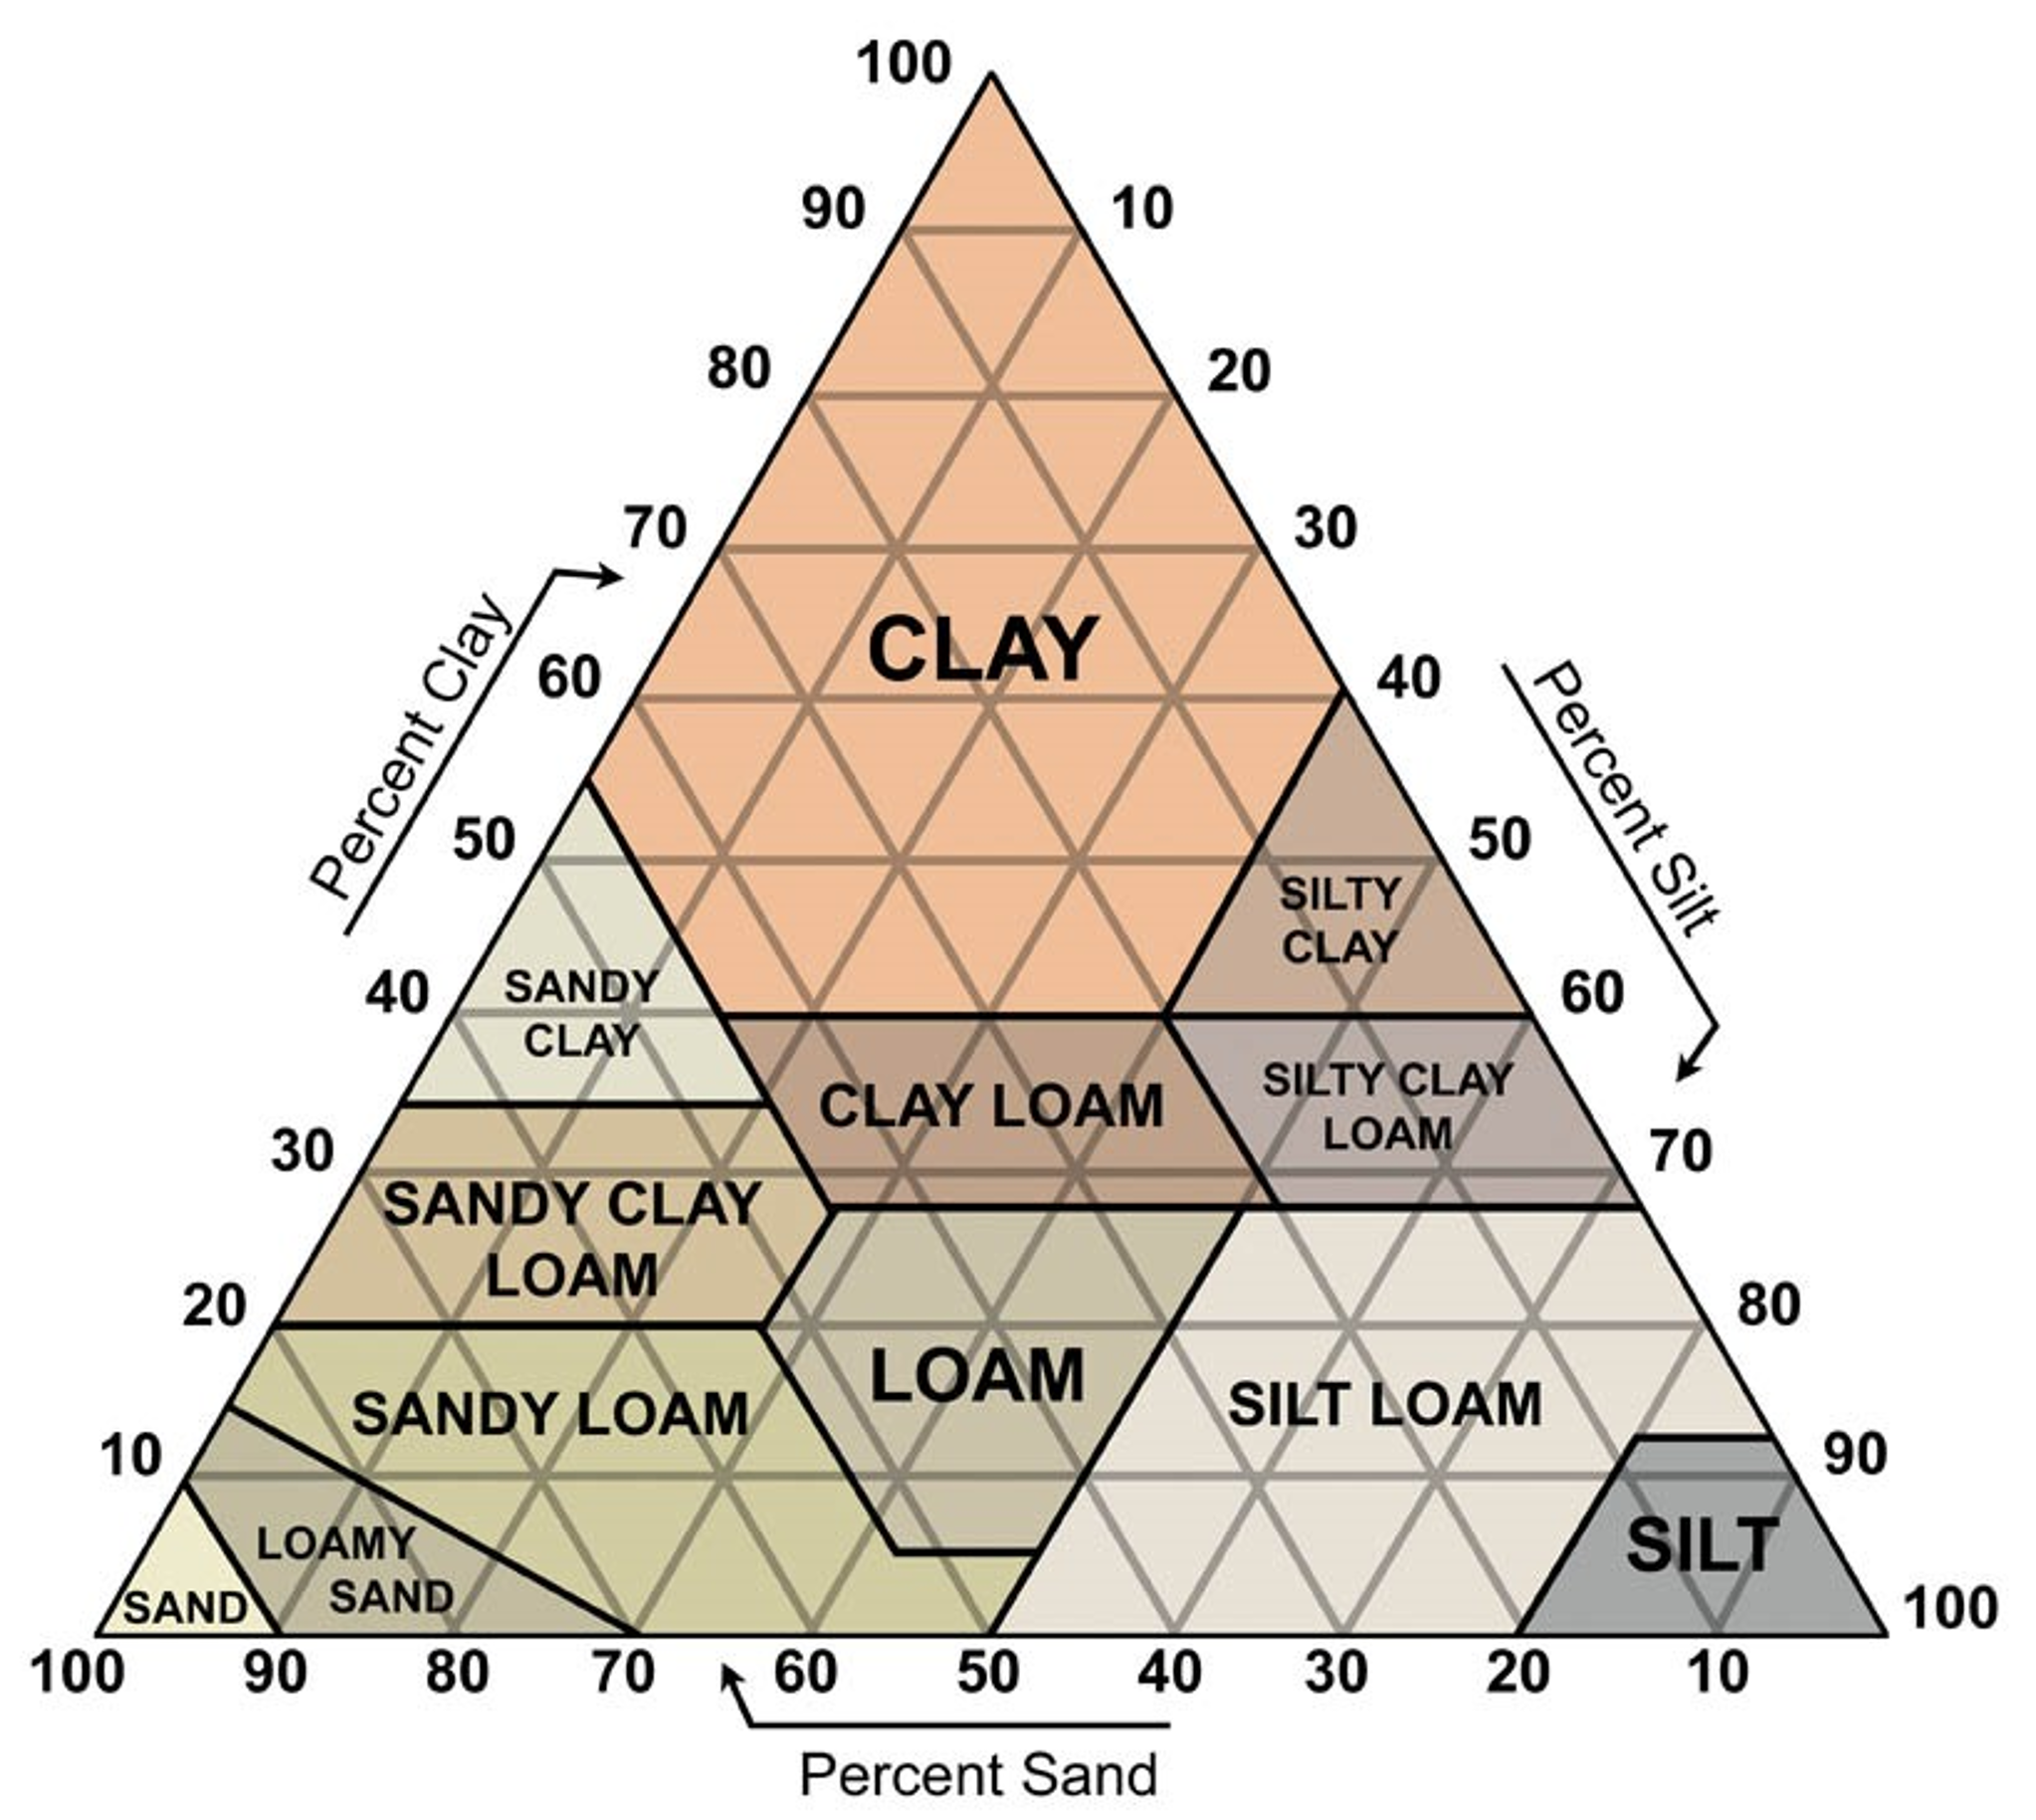
  • Based off graphic below and the percentages of the soil composition obtained from the experiment, the best estimate for the soil type is Loam. Loam is a fertile soil with a roughly 40-20-20 mineral composition of sand-silt-clay, which is very close to the results gathered in the experiment.
  • Image result for sand silt clay
  • By using the water percentage equation, the final calculated percentage of water in the soil was 24.80%. This is only 4% more water than the previous soil sample which was gardeners soil. Possibly this increase in water will be beneficial for the presence of phage.

    Work for calculating water percentage


Next Steps:

  • Analyze the plaque assay results for the presence of phage. If there are plaques present, a serial dilution will be performed to get a high titer of phage. If no plaques are present, a second plaque assay will be performed.
September 27

Results and Redoing of Plaque Assay for Soil C (09/26/18)

Results:

  • The positive control run by the TA’s was contaminated meaning everything run on Monday using Arthrobacter was unreliable.
  • The control plate run on Monday was contaminated. The “KEA 9/24/18 PA” plate looked negative.

Rationale:

The plaque assay will be run again with the enriched lysate from soil C to determine if there are bacteriophages in this soil sample that go after Arthrobacter.

Procedure:

  1. Once an aseptic zone was established, 10 μL of enriched lysate was transferred into a test tube which already had 400 μL of Arthrobacter.
  2. 4 mL of LB Broth, 90 μL of CaCl2, and 10 mL of 2X TA was combined into a conical vial.
  3. 5 mL of the conical vial mixture was added and mixed into the test tube with the enriched lysate and Arthrobacter.
  4. The mixture from the test tube was poured into a plate labeled “KEA 9/26/18 PA.”
  5. The “KEA 9/26/18 PA” plate was placed in incubator at room temperature.

Observations:

  • The positive control plate did not have any plaques on it. Both Anite and Murph are very high titer phages. The plate appeared negative as shown in the picture below.

  • The control plate from the plate assay ran on Monday had strange particles in it and other unusual features as shown in the pictures below.


  • The “KEA 9/24/18 PA” plate appeared negative as shown below.

  • The following calculations were performed to determine enough LB Broth, TA, and CaCl2needed for 4 plates.

5 mL Plate

X4
2.1 mL LB Broth

8.4 mL LB Broth

22.5 μL CaCl2

90 μL CaCl2
2.5 mL 2X TA

10   mL 2X TA


  • When 2X TA was pipetted into the conical vial, it was observed that the 2X TA was contaminated since there were white hair-like strains floating in the mixture. This conical vial was thrown away because the 2X TA added was contaminated. Steps 5-7 were repeated, but a different bottle with 2X TA was used.

Next Steps:

Next time in lab, if the plaque assay is contaminated, another plaque assay will be run. If the plaque assay is negative, new soil will be collected. If the plaque assay is positive, the experiment will move on to do the purification process.

September 27

Complete Metadata and Plaque Assay for Soil C (09/24/18)

Rationale:

Finished collecting soil metadata, such as percent water, soil texture, percent clay, percent silt, and percent sand. This metadata could possibly be used later to find correlations. A plaque assay will be run with the enriched lysate from soil C to determine whether or not there are bacteriophages in the sample that specifically target Arthrobacter.

Procedure:

  1. An aseptic zone was established.
  2. To complete the soil metadata, the “KEA 9/21/18 Soil C” weigh boat’s weight and the “KEA 9/21/18 Soil C” falcon tube different layers were recorded.
  3. The enriched filtered lysate from soil C was filtered with a 0.22 μL tipped syringe into a microcentrifuged tube labeled “KEA 9/24/18 FS enriched.”
  4. 10 mL of LB Broth, 112.5 μL of 1 M CaCl2, and 12.5 mL of 2X TA was combined into a conical vial.
  5. 10 μL of “KEA 9/24/18 FS enriched” was added and mixed into a test tube which already had 0.5 mL of Arthrobacter.
  6. This test tube then was set aside for 10 minutes, and the Top Agar mixture was placed in a hot water bath to keep it from solidifying.
  7. Transfer 4.5 mL of the Top Agar mixture from the conical vial onto a plate labeled “KEA 9/24/18 PA.”
  8. The test tube mixture was poured into the plate.
  9. The “KEA 9/24/18 PA” plate was placed in incubator at room temperature.

Observations:

  • Dry soil appeared lighter than the wet soil. The pictures below show the soil from before and after; however, it is hard to tell color differences from the photos.

  • The following calculations were performed to determine enough LB Broth, TA, and CaCl2needed for 5 plates.

Original Recipe

X5

2 mL LB Broth

10 mL LB Broth

2.5 mL 2X TA

12.5 mL 2X TA

22.5 μL CaCl2

112.5 μL CaCl2


  • When the Top Agar mixture was added, bubbles formed on a few of the plates. The picture shows the bubbles.

  • The falcon tube, as shown in the picture below, had a significant amount of black particles which could possibly be mulch. There is a layer of black particles then a layer of cinnamon-brown clay. The silt layer on top of these two layers appeared a whitish-gray. The remaining layer on top of this was a tannish-brown color.

Metadata:

Percent Water

Data Table

mass of empty weigh boat with lid (mi)

3.40 grams

mass of weigh boat with wet soil sample (mt)

6.39 grams

mass of wet soil sample (mwet soil)

mt – mi= mwet soil

2.99 grams

mass of weigh boat with dry soil sample (mf)

6.08 grams

mass of dry soil sample (mdry soil)

mf – mi= mdry soil

2.68 grams

mass of water in the soil sample (mwater)

mwet soil – mdry soil = mwater

0.31 grams

Equation for Percent Water

Percent Water = 10.34%

Percent Sand, Percent Silt, and Percent Clay

Data and Calculation Table

Texture

Approximate Amount Calculations Percent
Sand 2.5 mL 2.5 mL / 10 mL

25%

Silt

1.0 mL

1.0 mL / 10 mL

10%

Clay

6.5 mL 6.5 mL / 10 mL

65%

Total

10 mL 10 mL / 10 mL 100.00%

Percent Sand = 25%

Percent Silt = 10%

Percent Clay = 65%

Classifying Soil Texture

Based off the percent sand, percent silt, and percent clay, calculations using a soil texture triangle classifies the soil sample’s texture to be clay. The point is plotted on the soil texture triangle below.

This image was retrieved from the Natural Resources Conservation Service website at https://www.nrcs.usda.gov/wps/portal/nrcs/detail/soils/survey/?cid=nrcs142p2_054167.

Next Steps:

On Wednesday, if the plaque assay is contaminated, another plaque assay will be run. If the plaque assay is negative, new soil will be collected. If the plaque assay is positive, the experiment will move on to do the purification process.

September 27

9/26/18 Redo of the third round of purification

Rationale: Perform three plaque assays to pass the third round of purification. The entire lab had to redo their experiments since everyone had a negative control.

Procedure:

Before starting we had to create an aseptic zone to ensure that all bacteria were killed, and the working space would not contaminate our experiments.

  1. Cleaned off the workspace with CiDecon and applied the table with 70% ethanol solution.
  2. Wiped off the table after CiDecon was applied, same with the 70% ethanol solution, only, we let the ethanol solution evaporate.
  3. We then got an ethanol burner, and our aseptic zone was created.
  • Used the 10^0 lysate that was made on Monday 9/24/18 since this passed the second round of purification.
  • Added the 10^0 lysate to the 90 microliter PB into the 10^-1 solution, and pipetted/mixed well through the microcentrifuge. Labeled this solution as the 10^-1 solution on the microcentrifuge.
  • Got one more microcentrifuge caps, labeled one cap 10^-2.
  • Added 90 microliters of PB to the 10^-2 solution.
  • Added 10 microliters of the 10^-1 solution to the 10^-2 solution.
  • All microcentrifuge caps had the lysate solution, then added 10 microliters of Arthrophage to all three microcentrifuge caps (10^0,10^-1, and 10^-2).
  • Once this was done, went to get a 50mL vial to make the solution needed for the plaque assay.
    • The formula below was used to make the solution for 9 plates (three for Michael and Justin, two for Cooper, and one for the control).
      • 2.1mL LB Booth (x9)
      • 22.5 microliters of Calcium Chloride (x9)
      • 2.5mL 2X TA (x9)
      • 400 microliters of Arthro
  • Added the 2XTA last to the 5omL vials, shook the vial, and quickly pipetted the solution onto each vial containing the Arthro/lysate solutions.
  • Sat each plate for about 15mins to the solution solidify.
  • The remaining solution that was left in the 50mL vial was used for our control.
    • Added TA and poured that solution onto the last plate.
      • Side note: the control solidified <15 minutes.

Observations:

All groups had negative controls, which cause every group to redo their experiments from Monday. The experiment was not hard, but the hardest part was probably ensuring everything was done safely with no contaminations.

Group #4 Control 10^0

 10^-1


Conclusions/Next Steps:

Determine if the plaques on the plates are plaques (if plaques are present). Determine if the experiment was a high titter/low titter. If low, do calculations to determine how much lysate will need to completely web the plate. Next step is to make a webbed plate.

September 27

Plaque Assay for Original Plaque (Redo)

Title: Plaque Assay for Original Plaque (Redo)

Date: 26 September 2018

Rationale: Due to an error with the Arthrobacter culture, the previous experiment’s results are rendered invalid. The bacteria used was not Arthrobacter, therefore an Arthrobacterphage couldn’t grow on a bacterial lawn. Therefore the experiment is repeated. The attached pictures show the previous (contaminated/invalid) plaque assays.

Procedure: Aseptic zone created by washing the lab bench with CiDecon and ethanol and a heat lamp was lit.

  • The picked 10^0 lysate from the previous experiment was used for 2 more 10^0 plaque assays.

The following recipe was used to make 8 plaque assays (7 PA + 1 Top Agar Control):

  • 18.9 mL LB Broth
  • 180 microliters CaCl2
  • 20 mL 2x TA

4.6 mL pipetted into a vial containing 0.4 mL new Arthrobacter strain + 10 microliters 10^0 lysate. The mixture was plated, cooled for 10-15 minutes, and incubated. \

Conclusions: Much like the previous experiment, both plaque assays must pass in order to continue passaging. If the test fails, soil will be recollected and the washing/purification process will start over.

September 27

Plaque Assay for Original Plaque

Title: Plaque Assay for Original Plaque

Date: 24 September 2018

Rationale: The previous 10^0 plaque assays failed, so 2 more plaque assays of 10^0 will be done to determine a phage presence that must pas to continue passaging. Otherwise, soil must be collected again.

Procedure: An aseptic zone was created by washing the lab bench with CiDecon, Ethanol, and lighting a lamp.

– The original plaque assay (9/19/18) was picked to create a new 10^0 lysate for plating. This test will determine if the soil is still viable for passaging. After the new 10^0 was picked, the following recipe was used to make 9 plaque assays (8 PA, 1 Top Agar Control):

  • 18 mL LB Broth
  • 22.5 mL 2x TA
  • 202.5 microliters CaCl2

~ 4.5 mL pipetted into vial containing 0.5 mL Arthrobacter + 10 microliters 10^0 lysate. The vial was then plated, cooled for 10-15 min, and incubated. A Top Agar control was also plated and incubated

Conclusions: If the 2 plaque assays do not grow, soil will be collected again to re-passage a collected phage. If the plates pass, the dilution and passaging process will resume for the present phage to eventually isolate.


September 27

09/26/18- Purification run 2 repeated

09/26/18

Objective:

  • Make another plaque assay from the extracted phages from the plate from the first serial dilution

Pre-Lab Observations:

  • After checking the positive control made by the lab instructors, it was discovered that the arthrobacter culture used on 09/24/18 was not actually arthrobacter.
  • So, new plaque assays must be made from the same phage extract used on 09/24/18
  • The control plate from the plaque assays prepared on 09/24/18 was not contaminated.

Procedure:

  1. Cidecon was poured on the desk and wiped till the desk was dry. Then, 70% ethanol was poured and wiped until it was all over the table and then it was allowed to evaporate. After the ethanol had evaporated, an ethanol lamp was lit, setting up the aseptic zone.
  2. 400 μl of arthrobacter was retrieved from the lab instructor
  3. Using the micropipette, 10 microliters of the 10^0 bacteriophage mixture was transferred to the arthrobacter vial.
  4. The vial was then allowed to rest on the test tube rack for 15 minutes
  5. While the vial was resting, one Top Agar mixture was made for the group.
  6. The LB broth was retrieved from its storage bath, along with a 50 ml conical tube and a serological pipette
  7. While in the aseptic zone, 8.4 ml of LB broth was transferred to the 50 ml conical vial.
  8. Then, 1 M CaCl2 stock solution was retrieved from the lab instructor.
  9.  Using the micropipette, 90 microliters of the CaCl2  was transferred to the 50 ml conical tube with the LB broth.
  10. The vial was then set on the rack.
  11. 10 ml of the 2X TA was added to the LB broth and Cacl2 after the sample was allowed to enrich the arthrobacter for 15 minutes.
  12. Using another serological pipette, 4.5 ml of the top agar mixture was transferred to the test tube with the arthrobacter and the phage extract.
  13. The contents of the test tube were then poured onto the agar plate.
  14.  Part of the top agar mixture was poured into the top agar control plate for the group.
  15. To let the top agar solidify, the plates were allowed to rest for 15 minutes.
  16. The plates were placed upside down in the incubator, where they will remain for 48 hours

Analysis and Conclusion:

The procedures were properly performed in the aseptic zone and the chances on contamination were minimized. the control plate from 09/24/18 was not contaminated, which was a surprising outcome due to the repeated contamination of the control plates in previous spot tests and plaque assays. it may have been the plates that were contaminated when contaminated control plates were a result because more caution was used while picking plates for assays on Monday.